You can use your iPhone or iPad to examine your location history if you’ve ever wondered where you went the previous week. Additionally, you may obtain a tonne of specific information about your location if you use Google Maps. The article has the below steps which will show you how to view the summary of your iPhone’s location history. You might be startled to hear that iOS remembers the date, time, and location of places you’ve been, and even locates those places on a map for you. This should not come as a surprise as every major tech company and app has a location-tracking capability of some kind. Everyone does it, including Twitter, Facebook, Apple, and Google. Different approaches are used by each organization to utilize the data. Apple, for instance, says it doesn’t share your data with anyone and only keeps track of the major sites you’ve been to in the past. Google, on the other hand, meticulously records every action you take, particularly if you use Google Maps.
Checking the Location history on iPhone
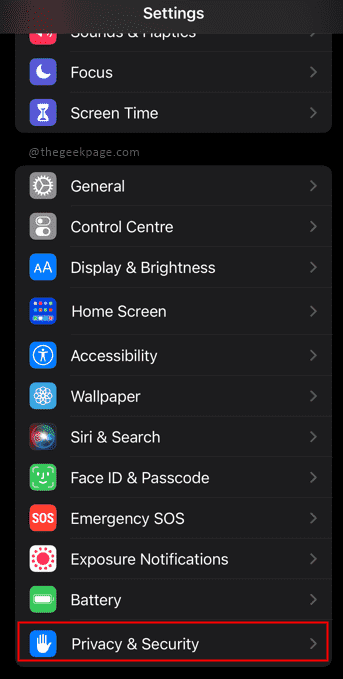
Step 1: Open Settings on your iPhone
Step 2: Go to Privacy & Security from the Settings screen.

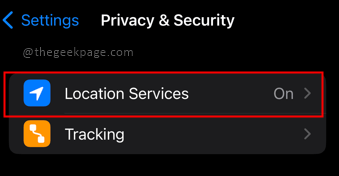
Step 3: Select Location Services from the Privacy menu.

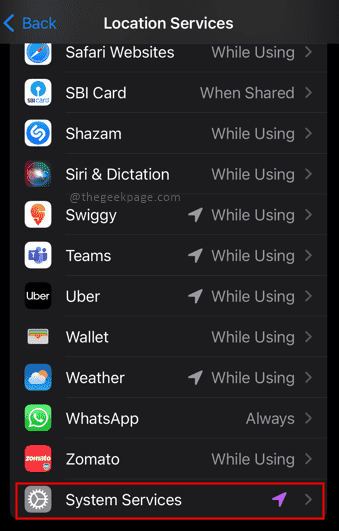
Step 4: Scroll down and open System Services from the Location services screen.

Step 5: Choose the Significant Location from the System services menu.

Step 6: Scroll down to the bottom of the page to check out the Summary section.

Note: In the History section, a map and a list of the individual locations we visited in that region will now be shown to you. In case you have privacy concerns we suggest you Toggle the Significant Locations Switch to OFF. A close-up of the location chosen is now visible to you, along with a list of the times and days you visited it. You can also choose to Clear the location history by selecting Clear History at the bottom. The locations visited by you will be visible in a summary format. To check out all the locations visited you will need an Apple Mac book for the same.
That’s all Folks!! Hope the article is informative and useful. Tell us in the comments section how you use your location tracking feature and whether you change certain features to suit your needs. Thank you for reading!!.