You have recently got a new high-speed internet connection, but you can’t use the network bandwidth to its fullest. Usually, there is a Windows policy that can reserve up to 80% of your network bandwidth for system programs (like Windows Update)! So, if that policy is reducing the overall bandwidth and leaving your system to bits and pieces of the network speed, yes, you can easily reverse this.
Fix 1 – Edit the Group Policy settings
[NOT FOR WINDOWS HOME EDITIONS]
Step 1
This Limit reservable bandwidth policy reduces the reservable bandwidth to 20%. You can fix the limiter to only 10% to
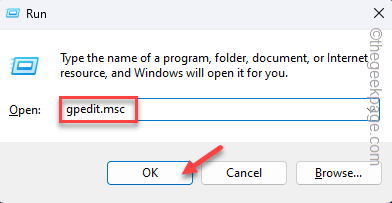
1. At first, press the Windows key and the R keys together.
2. Then, type this command and click “OK” to open the Group Policy Editor.
gpedit.msc
3. Now, straight go to this point –
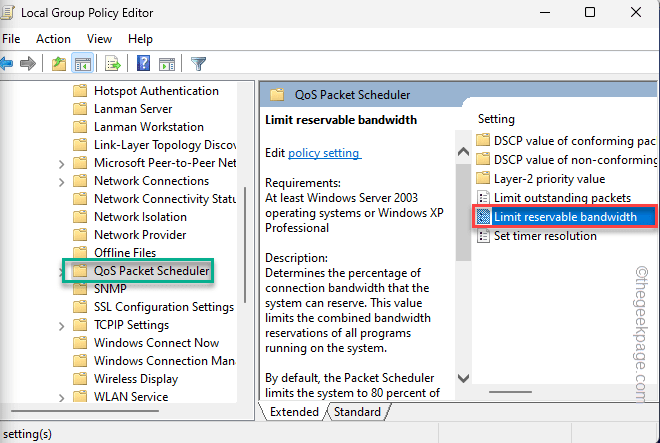
Computer Configuration > Administrative Templates > Network > QoS Packet Scheduler
4. Next, look for the “Limit reservable bandwidth” policy on your screen.
5. Then, double-tap it to open it.
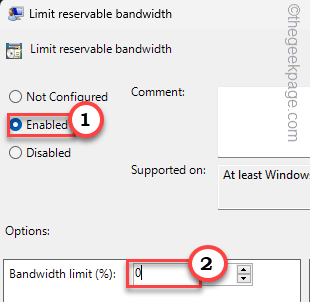
6. Now, you can just set the policy to the “Disabled” setting. This will disable the limiter completely.
7. Otherwise, you can set it to “Enabled” and then, set the ‘Bandwidth limit (%)’ to “0%“.
8. After this, tap “Apply” and “OK” to save the change.
Step 2
1. Search “cmd“.
2. Just right-click “Command Prompt” and click “Run as administrator“.
3. Next, type this code in the CMD terminal and hit Enter.
ipconfig /flushdns
Close the terminal once you have run the code.
You must restart your computer once to let this change take effect. You will notice a significant increase in network bandwidth while you are browsing or streaming videos.
Fix 2 – Edit the Registry
If you are a Windows Home user and don’t have the Group Policy, you can use the Registry Editor to do that same thing.
1. Just type “regedit” in the search bar.
2. Then, click on the “Registry Editor” to open it.
3. When you reach the Registry Editor page, go this way –
Computer\HKEY_LOCAL_MACHINE\SOFTWARE\Policies\Microsoft\Windows
4. On the right-hand pane, right-click on the space and tap “New>” and tap “DWORD (32-bit) Value” to create the value.
5. Then, name this value as “Psched“.
Normally, all the new values are set to the value 0. This depicts that the system will not secure any bandwidth for system tasks like Windows Update.
Just like in the Group Policy Editor, this change won’t take effect unless you restart the system.
Fix 3 – Using the Settings
There are certain limiters that you can use to limit the overall Windows Update bandwidth that may help you utilize the network for yourself.
1. Search “Delivery Optimization” in the box.
2. Then, tap “Delivery Optimization Advanced Settings” to open that.
[Or you can open Settings and go this way –
Windows Update > Advanced options > Delivery Optimization]
3. Now, choose “Percentage of measured bandwidth (measured against the update source)“.
4. Next, set the “Limit how much bandwidth is used for downloading updates in the background” to “5%“.
5. Similarly, slide down the slider to “Limit how much bandwidth is used for downloading updates in the foreground” to “5%“.
6. If you scroll down further, you can take control of the Upload settings.
7. There, check the “Limit how much bandwidth is used for uploading updates to other PCs on the Internet“.
8. Drag the slider to “5%“.
After this, close Settings.
Now, restart your computer.
You will notice an increase in the network speed for sure.


