Browsing is the thing most of the users do on their system either for work or in their free time. Many of the Windows users have reported that they have trouble browsing on their system because of browser’s back button which is not working all of a sudden which also means the back button is greyed out. They are not able to do anything about it.
There might be several reasons behind it to happen and we have analyzed this issue and came up with a few solutions. If you are also encountering the same problem on your system, then this post will definitely going to help you on how to do it.
Fix 1: Clear the Cookies and site Data of your Browser
At times, clearing cookies and site data might help in solving the browser issues to some extent. We have analyzed this fix and came up with a few steps on how to do it on your browser.
For Google Chrome
Step 1: Open your Google Chrome browser on your system by pressing Windows and typing google chrome.
Step 2: Then, Select Google Chrome from the Search results as shown below.

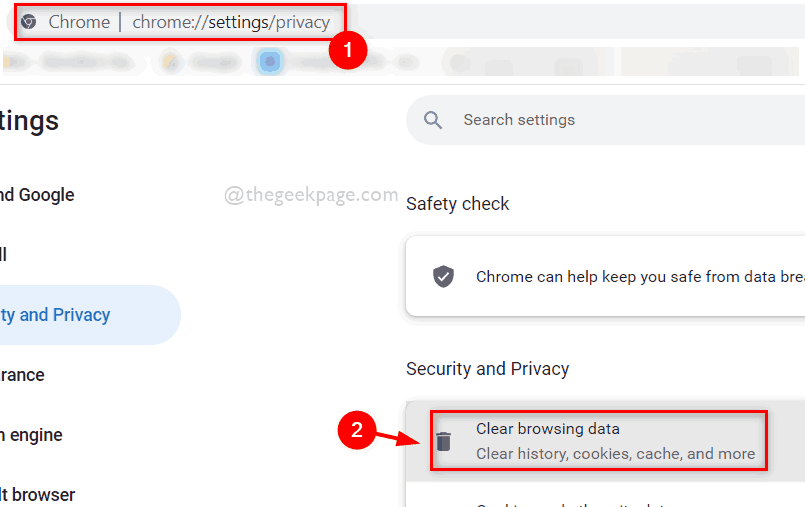
Step 3: In the new tab, copy and paste the given below path and hit the Enter key as shown below.
chrome://settings/privacy
Step 4: Then, Select Clear browsing data option in the Privacy page as shown below.

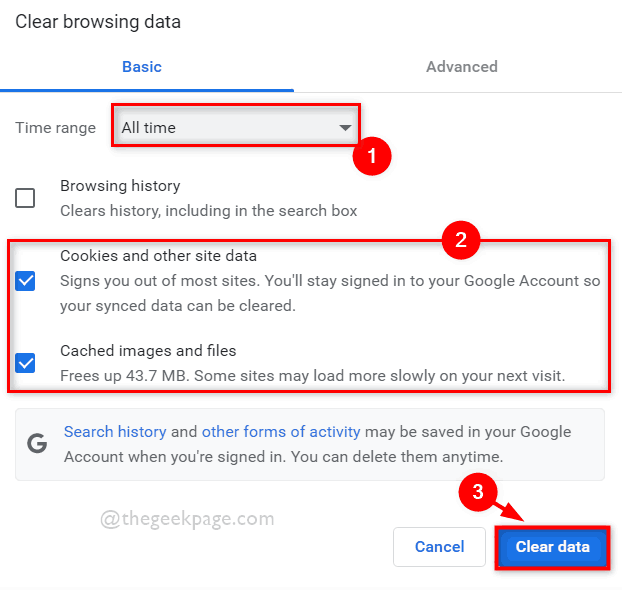
Step 5: Make sure All time is selected from the dropdown list of Time range.
Step 6: Then, Check the Cookies and other site data and also Cached images and files checkboxes as shown below.
Step 7: At last, click Clear data button in the Clear browsing data window as shown.

That’s all.
For Firefox browser
Step 1: Open Mozilla Firefox on your system by pressing Windows and typing firefox.
Step 2: Then, Select Firefox application from the search results as shown below.

Step 3: Enter about:preferences#privacy in the address bar and tap on Enter key to go to its privacy page.
Step 4: Once you are on privacy page, scroll down and click Clear Data button under Cookies and Site Data as shown below.

Step 5: Select the Cookies and Site Data and Cached Web Content checkboxes in the Clear Data window that popped up.
Step 6: Then, Click Clear button to clear the cookies and other site data as shown below.

Done!
Fix 2: Turn Off or Disable the Extensions on your browser
Extensions from the third party source can be quite dangerous if it is not secured for your system. So disabling the extensions can be one of the good practice when there is any serious issue with the browser. Go through few simple steps given below to disable the extensions on your browser.
For Google Chrome
Step 1: Open your Google Chrome browser on your system by pressing Windows and typing google chrome.
Step 2: Then, Select Google Chrome from the Search results as shown below.

Step 3: Open a new tab and enter the below given path in the address bar and hit Enter key to go to Extensions page.
chrome://extensions/
Step 4: Then, Click on toggle button of the extension to turn it Off that you want to disable as shown below.

Step 5: Once you are done with disabling the extensions, you can restart your browser once and start using it.
That’s all.
For Firefox
Step 1: Open Mozilla Firefox on your system by pressing Windows and typing firefox.
Step 2: Then, Select Firefox application from the search results as shown below.

Step 4: Open a new tab in the Firefox and type about:addons in the address bar and hit Enter key as shown below.
Step 5: Then, Click Extensions on the left side panel of the page as shown.

Step 6: In the Manage Your Extensions page, click on toggle buttons of the Extensions to disable it as shown in the below screenshot.

Step 7: Once done, restart your browser and start using it or else you can close it.
That’s it.
Fix 3: Reset the Browser Application
NOTE: Once you reset the browser application, all your browsing data will get erased and you will not get it back. Therefore, if you want, you could backup the browsing data on your Microsoft Account or Google Account, etc.
Sometimes, when we have tried most of the solutions that might solve not-working-browser’s-back-button issue, it it better to reset your browser application on your system which clears the browser settings and browser works even better than before. Please follow some simple steps given below on how to do it.
For Google Chrome
Step 1: Open your Google Chrome browser on your system by pressing Windows and typing google chrome.
Step 2: Then, Select Google Chrome from the Search results as shown below.

Step 3: Click three vertical dots (Show more options icon) at the end of the chrome windows as shown below.
Step 4: Then, Select Settings from the show more options list.

Step 5: On the left side panel of menu in the Settings page, Select Advanced dropdown option as shown in the below screenshot.

Step 6: From the Advanced dropdown list, Click on Reset and clean up option as shown below.

Step 7: In the Reset and clean up page, Select Restore settings to their original defaults option as shown below.

Step 8: In the Reset Settings window that appears, Click on Reset settings button to reset the browser to its default values as shown below.

Step 9: Close the browser.
For Mozilla Firefox
Step 1: Open Mozilla Firefox on your system by pressing Windows and typing firefox.
Step 2: Then, Select Firefox application from the search results as shown below.

Step 3: In the Firefox application new tab, Enter about:support in the address bar and press the Enter key as shown below.

Step 4: At the left side of the Support page, Click Refresh Firefox option as shown below.

Step 5: In the Refresh Firefox window, Click Refresh Firefox button to reset the Firefox to its default values as shown in the below screenshot.

Step 6: Once done, it will restart your firefox application and you can continue using firefox app without any problem.
That’s it.
Hope you liked this post and got your issue solved.
Please let us know which fix worked for you in the comments section below.
Thank you!