Destiny 2, is an online multiplayer FPS developed by Bungie, Inc. The game that recently became free to play, was first introduced in 2017. The game became an instant successor of the previous title Destiny. Some Destiny 2 users are complaining about an issue they are facing trying to access the game from their device. According to these users, they are seeing an error message stating “You must restart the application using Blizzard’s Battle.net app… Error code– buffalo“. Don’t worry. Follow these easy fixes and the problem will be solved in no time at all.
Fix-1 Delete the cvars.xml file
Deleting the cvars.xml file on your computer will solve the problem.
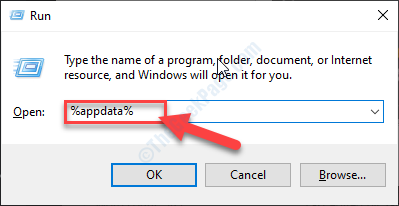
1. Press Windows key+R to open the Run window.
2. In the Run window, type “%appdata%” and then hit Enter.

3. In the Roaming folder, navigate to this location-
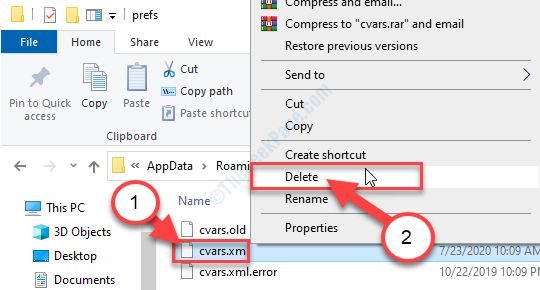
Roaming\Bungie\DestinyPC\prefs

4. In the Prefs folder, right-click on the “cvars.xml” file and then click on “Delete“.

5. Now, close the File Explorer window on your computer.
Launch Destiny 2 again on your device.
Fix-2 Log out and Log in to Steam
[NOTE- Destiny 2 recently switched to the Steam application from the older Battle.NET app. So if you have a Blizzard account for Battle.NET you will need to switch it to the Steam.]
1. Press Windows key+S and then type “Steam“.
2. Now, click on “Steam” on the elevated search result.

3. In the Steam application window, on the top-right corner, click on your account.
4. Now, click on the “Log out of account” option.

5. If there is a warning message, click on the “Logout” option.

The steam application will close and re-launch itself.
The steam Login page will open.
6. In the Steam Login window, enter your account name in ‘Account name‘.
7. Enter the account password and then click on “LOGIN” to sign in to your Steam account.

8. In the Steam window, click on the “View” on the menu-bar.
9. Now, click on “Library“.

10. Now, on the left-hand side, click on “Destiny 2“.
11. Finally, on the right-hand side, click on “Play“.
Check if you are still facing the issue or it has fixed.
Fix-4 Set Lan settings to detect automatically
1. Press Windows key+R to open Run window.
2. In the Run window, type “inetcpl.cpl” and then hit Enter.

The Internet Properties window will open.
3. In the Properties window, click on the “Connections” tab.
4. Now, click on “LAN Settings“.

5. In the Local Area Network (LAN) Settings window, check the option “Automatically detect settings“.
6. Then, click on “OK” to save the settings.

7. Finally, click on “Apply” and then click on “OK” to save the changes.

Now, launch Destiny 2 on your computer.
Check if this works.
Fix-3 Automate Destiny 2 updates
Automate Destiny 2 updates to receive it at the latest when the update is available.
1. Press Windows key+S and then type “Steam“.
2. Now, click on “Steam” on the elevated search result.

3. In the Steam application window, click on the “View” on the menu-bar.
4. Now, click on “Library“.

5. On the left-hand side, right-click on “Destiny 2” and then click on “Properties“.

6. In Destiny-2 Properties window, go to “Updates“.
7. Now, click on the drop-down and then select “High-priority-Always auto-update this game before others“.

8. Now, click on “Close“.

Now, launch Destiny 2 again.
The error won’t bother you again.
Additional Tips-
1. Log out of the other computer–
If you are playing Destiny 2 on multiple devices then that can cause this issue-
a. Log out from all the other devices where you have played Destiny 2.
b. Now, log in to your Destiny 2 account from where you want to play the game.
2. Disable antivirus on your computer and then try to open the game again.
3. Use VPN if there is a huge latency or high traffic from your location.