Is your Windows 11 device is continoulsy blacking out or flickering just after switching the refresh rate? Changing the refresh rate sometimes does that. But, if this phenemenon is repeating itself, you should not neglect this. Refresh rate plays a major role in the competitive gaming, and you don’t want to be losing because your screen flickers continuosly during the match.
Fix 1 – Use the Custom Resolution Utility (CRU)
The Custom Resolution Utility (CRU) tool can help you set a custom resolution on your system.
Step 1 – Download the Custom Resolution Utility(CRU).
Step 2 – Extract the CRU zip file in a location of your preference.
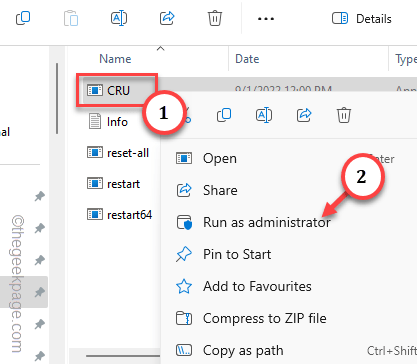
Step 3 – Next, right-click the “CRU” and tap “Run as administrator“.
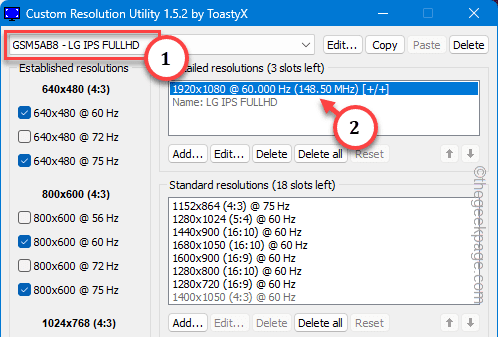
Step 4 – In the Custom Resolution Utitlity page, select the display in which you are having this black out or screen flickering issue. If you are using only one monitor, leave it be.
Step 5 – In the Detailed resolution, double-tap the default resolution to edit that.
Step 6 – Set the ‘Timing:’ to “Automatic PC” from the drop-down.
Step 7 – Now, you have to set the frequency to 5-10% lower than the maximum frequency of the screen.
Example – Like if the maximum frequency of the display is 60Hz, you can set the Refresh rate to 95*60/100= 57Hz.
Step 8 – Input the calculated number in the box and click “OK“.
Step 9 – Going to the next screen, you should be able to view the screen along with the refresh rate.
Step 10 – Finally, click “OK” to save the refresh rate changes.
This change will take place only when when the machine restarts.
Step 11 – When the system boots up, go to the “System” tab in the Settings menu.
Step 12 – Open the first option “Display” there.
Step 13 – Get access to the “Advanced display” settings.
Step 14 – Now, set the “Choose a refresh rate” to the refresh rate that you have set in the CRU (57 Hz in our case).
Your screen may flicker for just a second. But, as the screen settles in, you won’t have the black screen or screen flickering problem anymore.
Fix 2 – Use a lower refresh rate
Using a lower refresh rate can be a better alternative if the screen flickers too much.
Step 1 – Just press the Win+I key combination.
Step 2 – Next, go to the “System” tab.
Step 3 – Choose to open the “Display” section.
Step 4 – If you scroll down, you should be seeing the “Advanced display” settings in the ‘Related settings’. Open that.
Step 5 – Finally, click the list button to view the list of available refresh rates. Choose the least one (60 Hz) in there.
You have to do this for all the screens that you are using. Check if the screen flickering is gone now or not.
Fix 3 – Use low Resolution mode
The low resolution mode in the troubleshooter settings can help you address this screen flickering issue.
Step 1 – These troubleshooting steps are only available in Recovery Mode. So, shut down the system, first.
Step 2 – Once the machine shuts down completely, tap the Power Button to startup the system.
Step 3 – When the machine is just starting up, as the OEM logo shows up, shut down the system using the power button.
Step 4 – Repeat the same process for two times more. This recursive auto shut down method occurs, Windows automatically boots the system into Recovery Mode.
So, let the system boot normally for the third time.
Step 5 – Tap the “Troubleshoot” to explore further options.
Step 6 – After this, go to the “Advanced options” section.
Step 7 – This will show you an array of Startup Repair options on the screen.
Step 8 – Tap the “Startup settings” from there.
Step 9 – Now, tap “Restart” in the following page to restart your computer in special mode.
Step 10 – After the machine restarts, press the F3 button on the keyboard to turn on the “Enable low-resolution video” option.
This will run the computer in low resolution mode. If the system doesn’t flicker anymore, switching to a lower refresh rate (method discussed above) on the system.
Fix 4 – Disable the NVIDIA G-Sync and V-Sync features
If you are using an NVIDIA card in your system, the NVIDIA G-Sync and V-Sync feaure may be the actual reason behind the screen flickering.
Step 1 – Search and open up the “NVIDIA Control Panel“.
Step 2 – Expand the “3D Settings” in the left pane and then choose to open the “Manage 3D settings” tab.
Step 3 – On the right side of the screen, go to the “Global Settings” tab.
Step 4 – Scroll down to locate the “Vertical Sync” option and set it to “Off” mode from the drop-down menu.
Step 5 – Afer this, switch to the “Program Settings” tab.
Step 6 – There should be an option ‘Select a program to customize’. Let it load up the list of programs installed on your system.
Step 7 – Once it is done, open the table of programs and choose the program where you have experienced the screen black issue.
Step 8 – Select that and click “Add“.
Step 9 – Open the “Monitor Technology” setting from there and set that to “Fixed Refresh” mode.
Step 10 – Now, following the same pattern, disable the G-Sync universally on your system.
After doing this, you won’t face any screen flickering or screen black effect.
Fix 5 – Update the display drivers (GPU)
If none of the methods discussed above has helped you fix this problem, you should update the Graphics driver.
Step 1 – You can find the display driver on the Device Manager.
Step 2 – So, right-tap the Windows button and tap “Device Manager”.
Step 3 – Expand the “Display adapters” tab.
Step 4 – After this, right-tap the graphics driver and use the “Update driver“.
Step 5 – On the following page, open up the “Search automatically for drivers” option.
If this doesn’t help or returns a standard message –
The best drivers for your device are already installed
You can look into the Windows Update for more driver updates.
Otherwise, if your system has a dedicated GPU, you should use the proper GPU application to update the driver.
Intel Graphics Control Panel
Using the latest GPU driver, you won’t face the screen flicerking or a complete black out.
Fix 6 – Uninstall the Monitor Callibration tool
(For ASUS users only)
If you are using an ASUS PC/laptop or an ROG display, there is a possibility Monitor Callibration tool has caused this problem.
Step 1 – Pressing the Win+R keys, you can open the Run box.
Step 2 – Paste this and click “OK“.
appwiz.cpl
Step 3 – Find and right-tap the Monitor Callibration tool and tap “Uninstall” to uninstall that package from your system.
Uninstalling the Monitor Callibration tool in the ASUS should fix the problem on your system.


