You might have a device driver installed in your Windows and suddenly one day, it might go out of support. In that case, if you lose your driver, it becomes very difficult to install it again as Windows will not download it automatically. In such cases, it is extremely important that you backup your drivers and keep them safe somewhere for your future use. This article explains how you can backup your Windows 10 or Windows 11 device drivers and how you can safely restore or install them later.
How to Backup Windows 11 Drivers
Method 1: Backup Windows 11 Device Drivers Via Command Prompt
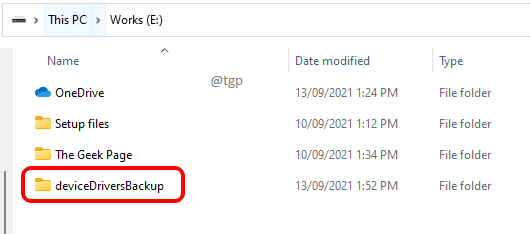
Step 1: Create a backup folder anywhere you want. This will be the folder where your device drivers will be backed up at. You can give it any name you want.
Step 2: On the taskbar, click on the Search icon.
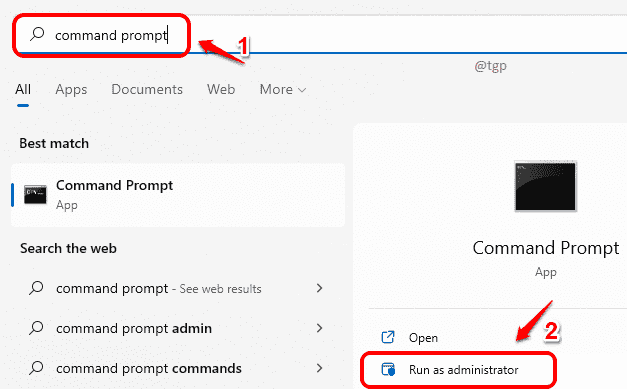
Step 3: In the search bar, type in command prompt. Now in the right pane, you should be able to see the option Run as administrator option. Click on it.
Step 4: Once command prompt launches in admin mode, copy paste the following command and hit Enter key. Do not forget to replace the destination folder placeholder with the backup folder name, with path, you created in Step 1.
dism /online /export-driver /destination:"<destination_folder>"
Example: dism /online /export-driver /destination:”E:\deviceDriversBackup”
Step 5: Once the operation in Step 4 finishes, go to the backup folder you created in Step 1 and check if your drivers got backed up.
Method 2: Backup Windows 11 Device Drivers Via PowerShell
Step 1: Just like in the previous method, create a backup folder where your drivers will be backed up at.
Step 2: To launch PowerShell, click on Search icon first.
Step 3: Type in PowerShell and click on Run as administrator option as shown in the below screenshot.
Step 4: Now in the elevated PowerShell window, type in the following command and hit Enter key.
Replace <destination_folder> with the folder name that you created earlier.
dism /online /export-driver /destination:"<destination_folder>"
Example: dism /online /export-driver /destination:”E:\deviceDriversBackup”
Step 5: Once the operation finishes up, check whether the drivers got backed up correctly in the folder that you created in Step 1.
How to Restore Windows 11 Drivers
Method 1: Restore Windows 11 Device Drivers Via Device Manager
Step 1: Click on Search icon in the taskbar.
Step 2: Type in device manager in the search bar and click on Device Manager from the search results or click on the Open button as shown in the snap below.
Step 3: When the Device Manager window opens up,
locate the driver and click on the down arrow associated with it.
As next, right click on the driver entry
and then click on the Update driver option from the right click context menu.
Step 4: Now click on the link that says Browse my computer for drivers.
Step 5: As next, check the checkbox that says Include subfolders. Then click on Browse button.
Step 6: Now browse and select the folder where you have backed up your drivers at.
Step 7: As next, click on the Next button.
Step 8: Wait while the driver is being installed. Click on Close button once done.
Method 2: Restore Windows 11 Device Drivers Via inf File Installation
Step 1: Go to the folder where your backed up driver files are present. Find the sub folder of the driver that you want to install.
If you have doubts on which folder corresponds to the driver you require, you can Google up the information by using the sub folder name. In the following example, I took the first part of the sub folder name and put it in Google and Google told me it’s the Bluetooth driver that I’m looking up.
Step 2: Now double click on the driver folder to enter inside. From the Type of the file column, find the file with the file type Setup Information.
Step 3: Right click on the file and then click on Show more options.
Step 4: Finally, click on the Install option from the right click context menu.
Hope you found the article useful.


