Some Windows users have complained about an error while connecting to the torrent client from their computers. The error message appears to be “Connection error: An address incompatible with the request protocol was used. (10047)” on the error report. There are some potential reasons that you may blame, like irregular network connectivity, app blockage by Windows Firewall, or antivirus (including Windows Security) blocking the app. Without paying attention to the reasons, here are some quick resolutions for the issue.
Workarounds –
1. Check the overall network connectivity. Test whether you are correctly connected. You should run a bandwidth test on your network to check this.
2. If you are facing trouble trying to transfer files over Bluetooth, try unpairing it and then repairing it.
Fix 1 – Reset the Windows sockets
Bad TCP or IP data can be blamed for this mishap. So, you should run some commands to reset the Windows sockets.
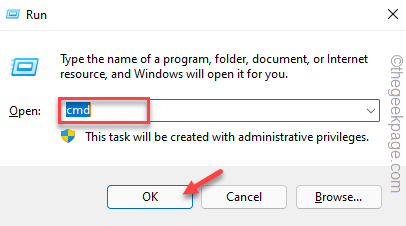
1. Press the Windows Logo Key and the R which will open the “Run“.
2. Next, write “cmd” and press the Shift+Ctrl+Enter keys at once to open the command prompt with administrative privileges.
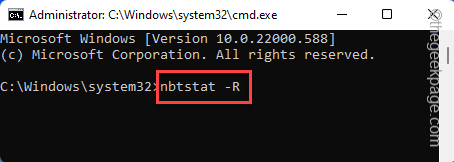
3. When the Command Prompt window appears on your screen, paste these codes one by one and hit Enter to execute these.
This runs the NETBIOS over TCP diagnostic tool on your computer.
nbtstat -R
nbtstat -RR
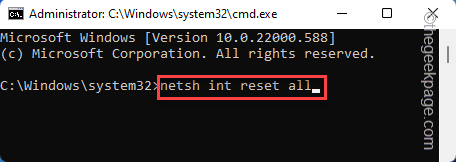
4. Now, you can reset the Windows sockets. Paste these commands into the terminal and press Enter to run all the commands.
netsh int reset all
netsh int ip reset
netsh winsock reset
Once Windows completes resetting the sockets, you can see the “Restart the computer to complete this action.” message has appeared on the terminal.
Close the Command Prompt terminal. Then, restart your computer.
Fix 2 – Avoid using the IPV6 network
The IPV4 network address and IPV6 socket mismatch can cause this network issue.
1. At first, press the Win key+R keys at once.
2. Then, type this word and hit Enter.
ncpa.cpl
3. The Network Connections page contains all the network adapters.
4. Now, right-tap the network adapter and tap “Properties“.
5. Now, uncheck the “Internet Protocol Version 6(TCP/IPv6)“.
6. Then, click “OK“.
This will reset the network adapter settings. Once that is done, launch the torrent and test.
Fix 3 – Flush the DNS configuration
You can flush the DNS configuration of the network and test.
1. You have to open the CMD terminal with administrative rights.
2. Then, right-tap the “Command Prompt” in the search results and click “Run as administrator“.
3. Now, copy-paste these codes one-by-one in the terminal and hit Enter to execute these codes one at a time.
ipconfig /flushdns
ipconfig /registerdns
ipconfig /release
ipconfig /renew
Fix 4 – Unblock the firewall port
If the firewall is blocking the port and the app, you can manually whitelist the port you are using.
Step 1 Whitelisting the port in the firewall
The port the torrent client is using can be blocked by the firewall. You can white-list the port in the firewall settings.
At first, you have to know which port the app is using. Usually, you can find the particular port in the torrent settings.
A. UNBLOCK THE PORT
1. Launch the torrent client.
2. When that opens up, go to the “Tools” in the menu bar and click “Options“.
3. On the Options page, on the “Connections” page, you can find the port you are using.
Now, once you have noted the particular port, close the torrent settings.
4. Once you have noted the port number, press the Win key+R keys together.
5. Then, write and click “OK“.
firewall.cpl
6. Going to the Firewall settings, click on “Advanced settings“.
7. Now, on the left-hand pane, click on “Inbound Rule“.
8. Next, click on “New Rule…” to create a new rule.
9. On the New Inbound Rule Wizard page, from the “Rule Type” page to “Port“.
10. Then, tap “Next” to go forward.
11. Coming on to the next step, the ‘Protocol and Ports’ tab, select the “TCP“.
12. Then, select the “Specific local ports:” and set it to the port that you have noted before. Click on “Next“.
[In our case, it is “30973”. ]
13. Once you are in the ‘Action’ tab, choose the “Allow the connection” setting.
14. Then, click on “Next” to proceed.
15. On the Profile page, you can check all three network types “Domain“, “Private” and “Public“.
16. Then, click “Next” to go to the final step.
17. When you are in the final step, give the rule any name you want.
18. Finally, click “Finish” to complete the process.
This way, you have successfully created a rule for the port to allow the connection.
Now, close all the windows that you have opened. Then, restart your computer. Once the computer is restarted, you can run a network connection test to check it out.
B. ALLOW THE APP
Now, you have to make sure the app is allowed in your network.
1. Just press the Win key+R keys together.
2. Then, write and click “OK“.
firewall.cpl
3. Wati for the Firewall settings to open up. When that does, click on the “Allow an app or feature through Windows Defender Firewall” to access it.
4. You have to tap “Change settings” so that you can make a change in the firewall rule list.
5. Next, scroll down through the apps and look for the torrent client.
6. Then, check the “Public” and “Private” boxes beside the app.
[Thoug it is not recommended that you use torrent clients in a Public network type. So, you can uncheck the Public box.]
7. Then, tap “OK” to save this.
8. But what if you can’t see the torrent client there? In that case, click on “Allow another app…”
9. Now, click on “Browse“.
10. After that, navigate to the location where you have installed the torrent client.
[
The default location of the installation is –
C:\Users\%username%\AppData\Roaming\uTorrent
]
11. Now, select the main executable file there and click “Open“.
Now, you can allow the executable file through private and public networks (Step-5 to Step-7).
Step 2 Exclude the app in SEcURITY
Windows Security can detect some components of the torrent application hostile and block them.
1. Press the Win key and type “security“.
2. Then, click on “Windows Security“.
3. When the Windows Security page opens up, click on “Virus & threat protection“.
4. Next, go to the ‘Virus & threat protection settings’ tab, and click “Manage settings“.
5. Now, on the right-hand side, scroll down to the ‘Exclusions’ list, and click on “Add or remove exclusions“.
6. Next, click the “Add and exclusion” option.
7. In the drop-down list, choose “File“.
8. Now, navigate to the location of the antivirus program and click “Open“.
Usually, the standard location of torrent is –
C:\Users\%usersname%\AppData\Roaming\uTorrent
This way, you have excluded the application from the Windows Security list.
Once you have included it in the list, close the Widows Security page. Now, try to launch the torrent and test.
Fix 5 – Disable/Uninstall the antivirus
The antivirus program can prohibit the program from connecting to the network properly.
1. At first, exit the torrent client or the app in which you are facing this issue.
2. Just click on the arrow icon on the bottom-right corner of the taskbar.
3. You can see the antivirus icon there.
4. Just right-tap the antivirus software and tap “Pause protection” to pause the antivirus temporarily.
Now, launch the torrent application and try to download something.
Test whether the network is working properly.
But, if the antivirus still continues to block network access, you can uninstall the antivirus from your computer.
1. First of all, press the Win key+R keys together.
2. Then, write “appwiz.cpl” and click “OK“.
3. Look for the antivirus app in the list of installed apps.
4. Then, right-click the antivirus and tap “Uninstall“.
Just follow the steps on the screen to completely uninstall the antivirus from your computer.
But, even if you have uninstalled the antivirus, some parts remain there until you restart the system. So, restart the system.


