You can directly right-tap anywhere on the taskbar and open the Task Manager on Windows 10. But, this convenient feature is gone from Windows 11, thanks to the new aesthetic and minimalist approach of Win 11. You cannot directly enable this like the other features in Taskbar settings. There aren’t any shortcuts available, yet. But, there is a way, you can easily recall this function in Windows 11. So, without wasting any more time, follow these steps.
How to add Task Manager to the Taskbar Context menu
You can add the Task Manager to the Taskbar context menu in two ways. Depending upon your need, follow anyone of them.
Way 1 – Using the Registry Editor
Way 2 – Using the ViveTool
Way 1 – Using the Registry Editor
If you don’t want to use any third-party tool, you can just tweak the Registry to activate the Task Manager in the context menu of the Taskbar.
Note – Always create a registry backup for your system before touching any registry values. You can follow the steps from here.
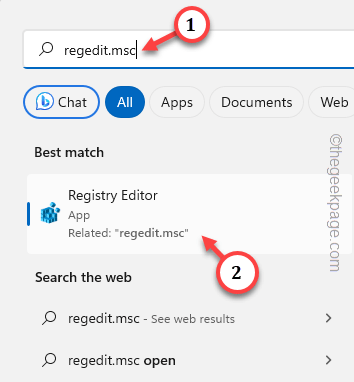
Step 1 – Simply enter “regedit.msc” into the search box.
Step 2 – Then, click “Registry Editor” as you see that in the search results.
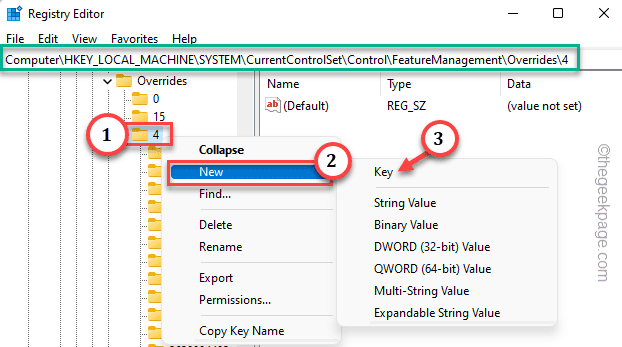
Step 3 – Once you have launched the Registry Editor, navigate to this specific location –
HKEY_LOCAL_MACHINE\SYSTEM\CurrentControlSet\Control\FeatureManagement\Overrides
Step 4 – There, right-click the “4” key and tap “New“. Then, choose “Key” from the same context menu to create a new key.
Step 5 – You have to name this key “1887869580“.
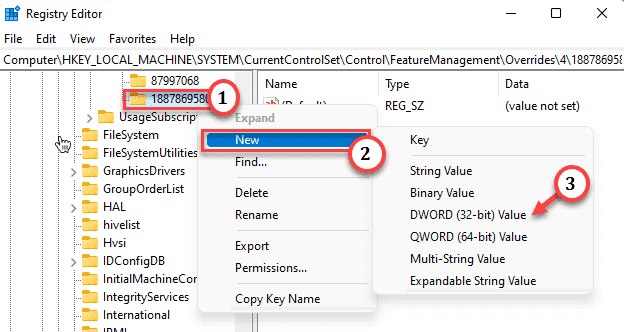
Step 6 – Next, right-tap the “1887869580” key and sequentially tap “New>” and then, click “DWORD (32-bit) Value“.
Step 7 – This is very important. Rename the new value as “EnableState“.
Step 8 – Then, double-tap that value to edit it.
Step 9 – Set this Value Data to “2“.
Step 10 – Then, tap “OK“.
Step 11 – After this, again right-click the “1887869580” and tap “New >“. Choose “DWORD (32-bit) Value” in the context menu.
Step 12 – Just name this value as “EnabledStateOptions“.
Step 13 – Then, double-tap it so that you can change the value.
Step 14 – Toggle the value to “0“.
Step 15 – Then, hit Enter to save the change.
Exit the Registry Editor once you have altered the value.
Any registry edits won’t take effect until you reboot the system. So, after restarting it, check if this solves the issue.
After you have logged into the machine, just right-click the Taskbar and you will notice the “Task Manager” right over the Taskbar settings.
Check if this works.
Way 2 – Using the Vivetool
If you don’t want to get into the messy registry edits, there is an easier way you can have the Task Manager in the Taskbar context menu. Just follow the steps to download Vivetool and use it to do that.
Step 1 – Open your preferred browser and get to the Vivetool download page.
Step 2 – Scroll down to the Assests section. Then, tap the ViveTool-v0.3.3.zip. (This number beside the ViveTool may change according to the version at that specific time.
Step 3 – Just unzip the downloaded Vivetool folder.
Step 4 – Extract the Vivetool zip file into a folder of your choice.
Step 5 – After extracting the file, head on to the extraction zone. There, find and right-tap the “Vivetool” and tap “Copy as path” to copy the executable path to the system clipboard.
Minimize the File Explorer.
Step 6 – Then, tap the Start button on the Taskbar and write “command“.
Step 7 – Next, right-click “Command Prompt” in the search list. Then, tap “Run as administrator” from the context menu.
Step 8 – After reaching the CMD terminal page, paste the copied Vivetool path. Then, paste the “/enable /id: 36860984” just next to the code and hit Enter.
[Example – Suppose the copied path is – “C:\Users\sambi\Documents\ViVeTool.exe“. Then, you have to write /enable /id: 36860984. So, the command will look like this –
"C:\Users\sambi\Documents\ViVeTool.exe" /enable /id: 36860984
]
ViveTool will activate the Task Manager shortcut in the Taskbar. But, you need to reboot your system to activate this.
Do check after a system restart. Test if this works.
How to remove the Task Manager shortcut from the Taskbar in Windows
If you ever want to remove the Task Manager shorcut from the Taskbar, you can easily do it by reverting the same way you have done it.
Way 1 – Users who have used the Registry Editor
Step 1 – Open Registry Editor.
Step 2 – Go straight to this point –
HKEY_LOCAL_MACHINE\SYSTEM\CurrentControlSet\Control\FeatureManagement\Overrides
Step 3 – Just detect the “1887869580” sub-key and tap “Delete” to remove the entire sub-key.
Step 4 – Tap “Yes” in the warning message to remove that key.
Way 2 – Users who have used the Vivetool
Step 1 – Open the CMD with administrative rights.
Step 2 – Then, paste the path of the Vivetool, followed by the “/disable /id: 36860984“, and hit Enter to disable the feature.
Exit the terminal and restart.
This way you can remove the Task Manager from Taskbar.


