If a user accesses the network resources often then he might need to map the network drives. If the network drive is mapped to a network location then it can be accessed from the windows file explorer just like a local drive. It can also be removed from the windows. This can be done by changing a few settings in the group policy editor or registry editor. In this article, let us see how to remove the map network drive from the context menu in windows.
Method 1: Remove The Map Network Drive Context Menu Using Group Policy
Step 1: Open the run prompt using Windows + R keys together
Step 2: Type gpedit.msc in the run prompt and hit enter. This will open the local group policy editor
Step 3: On the left side, expand User configuration by clicking on the arrow beside it
Step 4: Then click on the arrow beside Administrative Templates to expand it
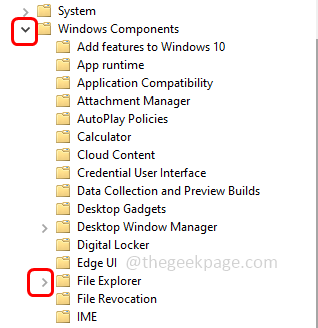
Step 5: Go to Windows components then expand File Explorer
Step 6: On the right side, double-click on the policy called Remove Map Network Drive and Disconnect Network Drive
Step 7: From the opened window, click on the radio button beside enabled
Step 8: To save the changes click on Apply and ok. This will remove map network drive and disconnect network drive
Method 2: Remove The Map Network Drive Context Menu Using Registry Editor
Step 1: Open the run prompt using Windows + R keys together
Step 2: Type regedit.exe in the run prompt and hit enter
Step 3: A user account control window will open click on yes. This will open the windows registry editor
Step 4: Navigate to the following path in the registry editor
HKEY_CURRENT_USER\Software\Microsoft\Windows\CurrentVersion\Policies\Explorer
Step 5: On the right side, right click on the blank area and click on New
Step 6: From the list click on DWORD (32-bit) Value
Step 7: Give it a name NoNetConnectDisconnect
Step 8: Double click on NoNetConnectDisconnect
Step 9: And change its value to 1 in the value data field
Step 10: To save the changes click on ok
That’s it! I hope this article is helpful. Thank you!!


