Autocorrect is a very good feature that windows offer to its users. If we misspell a particular word or make grammar mistakes or punctuation mistakes, the autocorrect shows the word with a red or green underline, when we right-click on the word, a list of suggestions is shown to correct them. We can just choose the one that we want. However, it can get annoying when you are writing a command or syntax. At times you might want to spell a word in a particular way for a reason. Let’s say you are going to use this word again and again in your document, instead of choosing to ignore it from the context menu, you can add that word to the dictionary.
In this article, let us see different ways of adding or removing a word from the dictionary.
Method 1: Add words to the dictionary from the Context Menu
Step 1: Open any MS Word application. For demonstrating, we will be using Microsoft Word. Making changes in any other application should be similar.
Step 2: In the text editor section,
- Type the word that you want to add to the dictionary.
- Right-click on that word
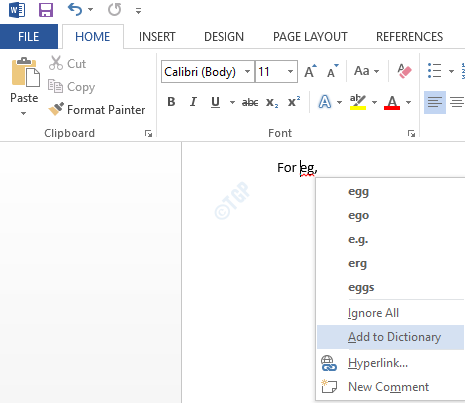
- From the context menu, choose the option Add to Dictionary
For instance, let us say we want to use the short form of the word example i.e eg in the document, and want to add this word to the dictionary. You might notice a red underline below this word. When you right-click on it, a context menu shows up with word suggestions. Choose Add to Dictionary option and the word “eg” would be added to the dictionary

NOTE: Sometimes the Add to Dictionary option is greyed out in the system. To make this option available, do the following:
1. Click on the File menu option from the top menu.

2. In the window that opens choose Options from the left-hand side menu.

3. In the Word Options window that opens,
- Select Proofing from the left-hand side menu
- Click on Custom Dictionaries

4. The Custom Dictionaries window, shows up.
- Under Dictionary list, Choose CUSTOM.DIC
- Click on Change Default
- In the Dictionary language drop-down, select All Languages
- Click on OK

5. Finally, Click OK on the Word Options window
With these changes, the Add to dictionary option will be enabled in the context menu.
Method 2: Add or remove words from the DEFAULT.dic dictionary file
Step 1: Open the run window holding Windows+r keys at the same time.
Step 2: Enter the command, explorer, and hit Enter

Step 3: In the explorer window, Copy-paste the following address in the address bar and hit enter
%AppData%\Microsoft\Spelling\en-US

Step 4: Open the default.dic file.
1. Right-click on default.dic file
2. Choose Open With from the context menu

3. In the How do you want to open this file window that appears, click on More apps

4. From the window, locate the Notepad and click on it.

Step 5: To add a word to the dictionary,
- Type the words you want to add. Only one word should be present in one line.
- Hold Ctrl+s keys together to save the file
- Close the file.
The default.dic file should look something like this,

Step 5: To remove a word from the dictionary, just delete the word from the file.
In case you want to delete all the words from the dictionary, you can simply delete this file.
Method 3: Add or remove a word from the Custom Dictionaries dialog box
Step 1: Open any MS Word application. For demonstrating, we will be using Microsoft Word. Making changes in any other application should be similar.
Step 2: Click on the File menu option from the top menu.

Step 3: In the window that opens choose Options from the left-hand side menu.

Step 4: In the Word Options window that opens,
- Select Proofing from the left-hand side menu
- Click on Custom Dictionaries

Step 5: In the Custom Dictionaries window,
- Click on CUSTOM.DIC or the dictionary of your choice
- Click on Edit Word List

Step 6: In the Edit Word List window,
- Under the Word(s) section, type the word that you want to be added to the dictionary
- Click on the Add button. If you want to add more words, just repeat 1 and 2.
- Once all the words are added, click on the OK button

Step 7: Once the word is added to the dictionary, you can see it under the Dictionary section.

Step 8: If you want to remove a word from the dictionary,
- Under the Dictionary section, click on the word you want to delete
- Press the Delete button. If you want to remove more words, just repeat 1 and 2.
- Once all the words are removed, click on the OK button

Step 9: Finally click on OK in the Custom Dictionaries window and the Word Options Window.
The changes will now be reflected.
That’s All. We hope this article has been informative. Thank you for Reading. Kindly comment and let us know which of the above methods helped.