Microsoft Teams was introduced in 2017, however, it gained more popularity post the Covod-19 pandemic in 2020 when work from home was on rise due to the lockdown. The Teams app is a perfect way to collaborate with teams and arrange meetings online through a video conference. The app is popular for its video conferencing capabilities and offers some other useful features that makes your entire meeting session smooth and productive.
However, just like any other app, the Teams app is also prone to some issues, like the video may lag or slow down while you are in the midst of a video call with your team. While a slow internet connection may be a possible reason behind the Microsoft Teams video lag issue sometimes, there could be other reasons also, for instance, limited system resources, a glitch with the app, a pending update and so on.
In this post, we have listed some possible solutions that may help you fix the video lag issue in Microsoft Teams on your Windows 11 PC. Let’s see how:
Method 1: Check your Internet Connection
Before you proceed make sure that your internet connection is up and running, because that’s one of the reasons why you may face issues with the Teams video performance. While you can run a speed test to check if it’s running at a good speed, you can also check if the Microsoft Team app works on others devices like on a smartphone or a tablet with the same internet connection. If it’s working, then there’s an issue with the Teams desktop app and hence, it should be fixed accordingly, however, if the issue persists, then there’s a problem with your internet connectivity.
You may also pause or stop any video streaming or avoid downloading tasks during the meet to check if it helps fix the issue. Moreover, make sure that your system meets the minimum requirements run Microsoft Team. If these do not help, you can proceed with the below methods.
Method 2: Monitor Call and Meeting Using Call Health
The Microsoft Teams app comes with a built-in tool – Call Health View that helps monitors the health of your calls and meetings. This helps you to detect any video lag issues in real-time by allowing you to keep a check on the data, sound, and screen sharing activities. Here’s how to access the Call health tool from the Teams app:
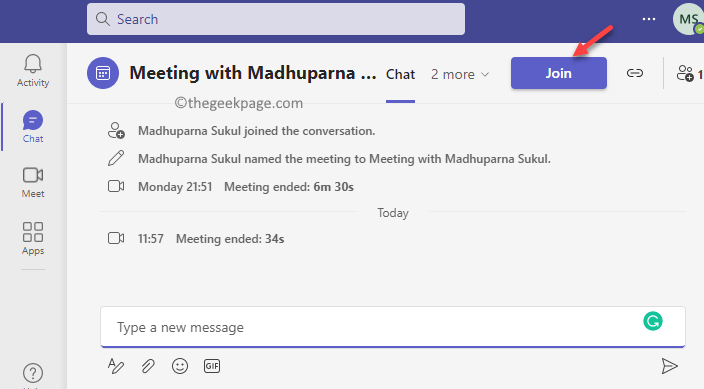
Step 1: Launch the Teams app, click on the meeting invitation in the dashboard and click on Join on the right side.
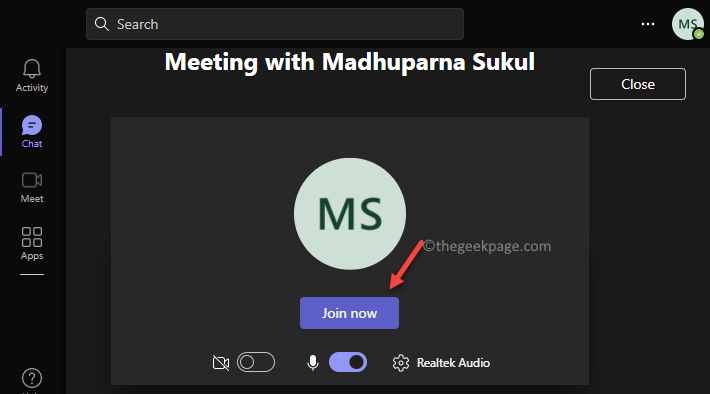
Step 2: It will take you to the video call screen.
In the middle of the screen, click on Join now.
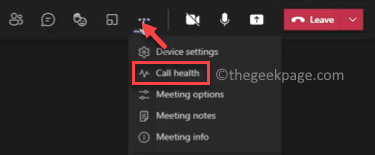
Step 3: Now, that you have joined the video call, click on the three dots (More actions) and select Call health.
Step 4: It will open a new pane on the right side where you can see the call statistics with the details related to different features, like the network, screen sharing, audio, video, etc.
*Note – The call health view feature is available only on Microsoft Teams Work/School versions only.
Looking at the call data, you can understand why you come across the video lag issue.
Method 3: Check for Microsoft Teams Update
Sometimes certain issues related to Microsoft Teams could be due to the fact that you missed updating the app. The pending updates can sometimes cause the video lag issue in the Teams app. Here’s how to check for updates with the app:
Step 1: Open the Teams app and navigate to the upper right side of the window.
Click on the three parallel dots (Settings and more) and select Check for updates from the menu.
The Teams app will now start looking for any new updates and if available, it will install them automatically.
Once the updates are installed, restart the app and the video lag problem should be resolved.
Method 4: Install Pending Windows 11 Updates
Sometimes, the video in your Teams app may lag due to pending installation of Windows updates. For the system and all its apps and services to function properly, you must check for any pending Windows updates at regular intervals and install if any available. Let’s see how:
Step 1: To open the Settings app, press the Win + I shortcut keys simultaneously.
Step 2: In the Settings app, go to the left side of the pane and click on Windows Update.
Step 3: Now, move the cursor to the right side and click on the Check for updates button in blue.
Windows 11 will now start looking up for any pending updates and if available, it will list them all below.
Step 4: You will now see the Download & Install button.
Click on it to install the updates.
Step 5: Next, you will be prompted to restart your PC.
You can choose to Restart now or some other time. You can reschedule the restart.
As you restart you PC, it will finish installing the updates and you can then check if you still encounter the Teams video lagging issue.
Method 5: Update Your Intel Graphic Drivers
The video lagging issue in your Teams app could also be possibly due to outdated Intel graphic drivers. Follow the below instructions to update the graphics driver and check if it helps fix the video issue:
Step 1: Press the shortcut keys – Win + R at the same time, on your keyboard.
This will open the Run command search bar.
Step 2: Type devmgmt.msc in the Run command search field and press the Enter key and it will open the Device Management window.
Step 3: In the Device Manager window, go to the Display adapters section and click on the down arrow next to it to expand it.
Here, right-click on Intel Graphics driver and select Update driver.
Step 4: Now, another window – Update Drivers will open.
Click on the option that says “Search automatically for drivers“.
Now, Windows will start searching for latest drivers and if available, it will install the update automatically.
Once done, restart your PC and now check if the video on your Teams app still lags.
Method 6: Run Microsoft Teams Network Assessment Tool
Chances are, that the video lag issue in your Microsoft Teams app has something to do with the internet connectivity of the user’s location and the Microsoft relay, which cannot be detected superficially. Hence, in such cases, you can try running the Microsoft Teams Network Assessment Tool offered by Microsoft, that helps identify any network related problems with the Teams app of your organization. Here’s how to run the tool:
Step 1: Click on the below link to download the Microsoft Teams Network Assessment Tool from its the official page:
Visit Microsoft Teams Network Assessment Tool Page
Step 2: The set up file will start downloading automatically.
OR
You can click on the Download button in red to start the download.
Step 3: Once the .exe file is downloaded, click on it to open the installer.
Now, follow the on-screen instructions to finish installing the tool.
Step 4: Now that you have successfully installed the tool, press the Win + R hotkeys to launch Run command.
*Note – Once you have downloaded the Microsoft Teams Network Assessment Tool, it will not appear in the apps list as you usually see in the GUI for other apps. Instead, it has to be opened using the Windows Explorer path in the Run command.
Step 5: In the search bar, type the below path and press OK to open the path in the File Explorer:
%ProgramFiles(x86)%\Microsoft Teams Network Assessment Tool
Step 6: The path will now open in the in the File Explorer window.
Here, look for NetworkAssessmentTool.exe file.
Double-click on it and it will open the Command Prompt.
The tool will now run some tests to check the performance of the internet connectivity and if it’s communicating with the relay servers properly through the UDP and the port of the app.
Method 7: Reinstall Microsoft Teams
The Microsoft Teams video lag issue can also arise due to corrupted files and similar other issues. In such cases, you can uninstall and install the Teams app again and see it helps resolve the issue. Let’s see how:
Step 1: Go to Start (Windows icon on Taskbar) and right-click on it to open the context menu.
Select Settings from the menu.
Step 2: In the Settings app that opens, click on the Apps option on the left side of the pane.
Step 3: You will be now redirected to the Apps settings window.
Navigate to the right side and click on Apps & features.
Step 4: Next, in the Apps & features window, go to the right side, scroll down and under the App list, look for the Microsoft Teams app.
Click on the three vertical dots next to it and click on Uninstall.
Step 5: In the small pop up window, confirm to proceed with the uninstallation.
Once the app is uninstalled, close the Settings app and reboot your PC.
Now, open the Teams app and check if the video is playing fine.
Method 8: Don’t Use Background Picture During Video Calls
The Microsoft Teams app allows you to use custom background pictures to cover up your room’s condition and give it a fresh look while you are on a video call. You can either choose to blur the background or choose from a selection of wallpapers to choose from and then customize the background as per your wish. This makes your system to use the resources to adjust the look for your live calls and make it look more natural, and this, can sometimes cause a glitch and slow down your videos during the call.
Therefore, when you don’t need t use the backgrounds, make sure to turn them off during your video conference and this will automatically save the system resources, thus, allowing you to make video calls without any lags.
Method 9: Lower Display Resolution
Those using an external PC monitor with a higher resolution, for instance, the ones with 4K capabilities can change to full HD resolution. This will help reduce the bandwidth usage by the Teams app. You can also attach the external monitor to your laptop’s video port, directly. Here’s how to lower the display resolution to possibly fix the video lag issue in Microsoft Teams:
Step 1: Hold the Win + I keys together on your keyboard and release to open the Settings app.
Step 2: As the Settings window opens, click on the System option on the left.
Step 3: Next, move the cursor to the right side of the one and click on Display.
Step 4: Now, you will be directed to the Display settings page.
Here, on the right side, scroll down and go to the Scale & layout section.
Now, under the Display resolution field, click on the drop-down to expand the list.
Select a lower resolution from the list.
Once done, close the Settings window and restart your Windows 11 PC.
Now, launch the Teams app and check if the video lag issue still persists.
Method 10: Close Background Apps
Too many apps open in the background is one of the major reasons why you may face issues with many apps and features on your system and the video lag issue with Teams is another common issue. Apps like the Chrome browser or Skype are known to consume highest system resources like the RAM, thus, slowing down other apps due to less available RAM. In such a case, you can close the background apps and see if it helps fix the issue:
Step 1: Navigate to the Windows icon (four blue squares) on your Taskbar, also called the Start button, right-click on it and select Task Manager from the context menu.
Step 2: In the Task Manager window, stay in the Processes tab.
Now, scroll down to the Background processes section and look for the app/s you want to close.
Right-click on the app and select End task.
Repeat this step for the all the background apps that you notice are using the maximum system resources and you want to shut down.
Once you are done close the desired background apps, exit the Task Manager window and open Microsoft Teams. You can now join a video conference and there should be no video lags anymore.
Moreover, to run good quality video calls, you must have a high-speed internet connectivity and the Teams app requires high-speed connection. So, if you are running too many similar instances alongside like downloading media files or big sized files, streaming a video or music at the same time, you must consider pausing the download or the streaming process temporarily. This can help you continue with the video call on Teams for the moment, without any hassles.
However, sometimes some Windows features may interrupt the video calling performance, for instance, the microphone and hence, you can try disabling the microphone if it’s not in use for the moment and this may help fix the issue momentarily. Alternatively, you can also try disabling the video if not urgent and keep any video lagging issues at bay.


