On-Screen Keyboard is one of the Ease of Access features in Windows 10. If you are using On-Screen Keyboard and you are facing some issues with the On-Screen keyboard- you are in the right place. Before going for the main solutions, you can try these initial workarounds which can solve your problem with minimal efforts.
Users are mainly reporting about these following problems-
- On-Screen keyboard not typing – If you are facing this issue, then you can try running keyboard troubleshooter on your computer.
- Keyboard and On-Screen keyboard is not working – You can check if necessary services are running on your computer(Fix-6).
- Could not start On-Screen keyboard Windows 10 – If you are facing this issue, make sure the “Touch Keyboard and Handwriting Panel” service is running. (Fix-6)
- Windows 10 On-Screen keyboard not working login – If the touchscreen keyboard is not working during login, then it may be the corrupted Windows installation or recently installed Windows Update. Go through our solutions, these will help you.
- Surface Pro On-Screen keyboard is not working – If you are facing this issue check if you have enabled Tablet Mode on your device.
- On-screen keyboard not working after update – Performing a System Restore on your device can solve this problem on your computer.
- On-screen keyboard not appearing Windows 10 – Some users are reporting about a problem where they are unable to see On-Screen keyboard on their device. Try enabling it from Settings.
- Windows 10 On-Screen keyboard not working in tablet mode – If you are facing this issue, check if On-Screen Keyboard is enabled in the Settings window. (Fix-1)
NOTE-
For all these fixes, you have to use a physical keyboard.
Fix-1 Enable On-Screen Keyboard on your computer
Check if you have enabled On-Screen Keyboard on your computer, from Settings application. Follow these easy steps-
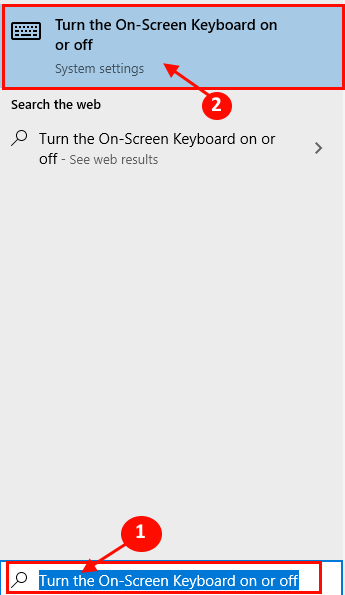
1. Click on the search box beside Windows Icon, and type “Turn the On-Screen Keyboard on or off” and click on “Turn the On-Screen Keyboard on or off” in the elevated window.

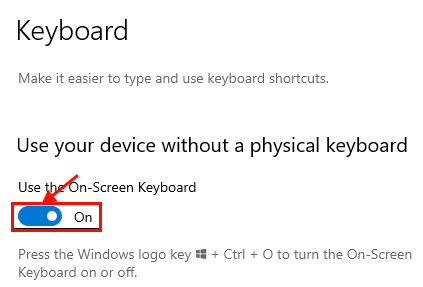
2. On the right side of the Settings window, check if the option “Use the On-Screen Keyboard” is “ON“. If you notice that the settings are “OFF“, then click on it to make it “ON“.

Also, you can press Windows key + CTRL + O keys together from your keyboard to open on screen keyboard instantly.
Note: – For Windows 11 users
Press Windows key + I to open settings. Now, Click on Accessibility from the left menu and then keyboard from the right side. Now, Just turn On the On screen keyboard option.

Fix-2 Automate Touch keyboard services-
If you are still unable to use On-Screen Keyboard then it may be happening because of necessary services are not running automatically on your computer. To check, follow these steps-
1. The easiest way to open the Run window is to press ‘Windows key+R‘.
2. Now, type “services.msc” and then hit Enter.

3. In Services window, double click on “Touch Keyboard and Handwriting Panel Service” to open the properties of this service.

4. Now, click on the drop-down of “Startup type:” and from the list, click on “Automatic“.
5. Check the “Service status” is “Running” or not. If you see the service is “Stopped“, click on “Start” to start the service.
6. Now, click on “Apply” and “OK” to save the changes on your computer.

Now, check if the On-Screen keyboard is working or not. If you see that the On-Screen keyboard is not functioning properly go for these steps to check if necessary services are running on your computer.
7. In the Touch Keyboard and Handwriting Panel Service Properties window, go to the “Dependencies” tab and then expand “Remote Procedure Call“.
8. Note the services under the Remote Procedure Call. Close the Properties window.

9. Now, in the Services window, check if those services (which you have noted) are “Running” or not.
10. If you see any of those services are not running, then double click on that service and follow the Step-3 of this solution.

Reboot your computer. After rebooting, you should be able to use the On-Screen keyboard on your device.
Fix-3 Create a shortcut for On-Screen Keyboard-
You can create an On-Screen keyboard shortcut on your desktop. You can access the On-Screen keyboard directly from the desktop icon. To do so, follow these easy steps-
1. Right-click on a space on your desktop. Now, click on “New” and then click on “Shortcut“.

2. Now, copy and paste this address in the box below “Type the location of the item:“. Click on “Next“.
%windir%\System32\osk.exe

3. Now, click on “Finish” to finally add the shortcut to the desktop.

You can the On-Screen Keyboard directly from the desktop by double-clicking on the shortcut.
Fix-4 Enable Touch Keyboard button in the Taskbar-
You can access the On-Screen keyboard (Touch keyboard, if you are using a touch-enabled device) directly from the Taskbar. To enable the settings follow this easy step.
1. Right-click on the Taskbar and then click on the “Show touch keyboard button“.

You should be able to notice a touch keyboard on the Taskbar deck. If you still can’t use the On-Screen keyboard on your device, go for these fixes.
Note: – For Windows 11 users
Press Windows key + I key together to open settings. Now, Click on Time & Language from the left menu. After that, click on Typing from the right side. Now, Click on Touch Keyboard to expand it. After that, Just select the option Show the touch keyboard when there’s no keyboard attached.

Fix-5 Open On-Screen Keyboard from Start Menu-
If are unable to open the On-Screen Keyboard directly from the Taskbar, you can open it from the application list or Start Menu.
1. Click on Windows Icon, and then on the left side, scroll down through the application list till you reach “W“. Now, in the folders of application listed under “W”, click to expand “Windows Ease of Access“. Then click on “On-Screen Keyboard“.

You should be able to use the On-Screen Keyboard.
Fix-6 Open On-Screen Keyboard from Run-
You can access the On-Screen keyboard from the Run.
1. Press Windows key+R to launch Run, and copy-paste this command in Run and hit Enter.
C:\Windows\System32\osk.exe

Fix-7 Change the Target of Chrome shortcut-
[NOTE- This fix is for the users who are having trouble of On-Screen keyboard not working in Chrome only]
Change the shortcut of Google Chrome “Target” in the Properties. To change the target of Chrome, follow these easy steps-
1. Make a copy of the Google Chrome shortcut, on your computer. In case anything goes wrong you will not lose the original shortcut.
2. Right-click on the Google Chrome shortcut copy and then click on “Properties“.

3. Now, in the “Shortcut” tab, click on the “Target” and at the end of the line, add a single space and copy-paste this line.
--disable-usb-keyboard-detect
It should read like this-
“C:\Program Files (x86)\Google\Chrome\Application\chrome.exe” –disable-USB-keyboard-detect
Click on “Apply” and “OK” to save the changes.

Now, close Properties window. Open Chrome on your device. Now, try to check if you can use the On-Screen keyboard on your computer.
Fix-8 Run SFC /SCANNOW
1 – Search cmd in the search box and right click and click on run as administrator.

2 – Now, run the command given below
SFC /SCANNOW
3 – Wait for it to get completeed and then close the window and try to open on screen keyboard again.
Fix-9 Create a new Administrator account-
You can create a separate administrator account and then try to use the On-Screen Keyboard. This method has worked out for many users. Follow these steps to create a non-Microsoft account.
1. Press Windows Key+I to open the Settings application. Click on “Accounts“.

2. On the left-hand side, click on the “Family & other users“.
3. Then, on the right-hand side, click on “Add someone else to this PC“.

4. As the next step what you need to do is to click on “I don’t have this person’s sign-in information“.

5. Then, click on “Add a user without a Microsoft account“.

6. Enter the “User name” in Create an account for this PC window,
7. Then, you need to enter a password and re-enter it to confirm it.
8. Click on “Next” to complete the account creation process.

9. Now, log off from your current account, and then log in with the new account.
Try to use the On-Screen keyboard on your computer. You should be able to use it without any further problems.
Fix-10 Uninstall Windows Updates-
If your computer has received a recent Windows Update then the update may be causing the issue with the On-Screen keyboard on your device. Follow these easy steps to uninstall recent Windows updates from your device.
1. You need to press the ‘Windows key‘ and the ‘R‘ key together.
2. Now, type “appwiz.cpl” and then hit Enter.

2. Now, on the left pane of Programs and Features window, click on “View Installed Updates“.

3. Now, in Installed Updates window, under the “Microsoft Updates” section, notice the recent updates (look for the column “Installed On” ). Double click on the most recent update to uninstall it.

4. Click on “Yes” to uninstall the update.

Windows will uninstall the update. Your computer will be restarted after uninstalling the update.
After rebooting your computer check if you are still facing the issue or not. Go for the next fix if your issue remains unsolved.
Fix-11 Change the Value Data in Registry Editor-
If all of the services are running on your computer but still you can not use the On-Screen computer, you can change the Value Data for a particular registry on your computer. Follow these steps to do so-
1. What you need to do is to press Windows key+S and then type “Regedit“.
2. Then, click on the “Registry Editor” in the search result.

3. Now, on the left pane of Registry Editor, expand this way-
HKEY_LOCAL_MACHINE\SOFTWARE\Microsoft\Windows\CurrentVersion\Explorer\Scaling
4. On the right pane, you should see the MonitorSize registry key. Double click on it, and then change the Value data to “22.5“.
Now, close Registry Editor window. Reboot your computer and try using the On-Screen keyboard on your computer.
If you are facing this problem particularly in Google Chrome only, then we have a solution for you.
Fix-12 Try to use another application-
If none of these fixes has worked out for you then you can try using another 3rd party application on your device. You can try these below mentioned On-Screen keyboard software on your computer.
This will surely fix your problem.
Additional work arounds
Additional Workarounds-
1. Restart your computer and after rebooting check if you are still facing the issue with the On-Screen keyboard.
2. Try pressing Windows Key+Ctrl+O to form your physical keyboard to open the On-Screen Keyboard.
3. Check if any of the Windows Update is pending or not. Update your Windows, and further check if you are still facing the problem with the On-Screen keyboard.
4. Try to Enable or disable Tablet Mode on your computer. Click on the “Notification” icon in the Taskbar, and then click on “Tablet Mode” to enable the Tablet Mode.
