It is very frustrating when you are outside of the home (in hotels) and you are trying to access a Public WiFi from your Windows 10 device but you are unable to connect with it as Public WiFi log in page is not showing up on your browser. Don’t worry there are easy fixes available to solve your problem. But before going for the fixes, attempt these initial workarounds to solve your problem-
Initial Workarounds-
1. Restart your computer if the problem is happening for the first time on your computer.
2. Try accessing the login page using another browser like Microsoft Edge or Opera browser.
If these initial workarounds have not fixed your problem, go for these fixes-
Fix-1 Use http://fixwifi.it/ from your browser-
You can access this website from your browser, it will troubleshoot WiFi related problems on your device.
Browse this website http://fixwifi.it/ from your browser. It will diagnose the WiFi connectivity on your device.
Check if you can open the Login page.
Fix-2 Uninstall and Reinstalling Network adapter
Uninstalling and reinstalling the network adapter can clear any corrupt or bad files of the network driver from your computer.
Steps to uninstall the network adapter driver-
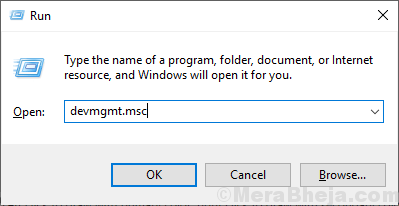
1. Press Windows key+ R to open Run. Now, type “devmgmt.msc” and hit Enter. Device Manager utility will open.

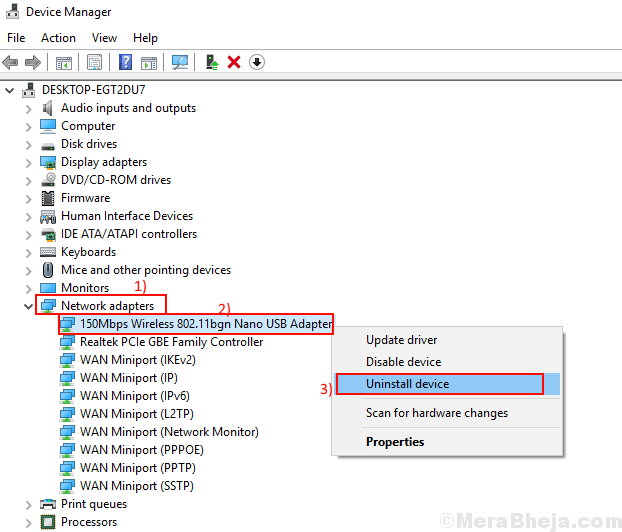
2. In the Device Manager utility window, look for the “Network Adapter” option and click on it and it will be expanded to show available drivers. Right click on the network adapter you are using, click on “Uninstall device“. This will uninstall the driver.

In the next steps we will install the network adapter driver again-
Method 1-
Just reboot your computer and Windows will install the uninstalled driver itself. You will have your network adapter working fine again.
Method 2–
If rebooting your computer didn’t install the driver then you have to install the driver yourself. Follow to install the driver manually-
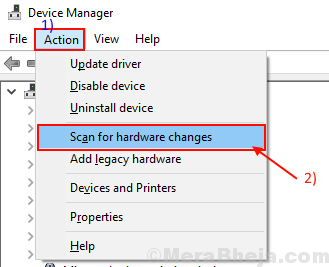
1. In the Device manager window, click on “Action”. Again click on “Scan for hardware changes“.

2. This will find the uninstalled the driver and install the driver again.
Close Device Manager window. Restart your computer to save the changes.
After rebooting, check if you can access the login page of the public WiFi.
Fix-3 Flush DNS cache
Windows typically stores DNS servers data of websites in the cache. If the IP of the login page of the public WiFi has changed recently, you may face this error. To solve this problem, follow these steps-
1.Press Windows Key+R to launch Run. Type “cmd” and hit “Enter“.

2. Now, copy and paste this command in command prompt window and hit Enter.
ipconfig /release
Wait a few minutes to complete the process.

3. Now, copy and paste this command in command prompt window and hit Enter.
ipconfig /flushdns

4. Now, copy and paste this command in command prompt window and hit Enter.
ipconfig /renew
Wait a few minutes to complete the process.

5. Similarly run the commands given below one by one.
ipconfig /registerdns
netsh winsock reset
Try to access the log in page of the public WiFi, check the problem is still there or not.
If the problem is still there then go for the next fix.
Fix-4 Try changing DNS to Google DNS
1. Press Windows key + R key together to open RUN.
2. Now, write ncpa.cpl in it and click OK.

3. Now, Locate tour network adapter with which you re connected to the internet. Right click on it. Choose the one which do not have red cross sign over it.

4. Double click on Internet Protocol version 4.

5. Now, select the radio button Use the following DNS server.
6. Now, enter the DNS settings of Google.
8.8.8.8

8.8.4.4

7. Click OK and close the window.
Fix-5 Turn Off Pop Up Blocker
1. Press Windows key + R key together from your laptop.
2. Write inetcpl.cpl in it and click OK.

3. Click on Privacy Tab.
4. Uncheck Turn On Pop Up Blocker

For Chrome Users : –
You are unable to view Public WiFi log in page maybe because Pop-ups are blocked in your browser. You can disable the Pop up blocking from your settings. Follow these steps to disable Pop-up on your browser settings.
1. Click on “three-dot” on the left-most corner on your chrome browser.
2. Click on “Settings“.

3. Scroll down and click on “Advanced” and again scroll down and click on “Site settings“.

4. Now, scroll down and click on “Pop-ups and redirects” option.

5. Click on the slider beside the “Blocked (recommended)” option under ‘Pop-ups and redirects’.Now, you will see “Allowed” instead of Blocked (recommended).

Close the settings tab. Try to access the login page of the public WiFi. If you still can’t access the login page from your browser, go for the next fix.
Fix-6 Try Re-enabling network connection
You can try resetting the network connection,which may help you to connect to the network. Follow these simple steps to reset the network connection-
1. Click on WiFi icon on the left corner of your and click on “WiFi” tab to disable it temporarily.

2. Now, click on WiFi icon again, and click on “WiFi” tab to enable the network connection again.

3. Open a browser and try to open “https://google.com“.
You should be able to access the log in page of the public WiFi. If this fix didn’t fix your problem, go for the next fix.
Fix-7 Temporarily disable firewall on your computer
Windows Firewall can be the cause of the error you are unable to access the log-in page of the public WiFi you want to connect to. You can disable the Windows Firewall by following these steps-
1. Press Windows key+ R to launch Run, and type “control firewall.cpl” and hit Enter.
Firewall settings will be opened.

2. Now, in the control panel, in the left pane, click on “Turn Windows Defender Firewall on or off“.

3. Now, under the Public network settings, click on “Turn off Windows Defender Firewall (not recommended)” and click on “OK” to turn your Firewall off.

Restart your computer and start the Windows installation process, check any of the above mentioned errors are happening or not.
[NOTE- DON’T FORGET TO TURN ON FIREWALL AFTER YOU HAVE TRIED ACCESSING THE LOG IN PAGE ]
You can turn the firewall on just by clicking on “Turn on Windows Defender Firewall”.
If you are unable to access the log-in page then go for the next fix.