Windows defender is a function that safeguards a system from virus attacks. When trying to install the latest security updates, a few users get an error saying ‘virus and threat protection engine unavailable’. This error is mostly because of corrupted system files, outdated updates on the system, or some issues in the windows update, etc. It can be solved by installing the latest update, resetting the Windows Security app, tweaking the registry editor key, and a few more. In this article, we have a few solutions that will help you to solve this issue on a Windows machine.
Method 1 – Run The Windows Update Troubleshooter
Step 1 – Open the windows settings using Windows + I keys together
Step 2 – Click on Update & security
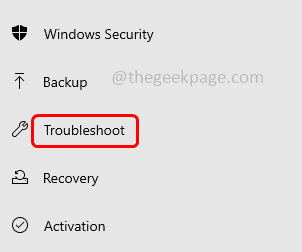
Step 3 – On the left, click on troubleshoot
Step 4 – At the right side, click on additional troubleshooters
Step 5 – Find Windows Update and select it. Then click on run the troubleshooter button
Step 6 – If there are any problems it will suggest the fix and click on apply
Step 7 – Restart the computer and check if the issue is solved.
Method 2 – Manually Install Latest Security Intelligence Updates
Step 1 – Go to the Microsoft website
Step 2 – Scroll down to the Manually download the update section
Step 3 – Click on the version that is suitable for your PC beside Microsoft Defender Antivirus for Windows 11, Windows 10, Windows 8.1, and Windows Server. Here I choose 64-bit
Step 4 – mpam-fe.exe file will be downloaded. Once download is complete double click on the file and follow the on screen instructions to install it
Step 5 – After the installation restart the computer and then check if the issue is solved.
Method 3 – Check For The Corrupted File System
Step 1 – Open the command prompt as an administrator. To do this, type cmd in the windows search then hold Ctrl + Shift keys together then hit enter
Step 2 – A user account control window will appear. Click on yes
Step 3 – Copy and paste the following commands in the command prompt and hit enter one after the other. It will take a few minutes to complete the execution process wait for it
sfc /scannow
DISM /Online /Cleanup-Image /RestoreHealth
Step 4 – Restart the computer and check if the error is solved
Method 4 – Update Windows Defender Using Windows PowerShell
Step 1 – Press the Windows + X keys together. From the appeared list click on the Windows PowerShell (Admin)
Step 2 – A user account control window will open, click on yes
Step 3 – Type the following command in the PowerShell window and hit enter
cd ../..
Step 4 – Copy and paste the below required command as per your need in the PowerShell and hit enter
If you need to update the antimalware definitions then use the below command
Update-MpSignature
If you need to update the antimalware definitions from the Microsoft Update Server
Update-MpSignature -UpdateSource MicrosoftUpdateServer
The general command would be as below
Update-MpSignature [-UpdateSource <UpdateSource> {InternalDefinitionUpdateServer | MicrosoftUpdateServer | MMPC | FileShares} ]
Step 5 – After the execution of the commands restart the system and check if the issue is solved.
Method 5 – Reset Windows Security
Step 1 – Press the Windows + X keys together. From the appeared list click on the Windows PowerShell (Admin)
Step 2 – A user account control window will open, click on yes
Step 3 – Type the following command in the PowerShell window and hit enter
Get-AppxPackage *Microsoft.Windows.SecHealthUI* | Reset-AppxPackage
Step 4 – Once the execution is done close the terminal and restart the computer. Now check if the issue is resolved.
Method 6 – Change The Settings In Windows Registry Editor
Step 1 – Open the run prompt using Windows + R keys together
Step 2 – Type regedit in the run prompt and hit enter
Step 3 – A user account control window will open click on yes. This will open the registry editor
Step 4 – Navigate to the following path in your registry editor or copy and paste the following path in the address bar of the registry editor and hit enter
Computer\HKEY_LOCAL_MACHINE\SOFTWARE\Policies\Microsoft\Windows Defender
Step 5 – At the right side, double click on the DisableAntiSpyware key
Step 6 – If not present create it. To create, right click on the empty space and click on new. From the appeared list click on DWORD (32-bit value)
Step 7 – Give it a name DisableAntiSpyware and then double click on it
Step 8 – Make sure the value data to be 0. Then click on ok
Step 9 – Also double click on DisableAntiVirus key. If not present create it similarly as shown in the above steps [step 6-step 7]
Step 10 – Give the value data as 0 then click on ok
Step 11 – Restart the computer and then check if the issue is solved.
Method 7 – Reset The PC
Step 1 – Open the windows settings using Windows + I keys together
Step 2 – Click on update & security
Step 3 – On the left click on recovery
Step 4 – At the right side under reset this PC, click on get started button
Step 5 – From the appeared window, choose keep my files. This option will reset your PC without removing your personal files. Now check if the problem is solved.
That’s it! I hope the above provided information is helpful and easy to follow. Let us know which method you applied to get it solved. Thank you and happy reading!!


