Without YouTube, your smartphone definitely can never be classified as smart at all. With that put in place, YouTube unable to play videos issue is no better a situation that an Android user needs to be at. But you have absolutely nothing to worry about. Once you are done trying the solutions listed in this article one by one, you definitely are going to have your issue fixed in no time.
So what are the reasons why you could be facing this problem? Well, the first thing to check is definitely your network connection. If you are connected to the Internet via a cellular data connection, try switching to a WiFi connection. If you are connected to the Internet via a WiFi connection already, try switching to another WiFi connection or to the cellular data connection. And of course, do try restarting your device once. As for other reasons, plunge into the article, the solutions listed here are sure to resolve your problem quickly!
Section 1: Solutions to Try if You are Connected to the Internet via Cellular Data Connection
In this section, we cover solutions that are applicable only if you are using a cellular data connection to connect to the Internet.
Solution 1.1: Change the Network Mode
Sometimes, the issue could be caused because of the wrong network mode configured for your mobile network. Remember, this method would work only if you are connected to the Internet via a cellular data connection.
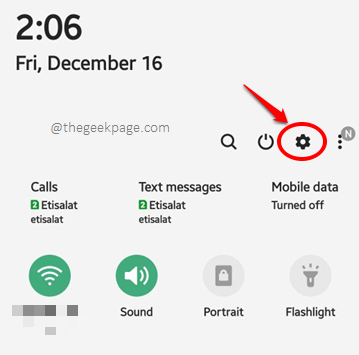
Step 1: Pull down the Notifications panel and hit the Gear icon to launch the Settings application.
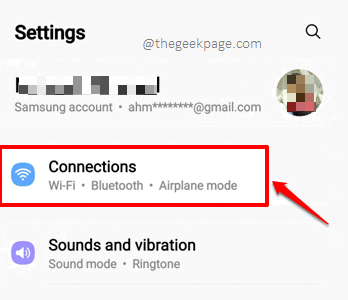
Step 2: From the Settings options, click on the option Connections.
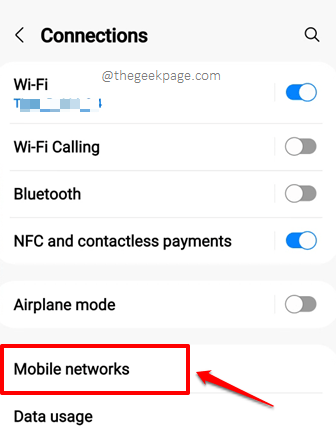
Step 3: As next, click on the Mobile networks option.
Step 4: Now, you can see that the Network mode is selected already. Let’s try changing your network mode by clicking on the Network mode option. If you have 2 SIM cards in your phone, you can do the same for both.
Step 5: As next. from the list of network modes available, you can try switching to a different one than the one already chosen. For example, if LTE/3G/2G (auto connect) was initially set, you could try 3G/2G (auto connect) this time.
That’s it. Please restart your device once and check if your issue is resolved or not.
Solution 1.2: Reset Access Point Names
This solution is also for those who are connected to the Internet via a cellular data connection. It wouldn’t make a difference if you are connected to the Internet via a Wi-Fi network already.
Step 1: Click on the Settings application icon to launch it.
Step 2: Click on the Connections option next.
Step 3: As next, on the Connections screen, click on the Mobile networks option.
Step 4: Now on the Mobile networks screen, click on the option named Access Point Names.
Step 5: You now need to click on the 3 vertical dots icon located at the top right corner of the screen.
Step 6: From the tiny context menu that expands out, click on the Reset to default option.
Don’t forget to restart your Android and try if you can play YouTube videos without facing trouble.
Solution 1.3: Modify APN Protocol Settings
Step 1: Launch the Settings application once again.
Step 2: Hit the Connections option.
Step 3: On the screen that follows, click on the option named Mobile networks.
Step 4: As next, click on the option Access Point Names from the Mobile networks screen.
Step 5: You now need to click on your Access Point Name (APN).
Step 6: On the Edit access point screen, click on the option APN Protocol.
Step 7: Set the APN protocol as IPv4/IPv6 by choosing the radio button against it.
Now that your APN Protocol is changed, restart your phone and check if your issue is still present or not. If still present, please head on to the next section.
Section 2: Solutions to Try if you are Connected to the Internet via any Type of Network Connection
The solutions listed in this section can be tried if you are connected to the Internet via a WiFi network or via cellular data or via some other means.
Solution 2.1: Reset App Preferences
Step 1: Launch the Settings application.
Step 2: Scroll down and click on the option named Apps from the Settings screen.
Step 3: As next, click on the More Options icon present at the top right corner of the screen, indicated by 3 vertical dots.
Step 4: Click on the Reset app preferences option from the tiny context menu that expands out.
Step 5: When asked for confirmation, hit the Reset button to proceed. Don’t worry, the application data will not be cleared, only the preferences will be reset.
Please check if your issue is resolved or not.
Solution 2.2: Reset YouTube Application Data and Cache
Step 1: Launch the Settings application. You can do it easily by pulling down the Notifications panel and hitting the Gear icon present at the top right part of the screen.
Step 2: Click on the Apps option from the list of Settings options available.
Step 3: Scroll all the way down, locate and click on the YouTube application.
Step 4: As next, click on the Storage option.
Step 5: Now click on the Clear data and Clear cache buttons respectively to clear off the application data and cache of the YouTube application.
Once the application data and cache are cleared off, relaunch the YouTube app and check if you can play YouTube videos without facing issues.
Solution 2.3: Set Automatic Date and Time
YouTube cannot play videos if the date and time of your device are incorrect. So let’s try setting them to the automatic date and time in the steps below.
Step 1: Launch the Settings application.
Step 2: Click on the General Management option or click on the Search bar located at the top and search with the keywords Date and Time.
Step 3: Under the General Management options, click on the Date and time option.
Step 4: Now you need to turn the toggle button against the option Automatic data and time to the ON state as shown in the screenshot below. That’s it. Check if your issue is resolved or not.
Note: Please note that the steps might slightly vary based on your phone’s model and OS version. If you are facing difficulties in finding the correct configurations of your device, please drop us a comment, we’d be happy to help.
Please tell us in the comments section which method fixed the issue for you and stay tuned for more and more amazing technical tricks, tips, hacks, solutions, and how-tos!


