Windows 10 is constantly evolving with a new update time and again. However, it still comes with lots of issues like PC boots slowly, unable to play DVD movies, not enough space to install Windows 10, and many more. One such issue is the “You’ll need a new app to open this .exe file” error in Windows 10.
This error can be really frustrating when you are trying to open an executable file and the error pops up. The error does not allow you to open the file and that’s when you should troubleshoot the problem with immediate effect. While some issues are relatively easier to solve, some can be really challenging. However, solving this error is pretty easy. Let’s find out how to fix the error while opening a .exe file.
How to Fix You’ll Need a New App to Open This .Exe File Error in Windows 10
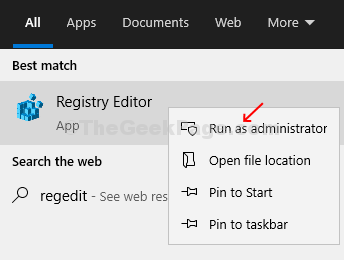
Step 1: Click on the Windows icon on your desktop and type Regedit in the search box. Now, right-click on the result and click on Run as Administrator to launch the Registry Editor.

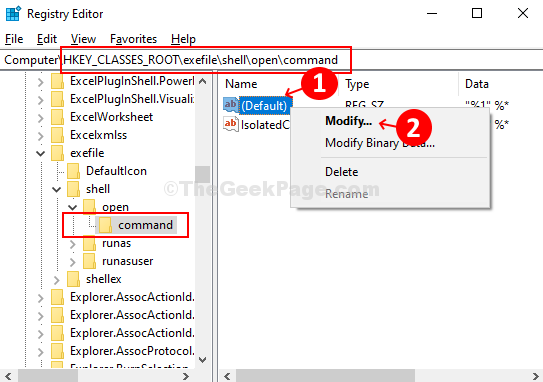
Step 2: In the Registry Editor window, navigate to the below path:
HKEY_CLASSES_ROOT\exefile\shell\open\command
The command sub-key is highlighted on the left side of the pane. Now, on the right side of the pane, right-click on the string named Default. Click on Modify to open the Edit String pop up.

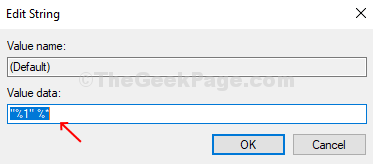
Step 3: In the Edit String pop up, change the Value data to the value given below.
"%1" %*
Press OK to save the changes and exit.

Step 4 – Now, go to the following path in registry editor.
HKEY_CLASSES_ROOT\.exe
Step 5 – Double click on Default on the right side and make sure its value data is exefile.
If not change it to exefile.

Step 4 – Now, go to the following path in registry editor.
HKEY_CLASSES_ROOT\exefile
Step 5 – Double click on Default on the right side and make sure its value data is Application.
If not change it to Application.

Reboot your system and try opening a .exe file to check if it’s opening and does not show the error. Your “You’ll need a new app to open this .exe file” error in Windows 10 should be resolved now.
Note: – If this does not work, repeat this method while booting in safe mode.
Method 2 – Running Powershell command
1 – Search Powershell in Windows search box
2 -Now, do a right click on the search result and then select run as administrator

3 -Now, copy and paste the command given below and Press Enter Key to run the command in Powershell.
Get-AppXPackage -AllUsers | Foreach {Add-AppxPackage -DisableDevelopmentMode -Register "$($_.InstallLocation)\AppXManifest.xml"}
4 – Close the Powershell window, once the command gets completed.
Method 3 – Reset Windows store
1. Click on Start Button and then Gear shaped icon to open settings panel.

2. Click on Apps.
3. Search store in the search box on the right.
4. Click on Microsoft store from the search result.
5. Now, Click on Advanced options.

6. Now, Scroll down and Click on Reset and reset Microsoft store.

For Windows 11 users
1 – Press Windows key + R keys together to open run command box.
2 -Now, Click on Apps from the left menu,
3 -Now, click on Installed apps from the left menu.
4 – Now, search store in the starch box
5 -Click on 3 vertical dots and click on advanced options.

4 – Now, Click on Reset.
