Desktop icons are the shortcut to the apps that you use on a daily basis on your Windows 10 and Windows 11 PC/laptop. For instance, you may be using the Word file, Edge/Chrome browser, My PC, etc. regularly and having the shortcut icons on your desktop makes life easier for you.
The best part is, you can move the desktop icons and arrange them as per your convenience. However, there are times when the icons may stop moving, causing difficulty in arranging them as per your requirement. For instance, you are trying to drag the icon to another location and it simply doesn’t budge. Isn’t that frustrating? So, how do you fix that issue? Here’s how you can fix it easily.
#1 – How to Fix the Desktop Icons Not Moving Issue in Windows 10 / 11
Step 1: Right-click anywhere on the Desktop on an empty space and from the context menu select View. Now, uncheck the Auto arrange icons option from the sub-menu.
![]()
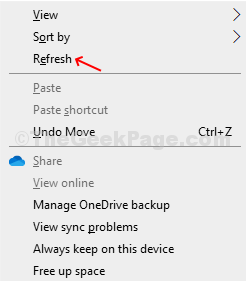
Step 2: Now, right-click again on an empty space on the Desktop and click Refresh.

It will refresh the desktop. You can now easily move the icons and arrange them as per your wish.
![]()
Step 3: If you want, you can also sort the arrangement of the icons based on Name, Size, Item Type, and Date Modified. Simply right-click on an empty space on the Desktop, select Sort by, click on any of the options as per your requirement.

Step 4: You can also view the desktop icons in different sizes, and also change the alignment of the icons or simply hide the icons. For this, right-click on an empty space on the Desktop, select View, now choose from and click on Large icons, Medium Icons, and Small icons, or uncheck Align items to grid, or uncheck Show desktop icons.

That’s it! You should now be able to freely move the desktop icons and even arrange them or view them based on your requirements.
#2 – Press Esc Keys Three times
Many users reported that Pressing Esc keys three times solved the issue. Just try this , press the Esc keys on your keyboard three times.
#3 – Using Registry editor
1. Just Press Windows key and R key together at once to open run command box.
2. Write regedit in it and click on OK.

3. Now, Go to the following path in the registry editor.
HKEY_CURRENT_USER/Control Panel/Desktop/WindowsMetrics
4. Now, in the right side locate IconSpacing.
5. Double click on it and change icon spacing . Note that the range is between -2730 to 480.

By default the icon spacing is -1128 , in your case it may be a bit different. Try to change it and then close the registry editor and restart PC.