Windows has included this new feature where the users can install the Linux subsystems simply by enabling the feature ‘Windows Subsystem for Linux’. But, while downloading a Linux distribution via the Windows Subsystem for Linux or WSL, users are facing this error message ‘WslRegistrationDistribution failed with Error:0x80370102’. This problem is associated with the disabled hardware Virtualization in system BIOS. Enabling it should fix the problem for the majority of the cases. If that doesn’t solve it, follow the rest of the solutions one-by-one.
Fix 1 – Enable the hardware-based Virtualization feature
Generally, the Virtualization feature is turned off on all the machines. You have to manually turn it on from the BIOS.
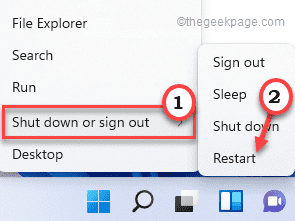
1. At first, right-click on the Windows icon and tap on “Shut down or sign out>“.
2. After that, tap on “Restart” to restart your system.

3. During the restart, when the manufacturer logo shows up, press and hold the “Delete” key on your keyboard to access the BIOS settings.
NOTE –
Keep in mind that this button to access the BIOS alters from manufacturer to manufacturer, even sometimes from model to model.
Keep your eyes open for the actual button to access BIOS while your computer boots up.

3. Once the BIOS window opens up, go to the “Advanced” tab*.
4. Next, use the arrows on your keyboard to select the “Virtualization” from the list and set it to “Enabled“.
[
*NOTE –
The ‘Virtualization’ option may not be present in the ‘Advanced’ tab on some computers. In that case, you will find it in the “Performance” tab.
]

5. Again, press the key that is associated with it to save the settings.
[It is the “F10” key for this computer.]

6. After that, select “Yes” to finally save and exit the bios settings on your computer.

Your computer will start up normally.
FOR THE SYSTEMS RUNNING ON AMD CPU –
1. Go to the BIOS settings.
2. Here, go to the “M.I.T” tab.
3. Now, go to the “Advanced Frequency Settings“.
4. Next, click on the “Advanced Core settings“.
5. Here you will see the ‘SVM Mode’ on your screen. SVM Mode is the Secure Virtual Machine mode.
6. Set it to “Enable” to switch it ON.
7. Now, you have to select “Yes” to finally save and exit the bios settings on your computer.

After doing this, let your computer start up normally. Now, you can check whether virtualization is enabled on your system or not.
1. At first, right-click on the Windows icon and tap on the “Task Manager“.

2. Then, go to the “Performance” tab.
3. Here, tap on the “CPU“.
4. Now, on the right-hand side, you will notice that the “Virtualization” setting is “Enabled“.

Now, try to install the Linux distribution again.
Fix 2 – Make sure HyperV is enabled
The hypervisor is needed to be enabled on the user system to use the virtualization features efficiently.
1. At first, press the Windows key and the R keys together.
2. Then, type “optionalfeatures” and click on “OK” to open the Windows Features window.

3. When the Windows Features opens up, scroll down to “Hyper-V“.
4. Just check the box beside “Hyper-V“. Then, tap on “OK” to enable the Hyper-V features.

Now, Windows will download and apply this feature to your system. This process may take a while.
6. Once you are done, tap on “Close” to close the window.

Now, restart your computer once to let these changes take effect.
After rebooting the device, try to install the Linux distribution using the WSL again. Check whether this works out or not.
Fix 3 – Activate Dynamic Memory allocation
Step 1
1. At first, terminate the virtual machine on your system.
2. Then, type “powershell” in the search box.
3. After that, right-click on the “Windows PowerShell” and tap on “Run as administrator” to open the terminal with administrative rights.

4. When the PowerShell opens up, copy-paste this code and hit Enter.
Set-VMProcessor <VMName> -ExposeVirtualizationExtensions $true

After that, close the PowerShell terminal.
Step 2
Now, you have to enable the dynamic RAM allocation.
1. At first, type “Hyper-V” in the search box.
2. Then, tap on the “Hyper-V Manager” to open it.

3. After that, right-click on your virtual machine and tap on “Settings“.

4. When the Settings window appears, select the “Memory” from the left-hand pane.
5. Set the value of the “RAM:” to twice the size of the present value.
[Suppose it is set to use “4096” MB RAM. So, you have to set it twice the size of it or “8092” MB RAM.]
6. Then, check the box beside the “Enable Dynamic Memory” box.

7. Finally, tap on “Apply” and “OK” to save the changes.

8. Now, launch the Virtual Machine on your system.
9. Then, just right-click on the virtual machine and tap “Connect…“. This will restart the virtual machine alongside the Hyper-V.

Later, try running the Ubuntu once again to test it out. It will work just fine.
This should solve your problem.