Some of Windows 10 users are complaining about a problem related to Windows Update. According to them, when they are trying to update their Windows, they are receiving an error message, “Windows Update Error 0x80070005“. If you are in the same situation, simply follow these fixes and the problem will be solved very easily.
Fix-1 Allow Permissions –
This error may happen due to the inadequate permission of some essential folder.
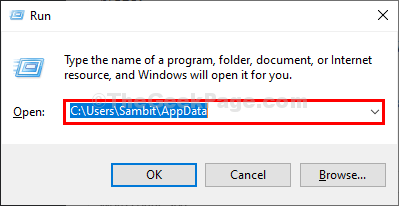
1. Press Windows key+R to launch Run window on your computer. In Run window type or copy-paste this location and hit Enter.
C:\Users\%username%\AppData

Note:-
- Replace “C:“ with the drive letter of Windows installation drive on your computer.
- Change “username” with your username.
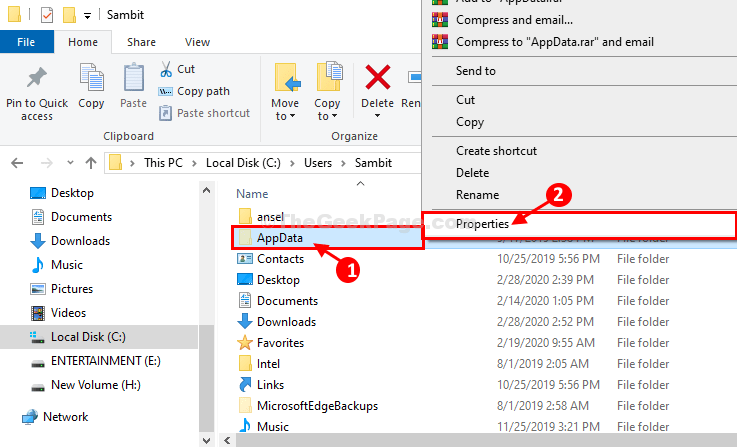
2. In the File Explorer window, right-click on “AppData” and then click on “Properties” to open the Properties of Appdata.

3. In AppData Properties window, go to the “Security” tab and then click on “Edit…” to change the permissions.

4. Now, click on “Add…“.

5. In Select Users or Groups window, type “Everyone” in the ‘Enter the object names to select‘ and then click on “Check Names“. An underline will appear below Everyone. Click on “OK“.

6. Coming back to the Permissions for AppData window, select “Everyone” and then check the “Full Control“.
7. Finally, click on “Apply” and “OK” to save the changes on your computer.

Close Registry Editor window.
Reboot your computer. After rebooting your computer, try to update your Windows.
Fix-2 Empty SoftwareDistribution folder-
Emptying the SoftwareDistribution folder on your computer and then running a batch file on your computer will solve this issue.
1. Press Windows key+R to launch Run, and then copy-paste this line and hit Enter.
Download folder will be opened in the File Explorer window.
C:\Windows\SoftwareDistribution\Download
Note- Replace “C:” with the drive letter of your Windows installation drive.

2. Now, press Ctrl+A to select all the folders and press “Delete” to empty the SoftwareDistribution folder.

Close File Explorer window.
3. Press Windows key+R will launch the Run window.
4. Then, type “powershell” and hit Ctrl+Shift+Enter to open Powershell with Administrator rights.

5. In Powershell window, copy-paste this command and hit Enter.
Clear-RecycleBin -force -ErrorAction:Ignore

After executing the command close Powershell window.
6. Download this batch file on your computer.
Batch-File-to-Reset-Windows-Update_TheGeekpage.com
7. Extract the zip file in a location of your choice. Go to the location where you have extracted the file.
8. Right-click on “WUReset” and then click on “Run as administrator” to run the batch file.

9. Simple press a key to execute the batch file on your computer.

10. Once executed, again you will be asked to “Press any key to continue…“, simply press a key to close command prompt window.

Restart your computer to save the changes on your computer. After rebooting your computer, your Windows should be updated without any further error. Your problem should be solved.
Fix-3 Run .cmd file on your computer-
Running a file with .cmd extension may work out for you. Follow these steps minutely-
1. Go to this website”SubInACL” on your computer.
2. Then, click on “Download“.

3 – Now, Install the downloaded SubInACL on your computer.
Note that , SubInACL is a free command-line tool to let you change permissions on windows syatem/
3. Now, in the desktop, right-click and then click on “New>” and then click on “Text Document“.
A blank text document window will be opened in Notepad.

4. Copy-paste these lines in the Notepad window.
Set OSBIT=32
IF exist "%ProgramFiles(x86)%" set OSBIT=64
set RUNNINGDIR=%ProgramFiles%
IF %OSBIT% == 64 set RUNNINGDIR=%ProgramFiles(x86)%
subinacl /subkeyreg "HKEY_LOCAL_MACHINE\SOFTWARE\Microsoft\Windows\CurrentVersion\Component Based Servicing" /grant="nt service\trustedinstaller"=f
5. In the Notepad window, click on “File” in the menu bar, and then click on “Save As…“.

6. In Save As window, choose a favorable location to save the file.
7. Set the ‘File name:‘ to “Fix.cmd“, and then in ‘Save as type:‘, choose “All Files“.
8. Finally, click on “Save” to save the file on your computer.

9. Go to the location where you have stored the file. Right-click on “Fix” and then click on “Run as Administrator“.
10. Click on “Yes” when you are prompted by User Account Control.

After running the file, reboot your computer.
After restarting your computer, try to update your computer. Your problem should be solved.
Fix 4 – Run SFC command
1 -Open elevated command prompt
2 -Run the command given below in the command prompt window.
SFC / SCANNOW
3 -Wait for some time to get it completed fully.
Fix 5 – Clean Boot your windows PC
1 -Search msconfig in windows saerch box.
2 -Now, click on System configuration from search result.

3 – Click on Services tab.
4 – Now, check option saying hide all microsoft sercies and click on disable all.
5 – Click Ok.
6 –Restart the System

After the PC restarts , just try again.