Windows Security Center helps to manage the different security options on a computer like Firewall, Antivirus, Maintenance, UAC, Internet Security Settings, and so on. Many Windows 11 / 10 users have reported encountering an error message that states :
The Windows Security Center service can’t be started.
When the user opens the Security and Maintenance in Control Panel, there is a message associated with Windows Security Center indicating that it is turned off. While trying to turn it on this error message pops up on the screen.
Are you also confronting this issue with Security Center? Then you have reached the right location. In this article, we have listed fixes that will help you resolve this error on your PC.
Fix 1 – Enable the Security Center Service
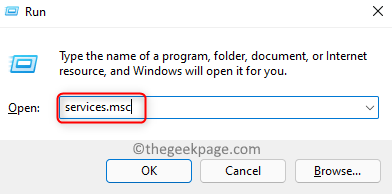
1. Just use the Windows and R keys to open the Run dialog.
2. Type services.msc and hit Enter to open Windows Services.
3. Locate the Security Center in the list of services.
Note: Since there is an issue, you will see that the service is Disabled in the Startup Type column.
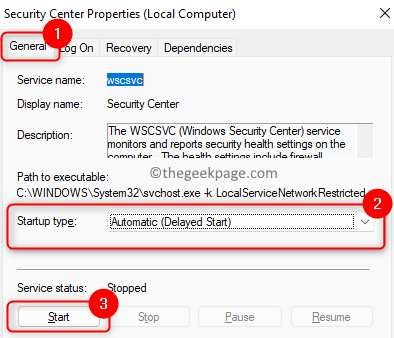
4. Double-click on Security Center to change its status.
Note: If all the available options in the Properties window for Security Center are greyed out and there is no way to start the service then move over to Fix 2 below.
5. In the Security Center Properties window, use the drop-down box associated with Startup type and select Automatic (Delayed Start).
6. Click on the Start button to start the service.
7. Click on Apply and then OK.
8. If the service doesn’t start, then go back to Services and locate Remote Procedure Call(RPC) and Window Management Instrumentation services.
9. Open their Properties, change the Startup type to Automatic (Delayed Start) and click on Start to start the service. Do this step for both the services mentioned in Step 8.
10. Click on OK to save the changes and exit the Services window.
11. Restart your PC and check whether Security Center is turned on and not showing any error.
Fix 2 – Modify Registry Entries
1. Press Windows + R to open Run.
2. Type regedit and click on OK to open the Registry Editor.
3. In the User Account Control prompt, click on Yes to continue.
4. Navigate or copy-paste the location below into the Registry’s navigation bar.
HKEY_LOCAL_MACHINE\SYSTEM\CurrentControlSet\Services\wscsvc
5. Right-click on the wscsvc folder in the left pane and click on Permissions to change the folder permissions.
6. In the Permissions window, select the group or user to who you want to give access in the list.
7. Check the box next to Full Control in the Allow Column to give permission to open, edit, and take ownership of the key to the selected user.
8. Click on Apply and then on OK.
9. Now back in the Registry with the folder wscsvc selected, move over to the right side and locate the DWORD named Start in the list.
10. Double-click on the Start key to modify its value.
11. In the Edit window, set its Value data field to 2 and click on OK.
12. Exit the Registry editor. Reboot your computer to get the changes into effect.
13. After startup, go to Security and Maintenance and check if the issue has been fixed.
14. If the issue has been fixed, then go to Security Center Service Properties using Steps 1 – 4 of Fix 1 and click on Start if the service is not started.
Fix 3 – Check Security Center is Running as Local Service
1. Open the Security Center service Properties using Steps 1 – 4 in Fix 1.
2. In the Properties window, select the Log On tab.
3. Here, select the option This account and click on the Browse button.
4. In the Select User window, type Local Service in the box below Enter the object name to select.
5. Click on Check Names and then on OK.
6. Now back in the Log On tab, type the password and confirm the password in the respective text boxes.
7. Click on Apply and then on OK.
8. Reboot your PC and check if the problem with Security Center is solved.
Fix 4 – Repair the WMI Repository
1. Open Run (Windows + R).
2. Type cmd and press Ctrl + Shift + Enter to open Command Prompt as an administrator.
3. Enter the command and execute it.
winmgmt /verifyrepository
4. If there are no issues, you will see a message WMI repository is consistent.
5. If you see a message WMI repository is inconsistent, then repair the WMI repository.
6. Open Command Prompt as administrator.
7. Type the below command and hit Enter.
winmgmt /salvagerepository
8. If this succeeds, then there is a message WMI repository has been salvaged displayed to the user.
9. Check if the issue is resolved.
Fix 5 – Run an SFC Scan
1. Hit the Windows key and type command prompt in the search box.
2. Right-click on Command Prompt and choose Run as administrator.
3. Type the command and press Enter.
sfc /scannow
4. Wait for the utility to run and check for any corruption. If any corruption is found, it will be repaired.
5. Restart your computer and check if the Security Center is running without showing any error.
That’s it!
Security Center must now be running on your Windows PC without showing the error that it can’t be started. Comment and let us know if the fixes were informative enough for you to solve this error.


