Many Windows users have reported instances of failures and errors while updating Windows 10. One of the common errors that users often face is the Windows 10 update error 0x80240061. There can be several reasons behind this error to show up. Here, we take a look at the solutions to fix the issue.
Fix 1: Make Sure Windows Update Service is Running
One of the services in Windows named Windows Update is responsible for updating the operating system. You will need to make sure if this service is running. Here’s how to do it:
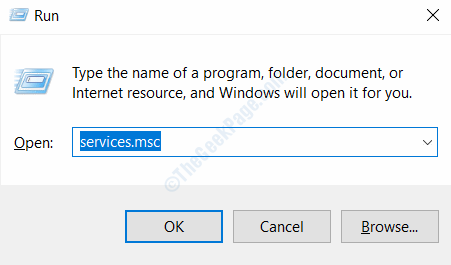
Step 1: Press Win + R to open the Run box. There, type services.msc and click on the Ok button.

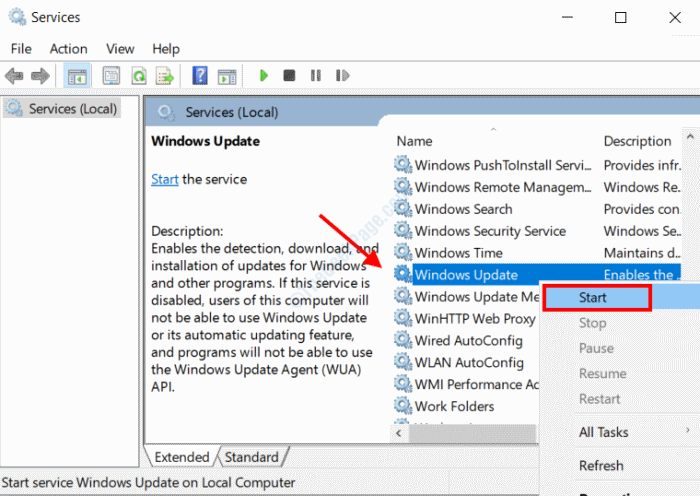
Step 2: The Services window will open. Here, scroll down the list of services and look for Windows Update. When found, right-click on it and press the Start button. If it is already running, click on the Restart button.

Once done, close down the Services window and try to update Windows again. If the issue wasn’t fixed, try the next solution.
Fix 2: Run Windows Update Troubleshooter
The Windows Troubleshooter is an in-built tool to identify and fix various issues that may occur on your PC. One of the sub-tools of the Troubleshooter is the Windows Update Troubleshooter. Follow the steps to run it:
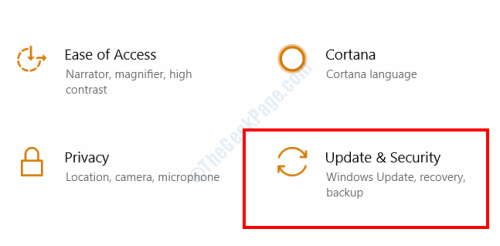
Step 1: Press Win + I keys together to open the Settings app in Windows. In the Settings app, click on the Update & Security option.

Step 2: In the new window, select the Troubleshoot option from the left pane. Then, from the right pane, select the Windows Update option, then click on the Run the troubleshooter button.

Now, let the troubleshooter look into the possible issues. In case, any issue is found, the troubleshooter will try to fix it on its own. Once the troubleshooter has finished scanning and fixing the issue, restart your PC and try to update Windows.
Fix 3: Reinstall Most Recent Servicing Stack Update
You also may want to reinstall the most recent Servicing Stack Update or Windows Update in order to fix the issue. Before you uninstall the update and reinstall, you will need the Windows Version updated on your PC and the Update Version. After that, you will need to download the latest SSU and install on your PC.
Find Windows Version
Step 1:Open the Settings app by following the steps in Fix 2 > Step 1, but instead of selecting the Update & Security option, select the System option.
Step 2: Now, from the left pane, select the About option, then view the Windows update version on the right pane. The Windows version on my PC is 1903.

Finding out the Update Version
Step 1: Open, the Start menu, then type Control Panel in the start search box. From the results, open the Control Panel option.
Step 2: In the Control Panel, click on the Uninstall a program text in the Programs option.

Step 3: On the next window, click on the View installed updates option.

Step 4: From the list of updates that will appear, view the name of the latest update under the Microsoft Windows category. Here, the name is KB4565351.

Step 5: As an additional step, select the latest update, then click on the Uninstall button. Follow on-screen instructions and uninstall the latest Windows update.

Download and Install Latest SSU
Step 1: Visit the Microsoft Update Catalog website. In the search box, type the Windows Update Version and perform a search. You will view a list of updates. There, look for the update with the Windows Version installed on your PC. My PC’s version is 1903 and it is an x64 based system, so I will download the version highlighted in the screenshot below.

Note: Make sure to select an update with the same Windows version as your PC and system architecture. x64 architecture is usually for PCs and ARM64 architecture is usually for mobile devices like tablets. To find out, right-click on the This PC icon on the desktop, then select Properties. You will be able to view the information under the System > System type section.
Step 2: While downloading the update, click on the Open button. Once the update has been downloaded, it will be installed on your PC.
Fix 4: Clear Windows Update Temporary Cache
Another method that you can try to fix the Windows Update Error 0x80240061 is clearing off the Windows Update temporary cache. Follow these steps:
Step 1: Press the Win + R keys together. In the Run box that opens, copy and paste the following text, then press Enter:
%windir%\SoftwareDistribution\DataStore
Step 2: A folder containing the temporary Windows update data will open. Press Ctrl +A to select all files, then press Shift + Del to delete all the files from the folder. After doing so, run the Fix 1 again to restart Update Service.
Now, see if the error still shows up.
Fix 5: Run SFC Scan
SFC Scan is a command-line tool that scans for faulty and corrupted files in your PC, then fixes them.
Step 1: Click on the Start button and type cmd in the search box. Then, from the search results, right-click on the Command Prompt search result and select the Run as Administrator option.

Step 2: In the Command Prompt window that opens, type the following command and press the Enter button:
sfc/ scannow
Let the scan run. Once done, restart your PC and check if the Update Error 0x80240061 still persists.
Fix 6: Run DISM Scan
Here’s another command-line tool that you can run in order to fix this Windows 10 update issue.
Step 1: Open Command Prompt in Admin mode as shown in the above method.
Step 2: In the Command Prompt window, type the command given below and press Enter:
DISM /Online /Cleanup-Image /RestoreHealth
The DISM scan may take a while to run, so wait till the scan is over. Once done, reboot your PC.
Fix 7: By Updating Intel Management Engine Interface Driver
You can update the Intel Management Engine Interface driver on your PC in order to get rid of the update error 0x80240061 in Windows 10.
Step 1: Press the Win + X keys simultaneously on your keyboard, then from the menu that opens, select the Device Manager option.

Step 2: When the Device Manager opens, from the list of devices, select the System Devices option to expand, then from the menu, right-click on the Intel(R) Management Engine Interface and click on the Update Driver option from the menu.

Step 3: Now, from the next screen, you will have to select the Search automatically for updated driver software option. If an updated version of the driver is found, the update process will begin. After the update, go ahead and restart your PC. Now check if the issue has been resolved.
Fix 8: Update BIOS
You can also try to update the BIOS of your PC in order to get rid of the 0x80240061 error. The BIOS upgrade is quite a complicated and advanced process and must be carried out very carefully. A single wrong step and your PC might be rendered useless because of it.
In order to carry out BIOS update, you must check out the manual of your PC’s motherboard. The steps to update BIOS and carry out various operations in there differ a lot from different manufacturers.
Fix 9: Perform an In-place Windows Upgrade
The in-place Windows Upgrade process lets you download Windows Installation Media on your PC in order to perform an update. Once the update is done, it would have served the purpose of Windows update, and most likely, you would not be getting the Windows update error 0x80240061.
Follow the steps below:
Step 1: Go to the Windows 10 Download website and click on the Download Tool Now option.
Step 2: Once the download is complete, click on the Run option on the downloaded file.
Step 3: The Windows 10 Setup window will open on your PC. Here, after clicking on the Accept option, select the Upgrade this PC now option, then click on the Next button.

Step 4: Now, proceed with the on-screen instructions to carry out Windows update on your PC. This will include selecting the Keep Personal Files and Apps option on the Choose what to keep screen.
Do note that it is a time taking process, so be patient. Once the upgrade is complete, your issue will be fixed.
Fix 10: Clean Reinstall Windows
Hopefully, the previous solutions will help you get rid of the issue for sure. However, if none of the above solutions worked for you, you will need to carry out a fresh Windows 10 installation on your PC in order to fix the Update Error 0x80240061. A fresh installation will wipe out all the data, apps, and software on your PC memory and freshly install Windows.
In order to do so, FOllow the steps provided in Fix 9 till step 3, then select the Nothing option on the Choose what to keep screen.
We also suggest you take a backup of your personal and important files present on your PC before you go ahead with the Clean Reinstall of Windows.