Many of the Window users have reported that out of blue, the wi-fi icon on their system has been disabled or greyed out, leaving the users unable to change the wi-fi settings or wi-fi options from the available list. This can be quite frustrating to those users who are solely dependent on Wi-Fi and are not having any other internet options such as USB tethering, LAN connection (Ethernet).
There can be many factors which are responsible for this issue and we have mentioned a few of them below:
- Outdated Wi-Fi Driver
- Disabled Wi-Fi adapter Manually by mistake
- Network issue within system
- Windows is not updated.
Therefore, keeping in mind all the above points, we have compiled a few of the fixes which are mentioned below in this post that will surely solve your problem.
NOTE: We highly recommend the users to create a restore point on their system before proceeding with the solutions. It is always a best practice to create restore point periodically if it there are no points available.
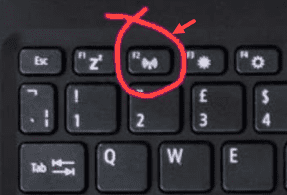
Fix 1 – Locate any WiFi or Networ key on your Laptop
Many laptop manufacturers place a Network enable and disable key or button on your laptop. Look closely in the keyboard or at the side of the laptop. If there is any Newtork icon, press that once and check again.

Fix 2: Make sure WLAN AutoConfig Service is Enabled
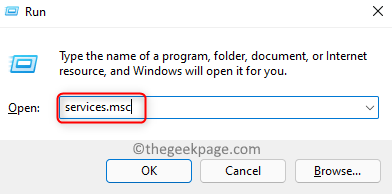
Step 1: Press Windows + R keys together on your keyboard to open Run dialog box.
Step 2: Then, type services.msc in the Run box and hit the Enter key to open Services window as shown below.

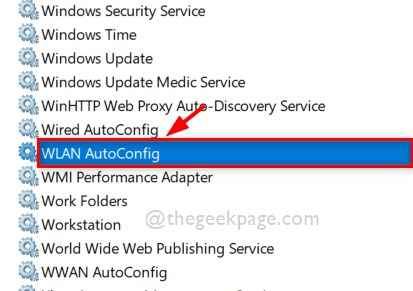
Step 3: In the Services window, Scroll down the list of services and locate WLAN AutoConfig Service at the bottom.
Step 4: Double-click on it to open its properties window.

Step 5: Then, Make sure Startup type is selected as Automatic.
Step 6: If the service is stopped, then click Start button as shown in the below screenshot.
Step 7: Click OK to reflect the changes and close the properties window.

Step 8: Once done, Close the Services window.
Now check if the Wi-Fi icon is activated so that it can be accessed on your system.
If this fix does not work for you, then check out our other solutions given below.
Fix 3: Reinstall Wi-Fi Network Adapters using Device Manager
Step 1: Press Windows key on your keyboard and type device manager and then, select the Device Manager from the search results as shown below.

Step 2: This opens the Device Manager window on your system.
Step 3: Double click Network Adapters options to expand it from the list of devices given in the device manager,.
Step 4: Now, right click on the Wi-Fi adapter and click Uninstall device option from the menu as shown in the below screenshot.

Step 5: After it is done, Click on Action and then click on Scan for hardware changes

it will reinstall the wifi driver on your system again. check if the issue is resolved.
Hope this should solve the issue.
Fix 4: Check if Wi-Fi adapter is disabled
Step 1: Open Run command box by pressing Windows + R keys together on your keyboard.
Step 2: Type ncpa.cpl in the run box and click OK to open the Network Connections page as shown below.

Step 3: In the Network Connections page, Check for Wi-Fi network adapter listed there.
Step 4: See if it is disabled or enabled.
Step 5: If it is disabled by mistake or for some other reasons, Right click on the Wi-Fi adapter.
Step 6: Then, Select the Enable option from the context menu as shown in the below screenshot.

Step 7: Once it is enabled, check if the Wi-Fi icon is accessible for you or not.
Hope this should solve the issue. If not, check the other fixes given below.
Fix 5: Disable the Airplane Mode
Sometimes, we are unaware of Airplane mode being activated for some obvious reasons, which will not let the users to access all the network conenctions on their system. Therefore it is better to check if the Airplane mode is activated or not. If it is enabled, please disable it and see if the Wi-Fi icon again appears on your system. Please follow below given steps on how to do it.
Step 1: Press Windows + I keys simultaneously to open Settings app on your system.
Step 2: Then, Click Network & Internet option on the left side menu of Settings app.
Step 3: After selecting Network & Internet, on the right side check for Airplane mode option.
Step 4: If it is enabled, then click on Airplane mode toggle button to turn it Off as shown in the below screenshot.

Step 5: After it is disabled, Close the Settings app and check if the Wi-Fi icon appears on your system.
Hope this resolved the issue.
Fix 6: Run Network Adapter Troubleshooter on your system
Step 1: Press Windows + R keys together on your keyboard that opens up the Run box.
Step 2: Next, type control.exe /name Microsoft.Troubleshooting in the run box and click OK to open Troubleshoot page directly on Settings app as shown below.

Step 3: Then, Click Other troubleshooters option from the page as shown below.

Step 4: Scroll the page and click on Run button of the Network adapter as shown below.

Step 5: Since we are trying to troubleshoot the WiFi issue, so select Wi-Fi radio button and click Next to proceed with the network adapter troubleshooting as shown in the below image.

Step 6: Then, follow the on-screen instructions to carry out the troubleshooting which ultimately tries to fix the issue.
Step 7: Once done, Check if the Wi-Fi icon appeared again on your system.
That’s it. Hope this fixed your issue.
Fix 7: Restart the Windows Explorer
Step 1: Open Task Manager by pressing CTRL + SHIFT + ESC keys together on your keyboard.
Step 2: If it opens in a compact view, then click More details button at the bottom of Task Manager.

Step 3: In the Task Manager, make sure Processes tab is selected.
Step 4: Then, right click on Windows Explorer and select Restart option from the context menu as shown in the below screenshot.

Step 5: This will restart the windows explorer.
Now check if the Wi-Fi option appeared again on your system.
Fix 8: Delete Iconstreams and PastIconStream registry keys using Registry Editor
Step 1: Press Windows + R keys together to open Run command box.
Step 2: Then, type regedit in the run and press Enter key to open Registry Editor on your system.
NOTE: Kindly accept the UAC Prompt by clicking Yes to continue.

Step 3: Copy and paste the following path in the address bar and hit the Enter key to reach the TrayNotify registry key as shown in the below screenshot.
HKEY_CURRENT_USER\Software\Classes\Local Settings\Software\Microsoft\Windows\CurrentVersion\TrayNotify
Step 4: Make sure TrayNotify is selected on the left side of the Registry Editor window.
Step 5: Then, on the right side of the window, select both the IconStreams and PastIconStreams binary values by holding the CTRL key pressed.
Step 6: Now, right click on them and select Delete option from the context menu as shown below.

Step 7: Click Yes on the Confirm Value Delete window as shown below.

Step 8: Close the Registry Editor and restart your system.
Step 9: After the system opens up, check if the issue is solved.
Fix 9: Enable WIFI in BIOS
It may have happened that WiFi has been disabled in your BIOS. Boot into bios and locate wifi settings and enbale it.

That’s it.
Hope you found this article helpful.
Please leave us comments below to let us know which fix helped you in resolving the issue.
Thank you!