Are you seeing a stop code ‘WHEA_UNCONTROLLABLE_ERROR’ during a blue screen of death event on your computer? In an unexpected turn of events, when your computer suddenly reaches a potential data-loss situation, it shows the specified error code and crashes into BSOD.
Fix 1 – Check for updates
Sometimes this problem occurs due to faulty Windows Update. Microsoft release patches to tackle these crash issues.
1. At first, click on the “Windows icon“.
2. Then, you need to click on the gear-shaped icon to access the Settings.
![]()
3. Then, click on the “Update & Security“.

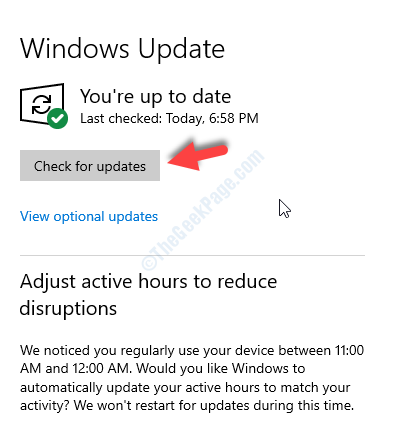
4. On the right-hand click on the “Check for updates” to check for recent updates.

Wait for Windows to install the update on your system.
Fix 2 – Try updating the graphics driver
Updating the graphics card driver should fix the issue.
1. Press the Windows key+X, and then click on the “Device Manager“.

2. When the Device Manager opens up, click on the drop-down list of the “Display adapters“.
3. After that, you need to click on the “Update driver“.

3. Just click on “Search automatically for updated driver” to let Windows search for the driver on your device and the Internet.

You need to simply for a while to finish this process.
This should fix your problem.
Fix 3 – Update any disabled driver in Safe mode
1. At first you need to write “Advanced Startup” in the search box.
2. Then you need to click on the “Change advanced startup options” in the search result.

3. After that, you need to click on the “Restart Now” option on the right-hand side of the screen.

4. Once your system goes into Recovery mode, you need to click on “Troubleshoot“.

4. After that, what you simply need to do is to click on “Advanced options“.

5. Then, click on the “Startup Settings“.

6. Then, click on “Restart” on the bottom-left corner of the corner.

7. You need to press the ‘F4‘ key to “Enable Safe mode “.
As soon as you press the F4 key, your system will boot into the safe mode.

In safe mode, your computer should appear black, ‘safe mode’ written at four corners of your screen.
8. After that, type “devmgmt” and press ‘Enter‘ to access the Device Manager.

9. After you have opened the Device Manager, check for any driver containing a yellow triangle (⚠️) or a red mark along with its name.
10. Right-click on it and then click on “Update driver” to update those drivers.

Once you have updated all the drivers, restart your computer normally.
This should fix your problem on your computer.
Fix 4 – Reset your BIOS settings
Updating your BIOS settings will fix this issue on your computer.
1. At first, press Windows key+I.
2. Then you need to click on the “Update & Security“.

3. After that, click on the “Troubleshoot“.
4. Then, you need to click on the “Restart Now“.

5. Soon you have to click on the “Troubleshoot“.

6. After that, choose the option “Advanced options“.

7. In the list of options, click on the “UEFI Firmware Settings“.

8. After that you need to click on the “Restart“.

9. When your system configuration appears, go to the “BIOS” section.
10. Inside the BIOS settings, click on the “Advanced tab“.
11. After that, click on the “Performance“.
12. Then, set the “Overclocking” to “Disabled“.
Save your changes. Restart your system back to normal again.
This should fix the issue you are facing the problem with.
Fix 5 – Run a System Restore
1. Type “Advanced Startup” in the search box.
2. After that, click on the “Change advanced startup options” in the elevated search result.

3. Under the ‘Advanced startup’ section, click on the “Restart Now” option.

4. Your device will boot into the Recovery mode where you need to click on “Troubleshoot“.

5. Once you have reached the ‘Troubleshoot’ page, click on the “Advanced options“.

6. After that you have to find the ‘System Restore‘ in the ‘Advanced options’ window.
7.When you see it, click on “System Restore” to start the system restoration process.

8. As the System Restore window appears, click on “Next“.

9. Now you will notice multiple restore points based on multiple dates. Select the one which is the latest.
10. Click on “Next“.

11. Click on “Finish” to finish the process.
After you have clicked on the ‘Finish’ option, the restoring process will start with your system boot.

Once it has finished, your system will work normally again.