Microsoft keeps rolling out updates for Windows 10 and windows 11 every now and then. Although the updates are meant to boost security, add new features, fix bugs, and enhance the overall experience, these can at times land your PC into trouble. Windows 10 Update issues are quite common, and one of these issues is the We couldn’t complete the updates, undoing changes error.
According to users, when an update is initiated, it goes on till 100%, but isn’t executed successfully and ends with an error message that says “We couldn’t complete the updates, undoing changes”. Now, there could be several reasons behind this error showing up while carrying out an update. A faulty update rollout and corrupt system files are among the main reasons behind this issue.
In this article, we take a look at all the possible solutions that you can try to get rid of this issue.
Solution 1: Uninstall recent windows update
First of all Boot in Windows Safe Mode
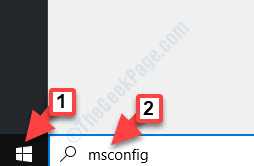
Go into safe mode in windows 10 by searching msconfig in windows 10. Now, click on msconfig to open it.

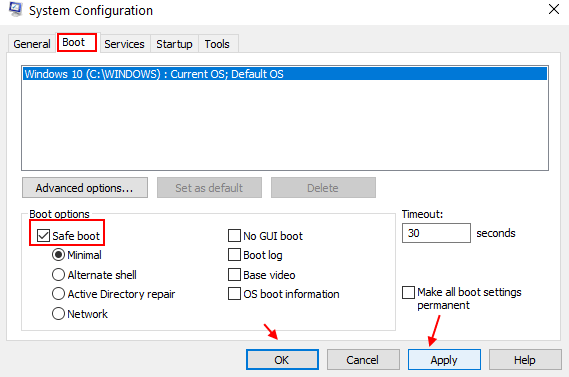
Now, click on boot and check safe boot option and click on Apply.

What if you are Unable to Boot into Windows 10?
It may happen that you will be stuck in an endless loop where your PC will show the above error message, and when you try to reboot the PC, it will begin the update process all over again, and so on. In such a scenario, you will need to boot Windows 10 into Safe Mode. Once you enter the Safe Mode, you will be able to troubleshoot and get rid of the issue by trying out the methods below.
How to Boot in Windows 10 Safe Mode when you can’t boot normally
You can enter the Safe Mode in Windows 10 by following the steps provided here:
1. Make sure your computer is OFF.
2. Then, start your computer by power button.
As soon as something appears on screen, just press and hold the power button for 5 secs to force shutdown your device.

3. Keep repeating this process of 2–3 times until you see Automatic repair screen.

4. Then, click on “Advanced options“.

5. After that, you need to click on “Troubleshoot“.

6. Then, click on the “Advanced options“.

7: Now, from the next set of options, select the Startup Settings.

8: In the Startup Settings screen, go ahead and select the Restart button.

Step 6: Your PC will restart now. You will enter the Startup Setting screen with options to select. Here, select the Enable Safe Mode option by pressing the 4 key.

After you have made the above selection, your PC will restart again. This time, you will be able to boot into Windows 10, but in Safe Mode.
When in Safe Mode try these solutions.
Once you boot into Safe Mode, the next step is uninstalling the last Windows Update on your PC. A faulty update could be triggering this issue.
Step 1 – Press Windows key and R key together from keyboard to open RUN command box
Type appwiz.cpl in it and click OK

Step 3 – Now, Click on View Uninstalled Updates from the left menu.

Step 4: Now, Control Panel will open with a list of Windows updates. Here go to the Microsoft Windows section, select the first update from the list, and click on the Uninstall option.

Once the Update is uninstalled, your PC will need to restart. After the restart, the issue will be fixed.
Solution 2: Delete software distribution folder
The first thing you should try is disabling the Windows Update Service. You can do it easily with the help of Command Prompt. Here’s how:
Step 1: Search services in Windows 10 search box.
Step 2: Click on services to open service manager window.

Step 3: Now, Locate Windows update from the list. Right click and Click on stop to stop the service, if its running.

Step 4: Close down the Command Prompt screen and open File Explorer. In File Explorer, go to the following folder location: C:\Windows\SoftwareDistribution
When in the Software Distribution folder, select all the files available there and delete them.

Step 5: After deleting the files, close down File Explorer and open service manager window again.
Step 6: Locate windows update again.
Step 7: Right click and choose start.

Now, try updating again.
Solution 3: By Running DISM Scan
The DISM scan is a command line utility that can be used to fix various issues. In order to get rid of the We couldn’t complete the updates, undoing changes error in Windows 10, run this scan.
Step 1: Run Command Prompt as Administrator. For this, press Win + S and in the search box type cmd. Go to the search results, right-click on Command Prompt and select Run as administrator.

Step 2: Copy and paste the command given below in Command Prompt and press the Enter key:
Dism /Online /Cleanup-Image /RestoreHealth
Once the command runs successfully, close Command Prompt and restart your PC.
Solution 4: By Running SFC Scan
Another Command Prompt utility, the SFC scan looks for corrupt files in your PC and fixes them. Let us find out how to:
Step 1: Run Command Prompt with admin privileges. Press Win + S and enter cmd in search panel that will open. Make a right click on Command Prompt from search results and select Run as Administrator.

Step 2: Type the following command in the Command Prompt screen and hit Enter key:
sfc /scannow
When the scan is complete, exit Command Prompt window and give your PC a restart.
Solution 5: Use the Windows Update Troubleshooter
Window’s in-built tool, the Windows Update Troubleshooter can help you fix issues related to Windows 10 updates on your PC. Let us checkout how to use it.
Step 1: Open Updates & Security Settings. For this, press Win + I and in the Settings menu select Update & Security.
Step 2: In the next window, go to the left pane and select the Troubleshoot option. Now make a click on the Windows Update option on the right pane and select the Run the Troubleshooter button.

As the troubleshooter begins the diagnostics, follow the on-screen instructions to complete the process.
Restart your computer after it and check if the issue persists.
For Windows 11 users
1 – Search troubleshoot settings in Search box and click on the search result.

2 – Now, Click on Other troubleshooters.

3 – Now, Run Windows update troubleshooter from there.
Solution 6: By Renaming Software Distribution Folder
The Distribution Folder in Windows stores all the temp files required for Windows update. By renaming it, you will force Windows to create a new Distribution Folder from scratch and free your PC from issues that may be arising from the renamed folder.
Step 1: Open Command Prompt in Admin mode. The procedure has been discussed above already.
Step 2: In Command Prompt window, type the commands provided below and press Enter key after typing each of the commands:
net stop wuauserv
net stop bits
rename C:\Windows\SoftwareDistribution C:\Windows\SoftwareDistribution.bak
net start wuauserv
net start bits
After running these commands, you can initiate Windows Update and see if you are able to carry it out successfully.
Solution 7: By Starting the App Readiness Service
If the App Readiness service is not running, you may be getting the We Couldn’t Complete the Updates/Undoing Changes error in Windows 10. Make sure that the App Readiness service is running.
Step 1: Open the Services window by pressing the Win + R keys and typing services.msc in the Run box that opens. Press the Ok key.
Step 2: From the list of services you see in the Services window, locate App Readiness service. Select the service and click on the Start option.

Once the App Readiness service is up and running, try to update Windows 10.
Solution 8: Perform a System Restore
System Restore is a tool offered by Microsoft in Windows that lets you restore your PC back to the settings from a previous date without hampering your files. By performing a System Restore, our aim in this method will be to restore your PC to a point where it was working fine and you were able to update Windows 10 without any issue.
Do mind that you will only be able to carry out a system restore on your PC if you have created a restore point earlier. If you haven’t, then you will not be able to carry out this process. However, I suggest you to give the method a try anyway, even if you do not remember creating one; there might be one on your system.
You can checkout here how to perform System Restore on Windows 10.
After successfully performing a System Restore in your PC, you can try to carry out Windows 10 Update.
Solution 9: Enable Metered Connection to Block Updates
If you are facing the same issue over and over again with the updates, then there must be something wrong with the update patch. In this scenario, all you can do is deter the update by enabling Metered Connection in Windows. This will hold Windows from updating your PC automatically. Once a new update is available, you can disable the metered connection back and update Windows 10.
Step 1: Go to right bottom corner of your screen and make a right click on the network icon, then select the Open Network and Sharing settings option.

Step 2: Now, select the icon of the network you are connected to. On the next screen, toggle the button below Metered connection to switch it on.

Closing Words
I hope the above solutions helped you getting rid of the We Couldn’t Complete the Updates, Undoing Changes error in Windows 10. If you have any queries, feel free to let us know in the comments section.