VPN or Virtual Private Network provides an extra layer of anonymity to its users as it is tough to identify the real-time location when someone uses a VPN. But while working with a VPN, you may see an ‘Error Code-789’ with a remote access error message. No need to worry. Simply follow these easy fixes to solve your problem.
Workarounds to try initially-
1. If this is the first time this is happening, reboot your computer.
2. Disable or remove the antivirus software you are using on your computer.
Fix-1 Modify registry-
Modifying the registry on your computer may solve the problem.
IMPORTANT–
You have to click on “File” > “Export” to create a backup of your existing registry. You can retrieve your registry back to its original form if any case you face any issue with the Registry.
1. What you need to do at first is to press the Windows key along with the ‘S‘ key. Now, type “regedit“.
2. Then a simple press on the ‘Enter‘ key and you will see the Registry Editor has appeared on your screen.
3. Then go this way-
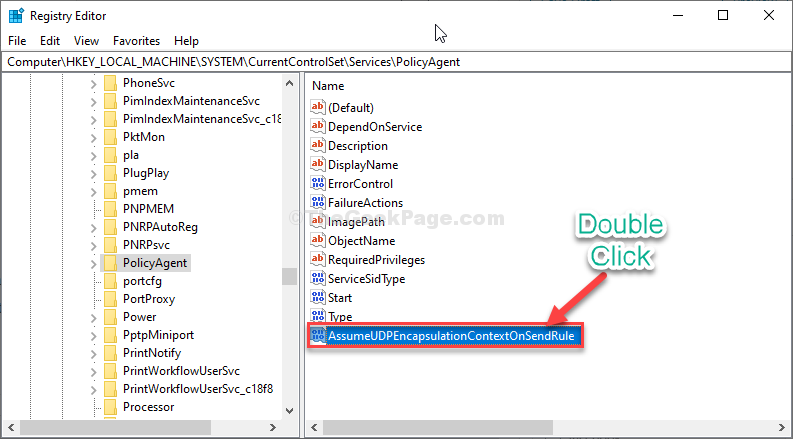
Computer\HKEY_LOCAL_MACHINE\SYSTEM\CurrentControlSet\Services\PolicyAgent
4. On the right-hand side, right-click on space and then click on “New>” and then click on “DWORD (32-bit) Value“.

5. Now, right-click on “New Value #1” and then click on “Rename“.
6. Set the name as “AssumeUDPEncapsulationContextOnSendRule“.

7. Now, double click on the “AssumeUDPEncapsulationContextOnSendRule” value to modify it.

8. Set the ‘Value data:‘ to “2“.
9. Then, click on “OK“.

Close the Registry Editor window.
Fix-2 Restart and automate necessary services-
Resetting the necessary services on your computer will solve the issue.
1. Click on the Windows key. Then, start to write “services“.
2. After that, you need to hit Enter.
3. Double click on the “IKE and AuthIP IPsec Keying Modules” service.

4. Now, click on “Start” to start the service.
5. Now, click on the drop-down menu and select “Automatic“.

6. Then click on “Apply” and click on “OK“.

7. Scroll down to find the “IPSec Policy Agent” service.
8. Right-click on “IPSec Policy Agent” and then click on “Restart” to start the service.

8. Now, double click on the “IPSec Policy Agent” service to change its settings.

9. Now, click on the drop-down beside the ‘Startup type:‘ and then select “Automatic“.
10. If the service is yet to start, click on “Start” to start the service.

11. To save this change, click on “Apply” and click on “OK”

Close Services window.
Now, restart the VPN service. It should function normally.