Have you been experiencing this issue where your PC volume automatically goes up/down in Windows 10 till it gets mute? Well, this is an error that has been troubling many users off-late. Many users have been reporting that whenever they are listening to music or have more than one tab/windows open that produces sound, the volume gets adjusted automatically, without any manual intervention. It can also go upto 100% automatically.
While this can be really annoying, the good news is, we can fix the issue. Let’s see how.
Method 1: Through Communications Tab
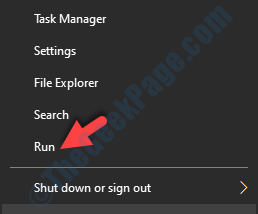
Step 1: Go to the Start button on your desktop and right-click on it. Select Run from the context menu.

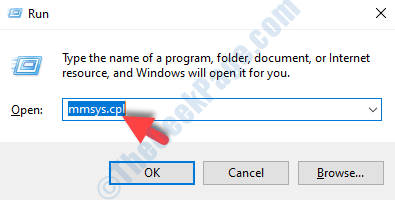
Step 2: In the Run command, type mmsys.cpl in the search field and press OK.

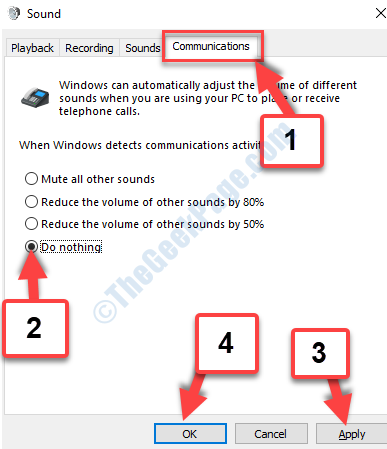
Step 3: Now, in the Sound window that opens, select the Communications tab and select the radio button next to Do nothing.
Press Apply and then OK to save the changes and exit.

Now reboot your PC and the volume should be fine. If the problem persists, try the 2nd method.
Method 2: Via Sound Properties
Here, we have to disable all enhancements for headphone in the sound properties.
Step 1: Follow Step 1 and Step 2 from Method 1 to open the Sound dialog box.
Go to Start > right click > Run command > mmsys.cpl > OK

Now, select the Playback tab, select the playback device that’s causing the issue, and click on the Properties button at the bottom.
For instance,the issue can be with either the Speaker, Headphone, or the Microphone.
Step 2: In the Properties dialogue box, select the Enhancement tab and check the box next to Disable all enhancements.

Press Apply and then OK to save the changes and exit.
*Note – If the the speaker or headphone settings of your system comes with the Immediate Mode, make sure to check that box also.
Now, reboot your PC for the changes to be effective and your volume issue should be resolved now. If the issue is still there, follow the 3rd method.
Method 3: By Switching to Generic driver
Step 1: Press the Windows + X keys together on your keyboard to open the context manager. Select Device Manager from the menu.

Step 2: In the Device Manager window, scroll down to find Sound, video, and game controllers. Click to expand it. Now, select the audio device, right-click on it and click on Update driver.
Here, we selected Realtek Audio and right-clicked on it.

Step 3: In the Update Drivers window, click on Browse my computers for drivers.

Step 4: In the next window, click on Let me pick from a list of available drivers on my computer.

Step 5: Next, go to Model and select the generic driver from the list .
Click on Next.

The High Definition Audio Device driver will now be installed. Restart your PC for the changes to be effective. This should fix the volume issue, but if not, follow the 4th method.
Method 4: By Uninstalling Drivers and then Reinstalling Them
Step 1: Open the Device Manager window as shown above in Method 3 > Step 1.
Now, go to the Sound, video and game controllers section again and expand it. Right-click on Realtek Audio and select Uninstall from the context menu.

Once it’s uninstalled, restart your PC. The drivers will be automatically installed as the Windows is starting up. This should fix the error, but if not, then follow the 5th method.
Method 5: By Turning Off Dolby Digital Plus Audio
This method is for those who are using a Dolby Digital Plus supported device.
Step 1: Follow Step 1 and Step 2 from Method 1 to to reach the Sound dialogue box. Now, under the Playback tab, select the sound device that’s getting adjusted automatically and click on the Properties button at the bottom.
Step 2: In the Properties window, go to the Dolby tab and press the Power button next to the brand name (Dolby Digital Plus) to turn it off.
Now, reboot your Windows 10 PC and now the issue where your PC volume automatically goes up/down in Windows 10 should be resolved. But, if it’s still the same, try the 6th method.
Method 6: By Running the Troubleshooter
Step 1: Press the Win + R keys together on your keyboard to open the Run command. Now, type control panel and press OK.

Step 2: In the Control Panel window, type Troubleshooting in the search field and hit Enter. Now, click on Troubleshooting.

Step 3: In the next window, click on View all on the left side of the pane.

Step 4: In the next window, under Name, find and select Playing Audio. Right-click on it and select, Run as administrator.

Step 5: Next, click on Advanced and then press Next.

Step 6: Now, follow the instructions and wait for the troubleshooter to complete detecting and fixing the issue.

This should fix the volume issue,. But, if you are still seeing the error, follow the 7th method.
Method 7: By Identifying If It Was Due To An External Issue
Many times, you may not even realize, the issue may lie not in your system hardware, but in the external devices. For instance, the volume maybe automatically going up/down due to a key that got stuck in your keyboard, or due to the mouse wheel. Yes, that’s possible, and so, it’s better for you to double-check if the external devices are causing any issues.
You may be using the external mouse (with wheels) to increase or decrease the volume, and you never known, it might well be driver or mechanical issue related to he driver that may be causing the issue. All you can do is to unplug the USB mouse, and reboot your Windows 10 PC, and this should fix the problem.
Alternatively, the culprit can also be the volume key on your keyboard that might have somehow got stuck. It can also be a stuck key on your monitor, if using monitor connected with speakers. So, make sure to check all these possibilities.
All the above methods are tried and tested, and they should fix the issue related to PC volume automatically goes up/down in Windows 10. However, if none of the above methods work, check on the audio card you are using in your system. Check if it’s not damaged and is plugged in, in the correct manner. Many times, even that can be the possibility.