Millions of people depend on MS Outlook to send and receive Emails. In many organizations, Outlook is integrated with the office software stack and is of utmost importance. Anything that hinders the seamless working of Outlook hinders the overall productivity. One such major issue faced by Outlook users is the issue with opening Outlook mail attachments. This issue can be caused by a variety of reasons.
In this article, we have covered the major reasons why this issue could be happening to your Outlook and what you should do to get this issue fixed in a matter of seconds. So what are you waiting for? Jump straight in, to get rid of this Outlook issue once and forever. Hope you enjoy reading!
Solution 1: Clear the Temporary Internet Files from OutlookSecureTempFolder Folder
Whenever you try to open an attachment from Outlook, it gets automatically stored in the OutlookSecureTempFolder temporary folder. One of the main reasons why you might not be able to open the Outlook attachments could be because the OutlookSecureTempFolder temporary folder has run out of space. If this is the reason why you are unable to open an attachment in Outlook, the quickest solution would be to free up space in the OutlookSecureTempFolder folder. Let’s now find out where this folder is located and how you can free its space in the coming steps.
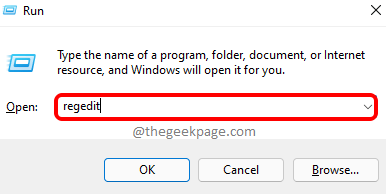
Step 1: Bring the Run window up, by pressing the WIN + R keys together. Once the Run window comes up, type in regedit and hit the Enter key.
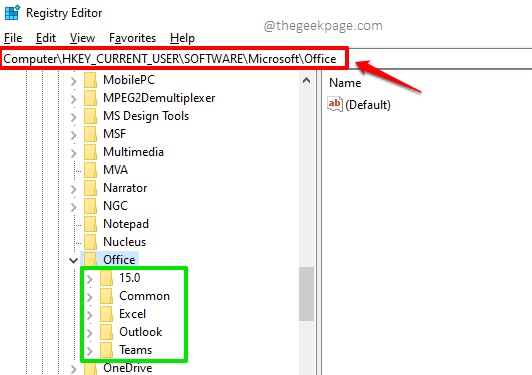
Step 2: When the Registry Editor window opens before you, copy and paste the following location on the Registry Editor navigation bar.
Computer\HKEY_CURRENT_USER\SOFTWARE\Microsoft\Office\
Now on the left side of the window, you will be able to view the folder structure of the Office folder, which is marked in green in the screenshot below.
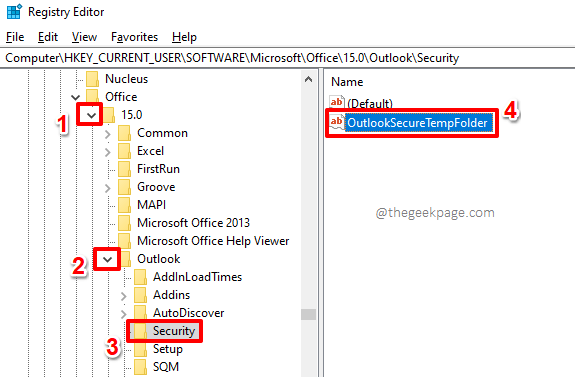
Step 3: As next, click on the expand arrow icon associated with the version of Outlook that you are using. Then expand the Outlook folder under it. Finally, under the Outlook folder, click on the folder named Security.
Now on the right side of the window, you should be able to see a data value by the name OutlookSecureTempFolder. Double click on it to view its contents.
Important Note: If you cannot find the above folder, then you may try the location HKEY_CURRENT_USER\Software\Policies\Microsoft\Office\<version>\Outlook\Security instead.
Step 4: On the Edit String window, select and copy the value present in the Value data field.
Step 5: As next, open File Explorer.
For that, you can right click on the Windows Start Menu icon and choose the File Explorer option from the list of options that get expanded out.
Step 6: Now, click on the navigation bar of the File Explorer, paste the location you copied in Step 4, and then hit the Enter key.
As next, delete all the files present in the location. That’s it.
Try restarting Outlook once and check if your issue is resolved or not. If not, please head on to the next method.
Solution 2: Delete System Temporary Files
Another quick fix that many users have reported to be working for them is deleting the system temporary files. Let’s see how this can be done in the steps below.
Step 1: Open the Run window by pressing the WIN + R keys together. Once the Run window is open, type in or copy and paste the following run command to open the temporary files folder.
%temp%
Hit the Enter key once done.
Step 2: When you are at the temporary files folder, press the keys CTRL + A together to select all the files and folders present inside it.
As next, right click anywhere on the selected range of cells and then click on the Delete option from the right click context menu.
Step 3: If you get the Folder Access Denied window as follows, simply tick the checkbox corresponding to the Do this for all current items and then click on the Conitnue button to proceed the delete operation with admin rights.
Step 4: As next, let’s delete the files from the recycle bin as well. For that, once again, bring up the Run window by pressing the WIN + R keys simultaneously. To open the Recycle Bin, copy and paste the following command onto the Run window. Once done, hit the Enter key.
shell:RecycleBinFolder
Step 5: When the Recycle Bin opens before you, click on the Recycle Bin Tools tab from the top ribbon.
As next, under the Recycle Bin Tools tab, click on the Empty Recycle Bin button to delete all the files and folders present inside the bin.
The above method has successfully resolved the issue for many users. Try relaunching your Outlook and check if your issue is gone or not.
Solution 3: Disable the Antivirus Software
One other reason why you might be facing the issue of not being able to open attachments in Outlook could be because your antivirus software is wrongly flagging the attachment as a malware piece of code that could potentially harm your system. In such cases, if you are sure that you are not trying to open a virus/trojan through your Outlook, you can try to temporarily disable your antivirus software and then enable it back right after you are done with opening/downloading your attachment.
Solution 4: Right Click on the Attachment and Click on Open
Sometimes, when you double click on the attachment, the attachment might not open because of incorrect configurations of your mouse double click speed. In such cases, you can try to right click on an attachment and then hit the Open button as shown in the screenshot below.
Another easy way would be to click on the down arrow associated with an attachment to view the same menu and then to go with the Open option.
Solution 5: Update MS Outlook to the Latest Version
Sometimes a simple update to your Outlook software can do wonders. In the steps below, let’s see how we can update our Outlook software to the latest version available. This could potentially solve the issue of you being not able to open the Outlook attachments.
Step 1: Launch Outlook and then click on the FILE tab from the top ribbon.
Step 2: On the left side of the window, click on the tab named Office Account.
As next, on the right side, against the section Office Updates, click on the dropdown button by the name Update Options and then choose the Update Now option from the list of options available.
Step 3: Now, you just need to sit back and relax while your Office updates to the latest available version.
Once the update process is complete, relaunch Outlook and check if your issue is resolved.
Solution 6: Repair Outlook Data Files
The PST(Personal Storage Table) file and the OST(Offline Storage Table) files are simply storage files used by Outlook to store all the information and data related to each of the mail accounts added to your Outlook. Sometimes the issue could be happening because these Outlook data files are corrupted. Let’s see how we can fix the corrupted Outlook data files.
Step 1: Firstly, we need to go to the installation folder of Microsoft Office. For that open File Explorer and get to the Microsoft Office folder. If you are using Office 13, it will mostly be at the following location.
C:\Program Files\Microsoft Office\Office15
If you cannot find the location, Office could be installed under the Program Files (x86) folder. In that case, you will have to look for the Microsoft Office folder under the below location.
C:\ Program Files (x86)\Microsoft Office\Office15
Also, it is very important to note that you have to look under the respective version folder if you are using a different version of Microsoft Office.
On the Microsoft Office folder, scroll down and double click on the SCANPST.EXE executable file to repair your Outlook data files.
Step 2: When the repair window opens, by default the Outlook pst file will be chosen under the field Enter the name of the file you want to scan. If that’s exactly the PST file that you want to scan, then you can jump straight to Step 3. Else, if you would like to repair a different PST file, click on the Browse button.
But before we proceed, we need to know the exact location of the PST file that you want to repair. The following sub-section explains well in detail how you can find the location of the PST file that you want to scan.
How to Find the Location of the Data File that You Want to Scan
Firstly launch Outlook and click on the FILE tab from the top ribbon.
Now on the left window pane, click on the Info tab.
On the right side of the window, click on the dropdown button associated with Account Settings. From the list of options available, click on the Account Settings option.
On the Account Settings window, click on the Data Files tab first.
Now under the Data Files tab, you will be able to see all the OST/PST files associated with the mail accounts added to your Outlook client. Click on the Outlook Data File that you want to repair and then click on the Open File Location button at the top.
Now this will open the location of the data files before you. You can copy this path and paste this path under the field Enter the name of the file you want to scan.
Step 3: Once you have selected the data file to scan, go ahead and click on the Start button at the bottom.
Step 4: When you get the following window with the error reports, hit the Repair button to repair the corrupted files.
Step 5: When the Repair is done, you will be notified with the following Repair complete window.
Please tell us in the comments section which method fixed the issue for you. If you are still facing the issue, do let us know about that too.
Hope you found the article useful.
Stay tuned for more amazing and super cool articles on all your favorite technical topics.


