How To Manage Downloads In Windows 10: – One of the most common things that we do while browsing is downloading, obviously. From songs to movies to iso files, the list is never ending. There is anything and everything that takes place in our long listed queue of items to be downloaded. It can be quite frustrating if we have no idea where our downloaded files are being saved. Even more frustration can be caused because of a failed download. Read on, to learn how to efficiently manage and troubleshoot your downloading issues.
Default Download Location In Windows 10
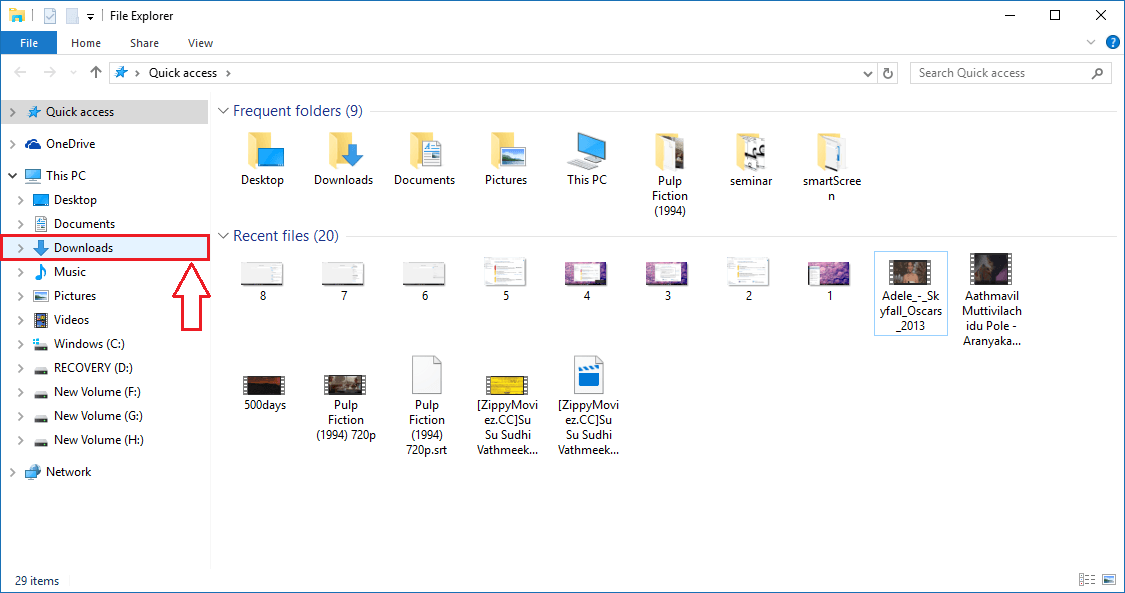
- All your downloaded files are stored in the Downloads folder in Windows 10, by default. To see your Downloads folder, simply launch the File Explorer and find the Downloads folder in the left window pane. You can just click on it see all your downloaded files.
- Or you can just type-in downloads into your Cortana search box and hit Enter. She’ll be happy to help you find your downloads.
How To Add Shortcut To Downloads Folder in the Start Menu
You can also add a shortcut to your Downloads folder in the Start menu for quick access. Follow the steps below to achieve the same.
STEP 1
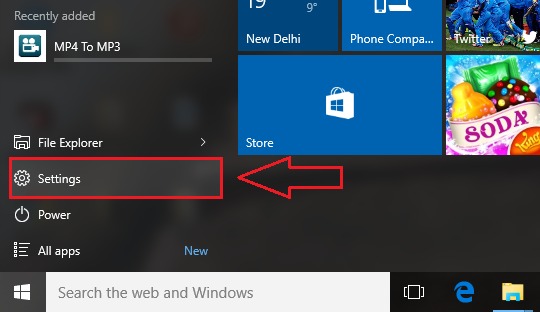
- Click on Start menu and then on Settings option as shown in the screenshot.
STEP 2
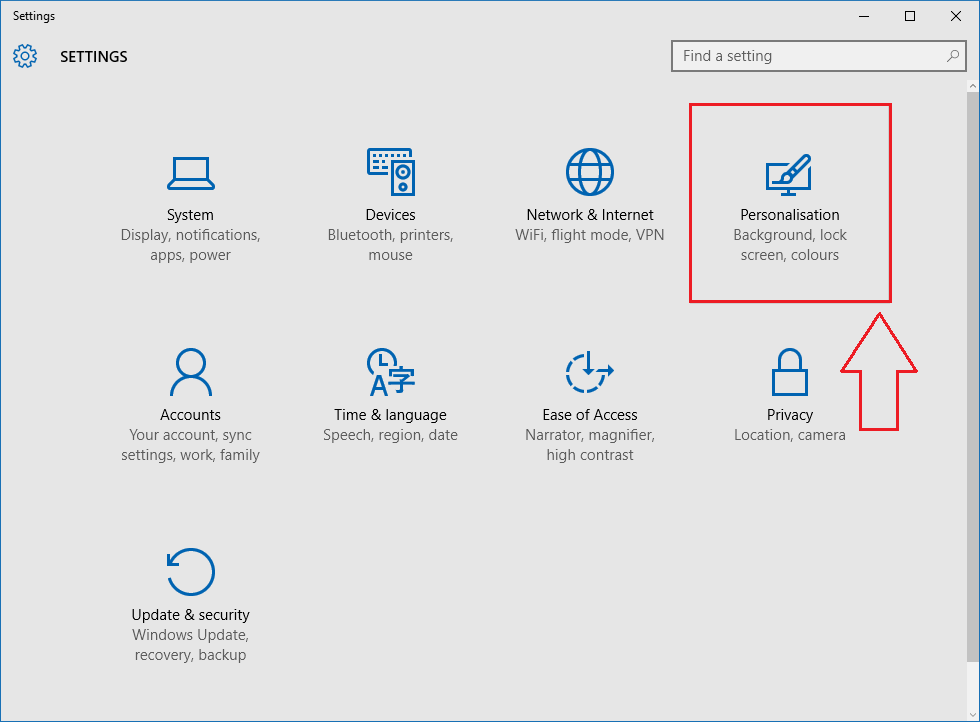
- When the Settings app launches, click on the option named Personalisation.
STEP 3
- Now from the left pane of the Personalisation window, find and click on the option named Start. In the right pane, click on the link that says Choose which folders appear on the Start.
STEP 4
- This is where you get to decide which all folders you want to see on your Start icon. To add the Downloads folder shortcut to your Start menu, simply turn on the toggle button corresponding to Downloads as shown in the screenshot.
STEP 5
- Now if you click on your Start menu icon, you will be able to see that a shortcut to Downloads folder is added successfully to your Start menu.
How To Change the default download location of Google Chrome
STEP 1
- Launch Google Chrome and click on the More actions icon at the top right corner of the Chrome window. From the menu that gets expanded out, click on the Downloads option.
STEP 2
- You will be able to view all your downloaded files if you have executed the previous step successfully.
STEP 3
- To change the default location of downloads in Chrome, you need to click on Settings from the More actions menu as in the first step. Once the page for Settings opens up, simply type-in downloads into the search box and hit Enter. Look for a section named Downloads. There you will be able to change the default download location of files. If you prefer to have different download locations for different downloads, you can check the checkbox that says Ask where to save each file before downloading.
Reasons why your downloads fail and troubleshooting tips
Antivirus
- Your antivirus could be preventing the download from taking place. Even though it is not recommended to turn the antivirus off, if you are so sure that you know what you are dealing with, you may try turning off your antivirus to proceed with the download.
Firewall
- Another important factor for a failed download is your Windows Firewall. If you get a warning that the file you are trying to download is harmful, try finding another source for download. You also have the option to turn off the windows firewall, even though it is not recommended.
SmartScreen Filter
- Windows SmartScreen Filter prevents you from downloading malicious programs. It also prevents you from vising a potentially harmful site. Click here, to turn off this feature. Again, it is highly recommended not to do that.
Temporary Files
- Another reason why your downloads fail is the space occupied by temporary files. You can refer to the How To Delete Temporary Files In Windows 10 Hard Drives article, to efficiently get rid of the temporary files in your Windows.
So these are some of the tips and tricks to get your downloads where you want them to be and to troubleshoot any error that could arise while downloading takes place. Hope you had fun reading the article.


