Is the NVIDIA Control Panel crashing automatically just after you have opened it? Few users have experienced this same issue while trying to alter the NVIDIA graphics settings on their respective systems. If you are one of them, don’t worry. Just follow these easy fixes to solve the problem very quickly.
Workarounds –
1. Restart your computer once. Check further.
2. Launch the NVIDIA Control Panel as an administrator.
2. Disable the third-party antivirus on your computer and open and test this out again.
Fix 1 – Rebuild nvdrsdb files
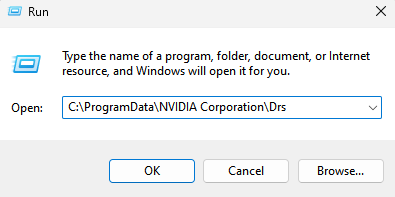
1- Open RUN command box by pressing Windows + R key.
2 -Now, copy and paste the path given below in text field of RUN and click OK
C:\ProgramData\NVIDIA Corporation\Drs

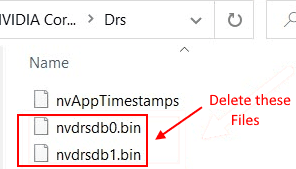
3 – Delete two files namely nvdrsdb0.bin and nvdrsdb1.bin

4 -Reboot your computer and try again.
Fix 2 – Alter the Output Dynamic Range
You have to toggle the Output Dynamic Range settings to Full instead of limited to solve this problem.
1. Write “NVIDIA Control Panel” in the search box.
2. Then, you have to click on the “NVIDIA Control Panel“.

3. Once the Control Panel appears, on the left-hand pane, click on the “Change resolution” under the ‘Display’ header.
4. On the right-hand side, scroll down to find the ‘Apply the following settings‘ section.
5. Then, select the “Use NVIDIA color settings” option.

6. Next, click on the drop-down of the “Output dynamic range:” settings and select “Full“.
7. To save this change, click on “Apply“.

Close the NVIDIA Control Panel window. Then, launch it again. Check if this helps.
Fix 3 – Change the Power Management settings
If the graphic card is configured to consume less power, setting it max may help your issue.
1. Click on the Windows icon and start to write “NVIDIA Control Panel“.
2. After that, just click on the “NVIDIA Control Panel“.

3. Once the Control Panel appears, click on the “Manage 3D settings” on the left-hand side.
4. Now, on the right-hand side, go to the “Global Settings” tab.

5. In the Global settings section, find the “Power management mode” settings.
6. Simply, click on it and choose the “Prefer maximum performance” option from the drop-down.

Now, you have to turn off the vertical sync.
7. In the Global settings, scroll down and look for the “Vertical Sync” settings.
8. Now, simply choose the “Off” option from the drop-down menu.

9. To save these settings, click on “Apply“.
![]()
Close the NVIDIA Control Panel. Open it again. Check if it is crashing again.
Fix 4 – Turn Off Fast Startup
1 – Press Windows key + R together to open run.
Write powercfg.cpl in it and click OK.

2. Now that Power Options is open, select “Choose what the power buttons do” from the left hand side of the window (the options under Control Panel home)

3. A new window called System settings will open. Click on Change settings that are currently unavailable;

4. This last category will have what you need. Simply uncheck the checkbox under this category that says “Turn on fast startup (recommended)”.
To turn fast startup on Check it and to turn it off just uncheck this option

Fix 4 – Download and Install Geforce experience
If you do not have Geforce on your computer , Just download and install Geforce experience on your PC.

Fix 5 – Restart Nvidia Display container service
1 – Open RUN by combinedly hitting Windows and R keys
2 – Now, in RUN command box, type services.msc and click OK.
3 – Now, In service manager locate two services, NVIDIA Display Container LS and NVIDIA LocalSystem Container service

4 – Right click and choose restart for both services.
Fix 6 – Reinstall NVIDIA Control Panel
You have to uninstall the NVIDIA Control Panel software.
1. You have to press the Windows key+R keys together.
2. Write “appwiz.cpl” in the terminal. Then, click on “OK“.

3. In the Program & Features window, check out the list of the NVIDIA drivers.
4. Now, right-click on the “NVIDIA GeForce Experience” and then click on “Uninstall” to uninstall the software.

Follow the on-screen instructions to uninstall the NVIDIA applications from your computer.
This way, uninstall all the NVIDIA-related software from your computer.
Once you have uninstalled this software, close the Control Panel window.
5. After this, simply download the GeForce Experience package installer on your computer.

Now, run the installer on your computer to install the latest version of NVIDIA GeForce.
As NVIDIA Control Panel comes right along with the GeForce Experience, your problem will be solved.
Fix 7 – Uninstall & re-install the graphics driver
You have to uninstall all the graphics drivers from this computer and re-install those again.
STEP 1 – UNINSTALL THE GRAPHICS DRIVER
At first, uninstall the graphics driver.
1. First of all, press Windows key+X from your keyboard.
2. After that, tap on the “Device Manager“.

3. Next, click on the drop-down beside the “Display adapters“.
4. Then, right-click on the NVIDIA graphics driver. After that, click on the “Uninstall device“.

5. A prompt will appear. Just check the box beside the option “Delete the driver software for this device“.
6. Then, click on “Uninstall“.

Once the driver is uninstalled from your system, close the Device Manager.
STEP 2 – DOWNLOAD AND INSTALL THE LATEST DRIVER
1. Go to the NVIDIA site to download the driver.
2. Just put your display driver specifications in the correct boxes. Like – “Product type“, “Product series“, etc. according to your graphics card specifications.
3. After putting in the details, simply click on “Search“.

5. Then, click on “Download” to download the driver.
6. Once the driver is downloaded, go to the download location.
7. After that, double-click on it to start the installation process of the driver.

8. While installing the driver, check the “Perform a clean installation” option.
This will make sure there are no corrupted files left in the system.
9. After that, click on “Next“.

Complete the installation process and restart your computer thereafter.
Fix 8 – Turn off the GPU Virtualization
If you are facing this issue with a Virtual GPU, try these steps.
1. First of all, open the VirtuMVP Control Panel on your device.
(You can find it right beside the clock on your Task Bar.)
2. Now, go to the “Main” tab on the Control Panel.
3. Then, toggle the “GPU Virtualization” setting to “Off“.
Save this setting.
Close and re-launch the NVIDIA Control Panel.
If this doesn’t work out, follow these steps.
1. At first, press the Windows key+R keys together.
2. Then, write “appwiz.cpl“. After that, hit the Enter key.

3. In the list of installed apps, look for the apps related to VirtuMVP.
4. Right-click on the VirtuMVP software and click on “Uninstall“.

Once you have uninstalled the software, access the NVIDIA Control Panel and check again.
Fix 9 – Roll back the driver
If this problem is occurring just after your computer has received a graphics driver update, try to roll back the driver.
1. First of all, right-click not the Windows key.
2. After that, click on the “Device Manager“.

3. Once you see that Device Manager has opened up, expand the “Display adapters“.
4. Next, just double-click on the NVIDIA graphics driver.

5. When the Properties window, visit the “Driver” tab.
6. Next, click on the “Rollback driver“.

Your computer will restart to complete the rollback process.
Rolling back the graphics driver should stop the NVIDIA Control Panel from crashing again and again.
Fix 10 – Use NVIDIA Control Panel app
Another alternative arrangement is to use the NVIDIA Control Panel app.
1. You have to open the Microsoft Store from your computer.
2. Once the Microsoft Store window opens up, click on the search box on the top-right corner and write “NVIDIA“.
3. After that, click on the “NVIDIA Control Panel” in the elevated search result.

4. To get the NVIDIA Control Panel, click on “Get“.

5. Next, click on “Install” to install the NVIDIA Control Panel app.

Now, all you have to do is to wait for the computer to download and install NVIDIA Control Panel app.
6. Once it is installed, click on “Launch” to launch it.

NVIDIA Control Panel app should be working just fine.
Also Read: NVIDIA Control Panel not opening / working
Alternative Tip –
1. Some users have claimed that having a folder with a very long path name on the desktop may cause this issue.
Just delete the folder or move it elsewhere.