The Dxgi.dll file is an essential component of the DirectX graphics infrastructure which comes with the latest version of DirectX installed on the user’s system. The absence of this dll file can result in application launch failure or a sudden crash while the application is just starting up. Usually, the corruption in DirectX files and its component causes this problem. Try to enact these easy fixes to quickly fix the DLL issue on your system.
Fix 1 – Install the latest DirectX
You should install the latest DirectX package to fix the issue.
Step 1 – Check the current version of DirectX
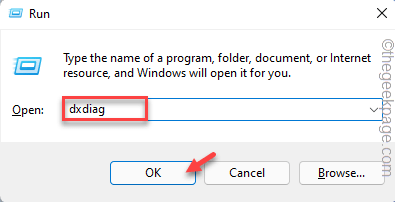
1. You can press the Win key and the R keys together.
2. Then, type this word and click “OK” on the Run box.
dxdiag
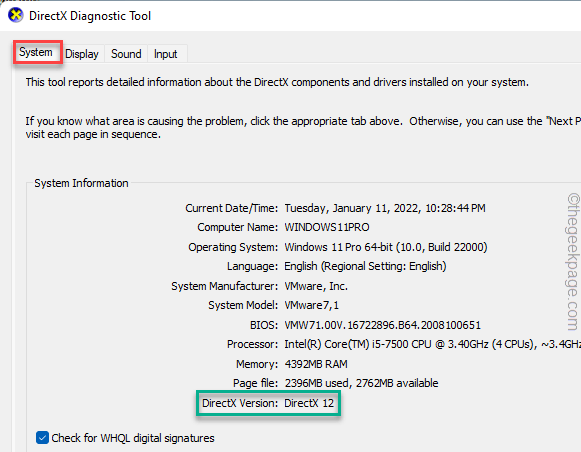
3. In the DirectX Diagnostics Tool window, head on to the “System” tab.
4. After that, check the “DirectX Version“. This shows which version of DirectX your system is running.
Step 2 – Install the latest version of DirectX
Now, you can easily install the latest version of the DirectX tool on your computer.
1. Just click on this DirectX to download the latest version of the DirectX package.
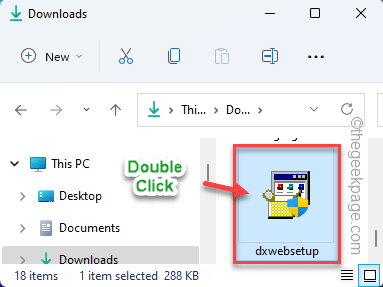
2. Once you have downloaded the setup, double-click on the “dxwebsetup“.
3. Just, check the “I accept the agreement” box.
4. Then, tap on “Next” to proceed.
Now, the DirectX setup will determine the current version of DirectX installed on your system.
If it detects there is a new version available, it will download and install it on your system.
Once it is done, run the game and test.
Fix 2 – Download and install the latest redistributables
Download the latest redistributable packages and install them on your computer.
STEP 1 – KNOW THE SYSTEM TYPE
Check whether your system is based on 32-bit or 64-bit. If you are using Windows 11, it is by default 64-bit. So, you can just skip these steps and go to the main part.
1. At first, hit the Windows key and the R key.
2. In that Run box, write down this keyword and hit Enter.
msinfo32
3. When the System Information page appears, make sure to select the “System Summary” tab.
4. On the right-hand pane, simply look for the “System type“.
Check whether the system is “x64-based” or “x32-based“.
Now, you can close the System Information page.
STEP 2 – DOWNLOAD AND INSTALL VC 2015
Follow these steps to download and install the latest version of Visual Studio 2015, 2017, 2019, and 2022.
1. Here is the direct link to the Visual Studio 2015, 2017, 2019, and 2022.
2. Once you reach the website, according to the CPU architecture, click on the particular link to download the package.
It is comparatively a small package. So, the downloading process is very short. Once it is downloaded, close the browser.
3. Go to the download location on your system.
4. After downloading the setup file, double-click on it.
5. Next, check the “I agree to the license terms and conditions” check box.
6. After that, click “Install“.
Once the Microsoft Visual C++ files are installed, close the installer screen and restart your computer.
Fix 3 – Restore the dxgi.dll file
There is a chance that you have mistakenly deleted/ moved the dxgi.dll file from your computer. So, perform a search over your system for the “dxgi.dll” file.
1. Just use the search box by pressing the Win key+S keys together.
2. Then, type “dxgi.dll” in the search box.
Now, wait for a while to locate the dxgi.dll file on your computer.
Additionally, look for the “dxgi.dll” file in the Recycle Bin. If you can find the file there, just right-tap the file and click “Restore” to restore the file to its proper location.
If you have another updated computer nearby, you can do another thing. You can just copy the DLL file from that computer just using a USB drive.
Follow these steps to do that –
1. Open the other laptop/ PC you have.
2. Then, log in with your administrative account and open the File Explorer using the Win key+E keys together.
3. When the File Explorer opens up, head on this way –
C:\Windows\System32
4. Once you are there, you can find several dll files in a list format.
5. Then, use the search box and type “dxgi.dll“.
6. Now, right-click on the “dxgi.dll” file and tap the “Copy” sign to copy the DLL file.
7. Next, plug in the USB device to your computer.
8. When Windows loads up the USB drive, go inside the USB drive and paste the dll file there.
9. After that, click on the taskbar icon to look at the hidden icons.
10. Then, click on the USB icon to take a look at all the USB icons there. Next, just click on the USB icon to eject the drive.
After ejecting the USB drive, go to the problematic system and plug in the USB drive.
11. Next, copy the “dxgi.dll” file from the USB device.
12. Then the File Explorer and go to this location on the affected system.
C:\Windows\syswow64
13. After that, paste the copied dll file inside the folder.
Now, restart your computer after this.
Fix 4 – Download the dxgi.dll file
Download the dxgi.dll file and place it in a particular location on your computer.
1. Go to this dxgi.dll.
2. You can find several versions of the DLL file here.
3. Now, check the architecture of your system and download the package according to your requirement.
4. Then, click “Download” to download the zip file.
5. Next, go to the location of the downloaded zip file.
6. After that, extract the “dxgi” zip file to your system.
7. After this, select the “dxgi.dll” file and then, click on the “Copy” icon to copy the file.
8. Next, head on to this folder –
C:\Windows\System32
9. Then, paste the file there.
10. Additionally, if you are working on a 64-bit system, you have to reach this place –
C:\Windows\syswow64
11. Then, paste the DLL there.
After that, close everything and restart your computer. You won’t face the error message again.
Fix 5 – Re-register the dxgi.dll file
Re-registering the DLL file may fix the problem.
1. At first, hit the Windows key and search for “cmd” in the search box.
2. Then, right-tap the “Command Prompt” and click on “Run as administrator“.
3. Now, you have to go to the default syswow64 folder. So, copy-paste this code and hit Enter.
cd C:\Windows\System32
4. Once you are in the syswow64 folder, run this command to re-register the dxgi.dll file.
regsvr32 dxgi.dll
Once you have re-registered the DLL file, close the Command Prompt screen.
Then, try to relaunch the application and test if that works.
Fix 6 – Verify the game files
Some games have the dxgi.dll inside their game installation folder. In case of this missing dll file, you can just verify the game to fix the problem.
You have to know whether you have installed the game from Steam or the Epic Store.
For Epic Store games
If the game belongs to the Epic Store, follow this path-
1. Open the Epic Games Launcher.
2. Now, click on “Library“. Here, look for the game you are facing this trouble with.
3. Once you have found the game, click on the three-dot menu and click “Manage“.
4. Then, click on “Verify files” to verify the game files on your system.
Now, all you have to do is to wait as Epic scans the game for missing files and automatically replaces them.
Once the process is over, launch the game and enjoy!
For Steam games
For any Steam games, go along –
1. Open the Steam app.
2. Then, go to the “Library” section. Here, you can see all the games in a list format.
3. In that list, right-click the problematic game and click on “Properties“.
4. Next, get to the “LOCAL FILES” section.
5. Then, click on “Verify integrity of game files…” to verify the game files.
Depending on the game installation size, it may take a while. Now, once that is done, you won’t see the “The program can’t start because dxgi.dll is missing from your computer” error message again.
Fix 7 – Uninstall and reinstall the affected game
There is another way you can solve the problem quickly.
1. At first, press the Win key+R keys together.
2. Then, write this term and click “OK” to open the Programs & Features page.
appwiz.cpl
3. After opening the Programs & Features screen, search for the problematic game.
4. Once you have found it, right-click the game and click “Uninstall“.
Now, follow the steps on the uninstaller to remove the app from your computer.
After uninstalling the game, install the game on your computer. Check if this resolves your problem.


