As we all know Windows Installer is used to install, uninstall programs in the system. Usually, this package runs to completion well without any errors. However, at times the users have reported seeing the following error: There is a problem with this Windows installer package
At times, the error is seen along with 1720,1721,17213112 error numbers. This error is noticed while installing popular apps like iTunes, Adobe Acrobat Reader, Unreal Engine, Datasmith exporter for 3dmax, SQLite, etc.
Possible causes for this problem are :
- Inadequate permissions of the installation folder
- Unstable network access
- Corrupted Installer file
- Malware or Virus infected system
- Windows is not up to date
In case you have encountered this issue, there is nothing to worry about. In this article, we will be discussing different ways to fix the error with the Windows Installer package.
Note: –
1.Try downloading and installing again after disabling third party Antivirus software. It fixed the issue for most of the users.
2. Check the downloaded file size again. May be this error is being show due to incomplete download of the software package.
Fix 1: Tweak the Registry Settings
NOTE: You must be logged in as an Administrator to do this change.
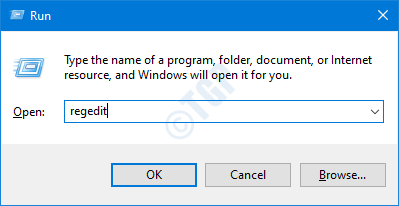
Step 1: Open run window holding Windows+r keys
Step 2: Enter regedit and press Enter

Step 3: If you see the UAC window popping up, click on the Yes button
NOTE: Registry editing can have an adverse effect on the system even with the slightest mistake. So please be very careful.Also, It is advised to take the backup of the registry before proceeding. To take a backup, In the Registry Editor–> Go to File –> Export –> Save your Backup file.
Step 4: In the top bar, copy-paste the following location and hit Enter as shown below
HKEY_CLASSES_ROOT\Msi.Package\shell

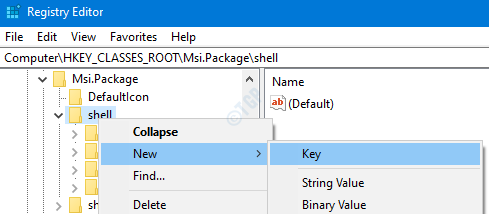
Step 5: Right-click on the shell key. Choose New and then select Key

Step 6: Name this newly created key as runas and hit Enter
Step 7: Click on runas and then double click on the (Default) key on the right-hand side

Step 8: In the Edit String window, under the Value data, enter the below text and hit Enter
Install as &administrator

Step 9: Right-click on the runas key that we created. Choose New–> Key.

Step 10: Name the newly created key as command and hit Enter
Step 11: Click on the command key. On the right-hand side, double click on (Default) key

Step 12: In the Edit String window, under the Value data, enter the below text and hit Enter
msiexec /i "%1"

Step 13: Restart the System
Step 14: Now try installing the application again.
Fix 2 – Change Temp folder permissions
1. Open file explorer.
2. Go to the address given below
C:\Users\%username%\AppData\Local\
3. Now, Right click on Temp folder and choose properties

3. Now, click Security Tab
4. Click on Edit

5.Click on Add.
6. Write Everyone in the text field.
7. Now, click on check names.
8. An underline will appear below everyone. Now, click OK.

9. Now, select all permissions, including full control etc. for everyone.
10. Click on OK and Apply.

Now, try again.
In case this doesn’t help check the general fixes listed below.
Fix 3: Run as an administrator
In case you do not have the Administrator rights, then contact your administrator
Step 1: Locate the Installer file in the system and right-click on it
Step 2: From the context menu, select Run as administrator

For some applications, you can see that Run as administrator doesn’t show up in the context menu. For such applications, follow the below steps
Step 1: Hold the Win Key and then press R
Step 2: Type cmd and hit Ctrl+Shift+Enter
This opens the command prompt in Admin mode

Step 3: In the User Access Control window, simply click on Yes.
Check if this helps, if not try the next fix.
Fix 4: Use Microsoft Program Install and Uninstall
Step 1: Download the Microsoft Program Install and Uninstall from this link
Step 2: Click on the Download troubleshooter button on the page

Step 3: Right-click on the downloaded troubleshooter and click on Open

Step 4: Select Next and then choose Installing
Step 5: From the given list of options, select the application you want to install. In case the required application is not listed, then select Not listed. In this case, you have manually browse to the location of the installer file
Step 6: The troubleshooter will start running wait for some time for it to identify the problems
Step 7: Once the issues are identified, follow the instructions on the screen to fix them
Check if this helps, if not try the next fix listed
Fix 5: Restart the Windows Installer service
Step 1: Open Run Dialog (Windows+r)
Step 2: Type services.msc and hit OK

Step 3: In the Services window, scroll down to find the Windows Installer service
Step 4: Right-click on the service and select stop as shown below

Step 5: Again, right-click on the Windows Installer service and choose Start

Step 6: Restart your system and try again.
If this does not fix the error, try the next one
Fix 6: Repair the Application
Note that not all applications will have this option. Just as an example, iTunes has the option to repair. However, if you check Adobe Acrobat Reader, it doesn’t.
For demonstrating, we are using iTunes App i.e Apple Mobile Device Support. However, the steps should be similar for any other application
Step 1: Open the Run dialog with Windows+R shortcut
Step 2: Type the command ms-settings:apps and press OK

Step 3: In the Settings window that appears, scroll down on the right-hand side to locate the required application. For example, Apple Mobile Device Support. Click on the Modify button

Step 4: In the App Support window that opens, Tick on Repair and then press on the Next button

Step 5: This would take some time and the application would be repaired.
Step 6: Now try installing again and check if the error exists.
If you are still noticing the error while installing, try the next fix.
Fix 7: Re-register Windows Installer
Step 1: Open Run Dialog holding Win Key+R combination
Step 2: Enter cmd and hit Ctrl+Shift+Enter to open a Command prompt with Admin privileges.

Step 3: In the UAC window that opens asking for permissions, click on Yes
Step 4: In the command prompt window that opens, type the below command and hit Enter
MSIExec

Step 5: When everything is working as expected you will see the Details window as shown below. If not, an error report will be displayed.

Step 6: If the error report is displayed, one should consider re-registering the Windows Installer.
Step 7: In the command prompt type the below commands one after the other. Make sure to press Enter key after every command
msiexec.exe /unregister
msiexec.exe /regserver
These commands will re-register the Windows Installer in the system. Now try installing the application again and check if everything is working as expected.
Fix 8: Disable the apps at Startup and try Installing
Step 1: Open the Run window(Windows+r)
Step 2: Type msconfig and press OK

Step 3: In the System Configuration window that opens, under the Services tab, Tick the Hide All Microsoft services
Step 4: Click on the Disable all button

Step 5: In the same window, Open the Startup tab, click on Open Task Manager

Step 6: In the Task Manager Window that opens, Disable all the programs that are enabled at the start-up.

Step 7: In the System Configuration Window, Click on Apply and then Press OK

Step 8: Restart the PC.
Step 9: Now that there will be no interference from any other application, try installing. If it does not help, checkout the fixes listed in the next section
Fix 10: Installing Latest Updates
Step 1: Open the Run window(Windows+r) and type ms-settings:windowsupdate-action and press OK

Step 2: In the Settings –> Update & Security –>Windows Update window that opens, click on Check for Updates. Once the updates are installed, restart the PC.

Now that the system is up to date, check if the issue still exists.
Fix 11: Scan the system for Malware or Virus
Sometimes, the viruses and malware in the system can affect the working of the Windows Installer.
Step 1: Hold the keys Windows+r and open the Run Window
Step 2: Type ms-settings:windowsdefender and press OK

Step 3: In the settings window, choose Virus & Threat Protection

Step 4: In the window that opens, click on Scan Options

Step 5: Choose Full scan and press on Scan now button

Once the scan finishes, it notifies about any viruses and malware in the system. Take necessary steps to mitigate them.
In case you are still seeing the same error, then try the next fix.
Fix 12: Run Program Compatibility Troubleshooter
Step 1: Locate the application file(.exe file) in the system
Step 2: Right-click on the Application file(.exe) and Choose Troubleshoot Compatibility

Step 6: In the Program Troubleshoot Compatibility window, click on Try recommended settings.

Step 7: In the window, the problems are detected and fixed.
Now try Installing again and see if this fixes the issue.
That’s All.
We hope this has been informative. Kindly comment and let us know in case you run into issues. We will be glad to assist.
Also, please comment and let us know if you were able to fix the issue with the above fixes.
Thank you for Reading.