Every application on your Windows 10 computer uses some essential services. The system that shows status also uses some crucial service. In case if the service that detects the status is disabled, you will see an error message. If you are facing this issue, don’t worry.
Fix 1 – Adjust the netprofm permission
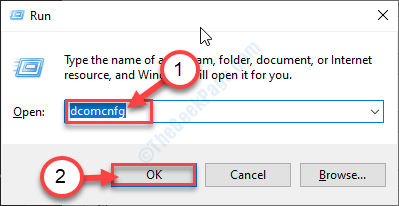
1. Press the Windows key with the ‘R‘ key. This will launch the Run window.
2. To access the Component Services, type this code in the terminal. After that, click on “OK“.
dcomcnfg

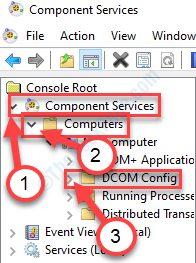
3. As soon as the Component Services window appears, go this way-
Component Services > Computers > My Computer > DCOM Config

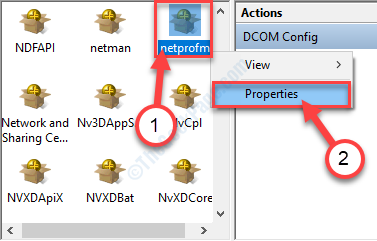
4. Go through the list of components on the right-hand side until you see “netprofm“.
5. Right-click on that service and click on “Properties“.

6. When the Properties window appears, click on the “Security” tab.
7. Then, click on “Customize” and then click on “Edit…“.

8. Now, click on “Add” in the Security panel.

9. When the Select Users or Groups window appears, set “LOCAL SERVICE“.
10. After that, click on “OK” to add the user group.

11. Select the “LOCAL SERVICE” object.
12. In the Permissions for LOCAL SERVICE section, tick mark the “Allow” beside “Local Launch“.
13. Do the same thing for “Local Activation” also.

14. Finally, click on “OK” to save these changes.

Once you have done all these, close the Component Services panel.
Fix – 2 Check Services window
1. Press Windows key+S to access the search box. Type “Services” there.
2. After that, click on the “Services” in the search result to access it.

3. Once you see that the Services window has appeared, access the “DHCP Client” service by double-clicking on it.

4. Then, set the startup type to ‘Automatic‘ mode.

5. Make sure the service is running. Otherwise, click on “Start“.
6. Don’t forget to click on “Apply” and then on “OK“.

7. When you have come back to the Services tab, double click on the “DNS Client“.

8. To automatically start the service as soon as the computer boots up, set the ‘Startup type:‘ to “Automatic“.
9. Check if the service is already ‘Running‘. By any chance, if it is stopped, click on “Start“.

10. Finally, click on “Apply“, followed by a click on “OK“.

NOTE–
Users are saying that it is necessary to automate and start these services also (following the previous method)-
Network Connections

Network List Service

Network Store Interface Service

Network Location Awareness
Once you are sure that all the above-mentioned services are automated and running normally, you can close the Services utility.
Fix – 3 Try troubleshooting network issues
1. At first, write “troubleshoot network” in the Search box.
2. Then, you need to click on the “Find and fix network problems“.

3. When the Internet Connections troubleshooter opens up, click on “Advanced“.

4. Then, check the “Apply repairs automatically“.
5. After that, click on “Run as administrator” to run the troubleshooter as an administrator.

6. Now, click on “Next“.

7. Then, click on the “Troubleshoot my connection to the internet“.

8. Once the troubleshooting process is over, click on the “Close the troubleshooter“.

This should help you to fix the issue.
Tips–
1. Try running an SFC scan on your computer to check if the issue is happening corrupted system files.
a. Open a CMD terminal.
b. Write this simple command and hit Enter to execute it.
sfc /scannow

Wait for a while. Once the scanning process is complete, restart your PC.