While trying to play Fortnite you may see this error message at the startup ‘The application has crashed and will now close‘. This extremely annoying issue occasionally happens to some users. But there’s nothing to worry about. We have detailed some easy fixes to sort this out as soon as possible.
Workarounds
1. Close Fortnite, if you have already opened it. Disconnect your PC from your network. Connect to the network again and access Fornite from the Epic Launcher.
2. Disable the third-party antivirus (like McAfee, Avast, etc) on your system.
Fix 1 – Update the graphics card driver
If you haven’t updated the graphics card driver in a while, follow these steps.
1. Press the Windows key+X.
2. Then, click on “Device Manager“.

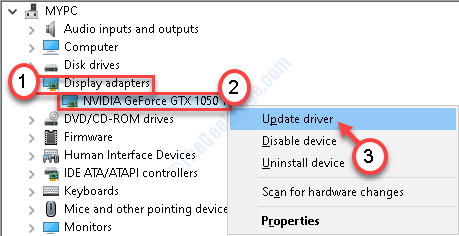
3. Now, simply expand the “Display adapters” section.
4. Right-click on the graphics adapter and then click on “Update driver“.

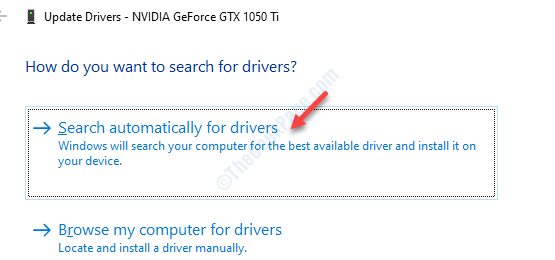
5. Now, to let Windows search for the driver itself and install it on your computer, click on “Search automatically for drivers“.

Allow Windows a while to search for the latest graphics driver and install it.
Alternative method–
If the above method doesn’t update the driver, follow these steps.
1. Type “GeForce Experience” in the search bar.
2. Click on “GeForce Experience“.

3. When the GeForce Experience appears, click on the “Drivers” tab.
4. Now, click on “CHECK FOR UPDATES“.

5. To download the latest version of the driver, click on “Download“.

This will download the driver on your computer.
6. Once the downloading process is over, you will notice that there are two ways to install the driver – “Express Installation” and “Custom Installation”.
7. You have to choose “Custom Installation“.

8. After this, check the “Perform a clean install” box.
9. Next, click on “Next” to begin the process.

GeForce Experience will uninstall the existing graphics drier and install the latest version.
This process will 5-10 minutes.
10. In a few minutes you will notice the “Installation Complete” message.
11. Then, click on “Close“.
Restart your computer.
Fix – 2 Verify Fortnite files
There is a chance that Fortnite files have become corrupted.
1. Open the Epic Games Launcher on your computer.
2. Once it opens up, on the left-hand side, click on the “Library“.
3.Click on the three-bar menu beside “Fortnite” and click on the “Verify“.

Just wait for a while to analyze the Fortnite files on your system.
Try to access the game once more. Check if this helps you.
Fix 3 – Run anti-cheat batch files
Sometimes Windows blocks the anti-cheat services on your computer that may have caused this problem.
1. You have to go to the Fornite installation location. Double click on the folder “BattlEye“.
It is generally at the –
Local Disk (C:)\ Program Files\Epic Games\Fortnite\FortniteGame\Binaries\Win64

2. When you are there, double click on the “Uninstall_BattlEye.bat” to uninstall it from your system.

3. To install it again, double click on the “Install_BattlEye.bat“.

4. After that, navigate back to the ‘Win64’ folder again (same as the step-1).
5. Then, double click on the “EasyAntiCheat” folder.

6. Double click on the “EasyAntiCheat.exe” to access it.

7. Then, click on “Repair Service“.

This will repair the EasyAntiCheat service.
Try to play the game again on your computer.
Fix 4 – Clear Vault Cache
1. Open the Epic Games launcher once more.
2. After that, click on the “Settings” on the left-hand side.

3. Then, click on the “Edit Vault Cache Location“.

4. Then, click on “Browse“.

5. Vault Cache will be opened.
6. Check if there is any file/ folder in that location. Delete any files.

Close the window. Relaunch the Epic Games launcher on your computer.
Try to play the game once more.
Fix 5 – Add CMD arguments
You can use additional command-line arguments to fix the issue.
1. Open the Epic launcher.
2. After that, go to the “Settings“.

3. Scroll down until you see the list of games installed on your system.
4. Check the “Additional Command Line Arguments“.
5. Paste this code in the box*.
-USEALLAVAILABLECORES

Open Fortnite again.
This should solve the problem on your computer.
[*NOTE– Apart from the ‘Useallavailablecores’ argument, there are other commands you can use and test. Like-
-NOSPLASH
-lanplay
-limitclientticks
-NOTEXTURESTREAMI
]
Fix – 6 Override high DPI scaling feature
Sometimes the DPI scaling feature may solve the issue.
1.Navigate to go to the Fornite installation location, again.
It is normally at the –
Local Disk (C:)\ Program Files\Epic Games\Fortnite\FortniteGame\Binaries\Win64
2. Right-click on the “FortniteLauncher.exe” and then click on “Properties“.

3. Go to the “Compatibility” tab.
4. After that, click on the “Change high DPI settings“.

5. Then, check the box “Overdrive high DPI scaling behavior.”
6. After that, click on “OK“.

Don’t forget to click on “Apply” and “OK“.
Try to launch Fortnite again. Check if this works out.
Fix 7 – Modify the registry
Use Timeout Detection and Recovery (Tdr) key to reinitialize and reset GPU-system link to fix the issue.
1. Just write “regedit” in the search box beside the Windows icon.
2. Then hit Enter to access the Registry Editor on your computer.

Before you proceed to the steps, just a routine reminder on taking a backup of your Registry Editor.
3. When you have opened the Registry Editor on your computer, expand the left side to go to this place~
Computer\HKEY_LOCAL_MACHINE\SYSTEM\CurrentControlSet\Control\GraphicsDrivers
4. You need to right-click on the space on the right-hand side and then click on “New>” and then click on “D-Word (32-bit) Value“.

5. Name this key as “TdrLevel“.
6. Now, to change the value of this delay, double click on this key.

7. In the Edit DWORD (32-bit) Value window, put “0“.
8. Then, click on “OK“.

Close the Registry Editor window and restart your device to let this change take effect.
After restarting the problem won’t bother you again.
Fix – 8 Update your Windows
Maybe the Windows version you are using is not the latest version.
1. Press the Windows key+I.
2. Then click on the “Updates & Security“.

3. Then, click on “Check for updates“.

4. When the updates are downloaded, click on “Restart Now” to restart your computer.

This should have fixed the issue on your computer.