Are you facing audio or sound issues on your new Windows 11 machine? Are the speakers or headphones not working at all? If you are trying to troubleshoot the audio devices on your Windows but are unable to do it, just follow this troubleshooting guide. Just follow these easy solutions to fix this problem.
Workarounds–
1. Try restarting the device, if this is the first time after the upgrade you are facing this problem.
2. If you are using an external speaker/headphone, try attaching it to another device. Check if it works fine or it still sounds stutters/distorted.
3. Disconnect the device from the USB port and connect it to the ports on the backside of the cabinet.
If these quick tricks don’t work out, go for these solutions.
Fix 1 – Check Audio settings
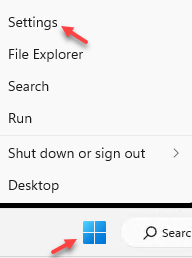
1 – Right click on Start button and click on settings

2 – Now, Click System from left side.
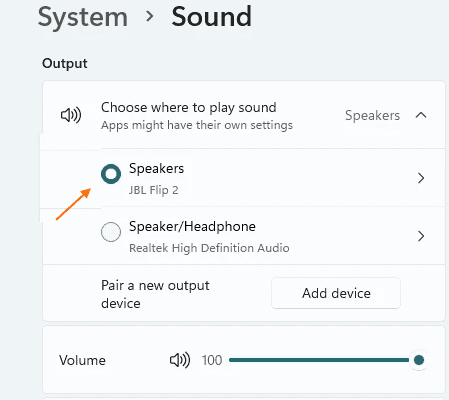
3 – Click Sound from right side

4 – Choose correct sound output

Fix 2 – Troubleshoot the audio
You can just troubleshoot the audio from the taskbar itself.
Way 1 –
1. At first, right-click on the audio device icon on the Taskbar and click on “Troubleshoot sound problems“.

2. This will instantly start to analyze the audio device.
3. Then, follow the on-screen instructions to troubleshoot the audio.

Restart your computer and check if this works out for you.
Way 2 –
If you don’t see the audio icon on the taskbar, go this way –
1. At first, press the Windows key+I keys together.
2. Then, on the left-hand side, tap on the “System“.
3. On the left-hand side, click on the “Troubleshoot“.

4. Once the troubleshooter window appears on your screen, on the right-hand side, click on “Other troubleshooters“.

5. In the list of troubleshooters, scroll down and find the “Playing Audio” troubleshooter.
6. After that, click on “Run“.

7. Follow the on-screen instructions and complete the troubleshooting process.

This should solve the issue you are facing with the audio devices.
Fix 3 – Update the sound driver
You have upgraded to Windows 11. So, some of your devices may be uninstalled or replaced with other versions of the drivers.
1. Press the Windows key+R.
2. After that, type “devmgmt.msc” and then, click on “OK“.

3. When the Device Manager opens up, expand the “Sound, video and game controllers” section.
4. After that, right-click on the audio device and tap on “Update driver“.

5. After that, click on the “Browse my computer for drivers“.

6. Then, tap on the “Let me pick from a list of available drivers on my computer.”.

7. Now, select the default sound driver from the list.
8. Then, click on “Next” to install it on your computer.

9. If you notice any warning message, click on “Yes“.

Now, close the Device Manager and restart the system.
Fix 4 – Uninstall the sound driver
If updating the audio driver doesn’t solve the problem, uninstall the audio driver and restart the machine.
1. At first, right-click on the Windows icon and click on “Device Manager“.

3. You have to expand the “Sound, video and game controllers” section.
4. Now, right-click on the audio driver and then click on the “Uninstall device” to uninstall the particular audio device.

5. Simply, click on “Uninstall” to confirm the uninstallation of this driver.

After that, simply restart your computer once. Windows will automatically install the default driver for the audio device.
If the driver still isn’t there, follow these steps-
Open the Device Manager window.
a. In the Device Manager, click on “Action“.
b. After that, tap on “Scan for hardware changes“.

Windows will scan for the removed hardware device and install it in the process.
Fix 5 – Disable all enhancements
The enhancements of the sound device may be the reason you are facing this problem.
1.At first, what you need to do is to press the ‘Windows key‘ along with the ‘R‘ key to open the Run window.
2. Now, type “mmsys.cpl” and hit Enter.

3. Once the Sound window, go to the “Playback” tab.
4. Then you have to right-click on it, and then click on “Properties“.

5. Once the Speakers Properties window opens up, go to the “Enhancements” tab.
6. Then, uncheck the “Disable all sound effects” option.

7. Don’t forget to click on “Apply” and on “OK“.

Now, check if the sound is working on your computer or not.
Your problem should be solved.