An exact copy of a document is a fax. It is the telephonic transmission of a printed material. A fax is often sent to a telephone number associated with a printer like output device, which displays something to the user. A fax machine is used to scan the origial document. In our case, the computer system uses an input device known as Scanner inorder to scan the documents. The document gets encoded and sent over the telephonic medium in the form of electronic signals. At the receiving end, the document is decoded and converted back to it’s original form, which can later be printed.
See also: – Top 10 websites to send Fax for Free
Windows 10 allows you to send and receive faxes from your computer system. A simple program called Windows Fax and Scan is employed by Windows operating system in order to achieve this functionality. For the feature of fax to be available, your system needs to have the following essential requirements:
- Make sure that a fax modem is connected to your computer via the phone line.
- Alternatively, a fax server should be connected with your computer.
- In order to send and receive faxes, a fax account must be created before everything.
Read on, to learn how to use your computer to send and receive faxes efficiently.
STEP 1
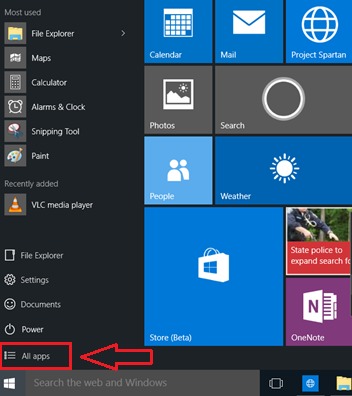
- Click on the Start menu in order to navigate to Windows Fax and Scan. From the menu that appears, find and click on All apps.
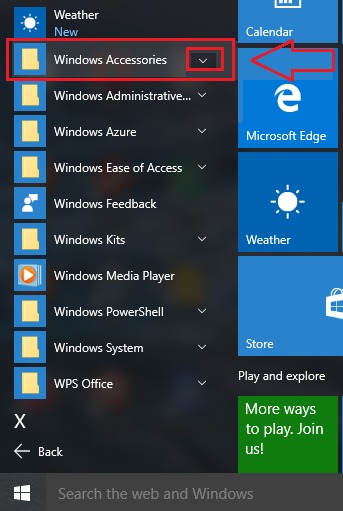
- Now you need to find Windows Accessories from the list of options. There will be a drop-down arrow associated with Windows Accessories. Click on it to expand the list.
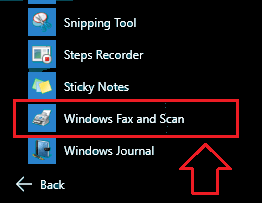
- Once the list expands, locate Windows Fax and Scan and click on it, to get to the next step.
- A new window for Windows Fax and Scan will open up. At the bottom left corner, you will now see a button named Fax. Click on it.
- Now we are all set to composing a new draft. As the first step, click on New Fax, which is located at the top left corner.
- As you can now see, a new window appears, which looks like the following screenshot. This is where you will get to compose your fax from.
- There is obviously the To and the Subject columns, which you have to fill out inorder to send the fax. If you want to attach a file to your fax, you can do that clicking on the Paper clip icon as shown in the screenshot.
- You can insert a picture into your fax by clicking on the Pictures icon.
- You can also insert a scanned document or picture using the icon shown in the following screenshot.
- Once you are all done with composing your fax, you can send it out using the Send button at the top left corner of the window.
- Receiving a fax is just as easy as anything else. If you know that you have a fax to receive, open the application and click on the Receive a fax now as shown in the following screenshot. Now you are all set to receive your fax.
Sending and receiving faxes from your windows 10 is just as easy as it is presented in this article. Hope you found the article useful.


