Three basic power plans are associated with any Windows 10 device. Those are the Power Saver plan, Balanced Plan, and the High Performance plan. High performance plan helps you make the most out of your resources while dealing with power-hungry stuffs (like -gaming, editing videos, etc). Sometimes you may see that the High Performance plan is not there in the list of Power Plans.
How to retrieve missing High Performance plan in Windows 10
There are some pretty easy ways to retrieve the absent High Performance plan.
Fix 1 – Using a command in cmd
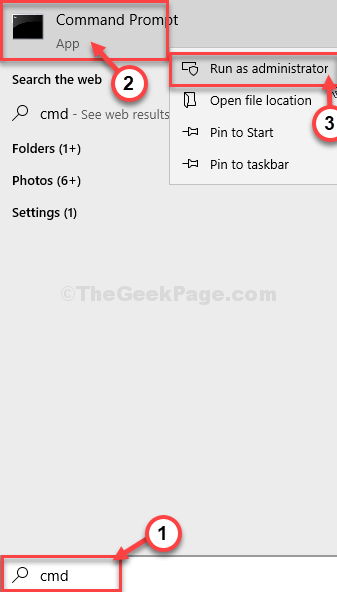
1 – Search cmd in Windows search box of taskbar.
2 -Right click and then click run as administrator.

3 – Now, run the following command given below
powercfg /s SCHEME_MIN
4 – Now, press Windows and R key together to Open a Run window.
5 – Copy-paste this code in the Run window. Click on “OK“.
powercfg.cpl

3. Once the Power Options window opens up, check that whether the plan has showed up .
Fix 2 – Run CMD command
Just by running a simple CMD command, you can restore the High Performance plan.
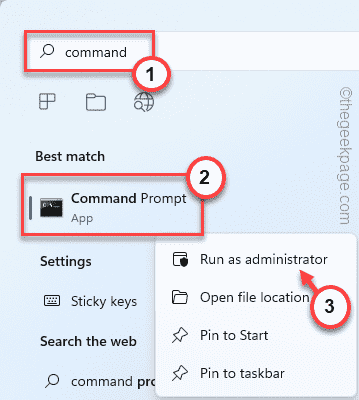
1. Type “cmd” in the search box.
2. Then, right-click on “Command Prompt” and choose “Run as administrator“.

Command Prompt will open.
3. To restore the High Performance power plan, just copy this line of code and paste it into the terminal. Now, hit the Enter key to execute it.
powercfg -duplicatescheme 8c5e7fda-e8bf-4a96-9a85-a6e23a8c635c

Close the CMD window.
4. After that press the Windows key+R.
5. Type “powercfg. cpl” and click on “OK“.

6. Here, look for the ‘High Performance’ plan.
7. Click on the “High Performance” plan to select it.

NOTE– You can restore any of the Power plans we have talked about before. We are giving you a list of commands associated with particular power plans. Just execute the code following the above steps.
High Performance:
powercfg -duplicatescheme e9a42b02-d5df-448d-aa00-03f14749eb61
Balanced:
powercfg -duplicatescheme 381b4222-f694-41f0-9685-ff5bb260df2e
Power saver:
powercfg -duplicatescheme a1841308-3541-4fab-bc81-f71556f20b4a
Don’t forget to restart your computer once to let the changes take effect.
Fix 3 – Run PowerShell commands
If the Command Prompt commands don’t work out, try them with the PowerShell command.
1. Press the Windows key+X.
2. After that, click on the “Windows PowerShell (Admin)“.

3. When the PowerShell window opens up, copy-paste this code and hit Enter.
powercfg -duplicatescheme 8c5e7fda-e8bf-4a96-9a85-a6e23a8c635c

4. You can press the Windows key+R keys together.
5. Type “powercfg.cpl” and click on “OK“.

6. Click on the “High Performance” to switch to that power profile.

This should have fixed the issue on your computer.
Fix 4 – Download Power plan file
Download the Default_Power_Plan zip file and run a PowerShell command.
1. Click on this Default_Power_Plans.
Default_Power_Plans will be downloaded.
2. Open the File Explorer.
3. Extract the “Default_Power_Plans” file to a location on your computer.

4. Now, go to the location where you have extracted the zip file.
5. Click on the address bar once and press the ‘Ctrl+C‘ keys together.

6. Press the Windows key+X keys together.
7. To access the PowerShell window, click on the “Windows PowerShell (Admin)“.

8. Now, write this code in the PowerShell window. Adjust it accordingly and hit Enter.
powercfg -import "path of the extracted file\High performance.pow"
[Paste the file location you have copied from the extracted folder.
Example – We had extracted the zip file at folder location “C:\Users\Sambit\Pictures\New folder”. So, the command will be-
powercfg -import "C:\Users\Sambit\Pictures\New folder\High performance.pow"
]

Restart the system, if needed.
Fix 5 – Adjust your registry
Sometimes Windows can hide this power plan. You can recover this simply by tweaking your registry.
Important– You should take a backup of your registry before you make any certain changes in it. If you haven’t taken a backup yet, here is how to back up your registry step by step.
1. Type “regedit” in the search box.
2. Then, click on the “Registry Editor” to access it.

3. Then, navigate to this location –
Computer\HKEY_LOCAL_MACHINE\SYSTEM\CurrentControlSet\Control\Power
4. Check out if there is any “CsEnabled” key on the right-hand side of the screen.
5. If there is no “CsEnabled” key, right-click on the screen, click on “New>” and click on “DWORD (32-bit) Value“.
6. Name the new key as “CsEnabled“.

7. Then, double click on the “CsEnabled” key to modify it.

8. After that set the value of the key to “0“.
9. Click on “OK” to save it.

Close the Registry Editor on your system.
Restart your machine and further check if you can find the High-Performance power plan.
NOTE–
If this doesn’t work out, you have to further modify the Registry Editor.
1. Open the Registry Editor again.
2. After that, go to this location, there –
HKEY_LOCAL_MACHINE\SYSTEM\CurrentControlSet\Control\Power\PowerSettings
3. You will notice a lot of keys on your left side panel. Select the first key.
4. After that, right-click on the space and click on “New>” and click on “DWORD (32-bit) Value“.

5. Name the new key as “Attributes“.
6. Double click on the “Attributes” key to modify it.

7. After that, click on “Hexadecimal“. Put the ‘Value data:’ as “2“.
8. After that, click on “OK“.

9. Repeat this same process for all the keys on the left-hand side under the ‘PowerSettings’ header.

After this, restart your computer and check if this works.
Fix 6 – Create a new power plan
You can create a power plan and name it accordingly.
1. You have to press the Windows key+R keys together.
2. Type “powercfg. cpl” and click on “OK“.

3. Click on the “Create a power plan“.

3. Under the “Plan Name” settings, set the name as “High Performance“.
4. Click on “Next“.

5. After this, you will notice “Turn off the display” and “Put the computer to sleep” settings. You can tweak this now or maybe later.
6. Click on “Create” to create the High Performance power plan.

That’s it! You can modify these settings whenever you want from the Power Options window.
How to delete the High Performance Power plan
Sometimes you may need to delete the ‘High Performance’ plan from your computer. Follow these easy steps-
1. Open a Run window.
2. Copy-paste this code in the Run window. Click on “OK“.
powercfg.cpl

3. Once the Power Options window opens up, you will notice the list of power plans on your device.
4. Now, click on the “Balanced” to switch on to that profile.

5. After that, click on the “Change plan settings” of the ‘High Performance’ setting.

6. You have to click on the “Delete this plan“.

7. To confirm the deletion, click on “OK“.

After that, close the Power Options window. The plan is deleted from your device.