Windows Explorer creates a hidden system file named Thumbs.db in all folders that contain video and image files. The extension db stands for database. So Thumbs.db is basically a database file that contains the images in the folder you are viewing, but the images would be of thumbnail size. Even if you delete these files, they will get created again by Windows Explorer. Though this is a great feature to enhance system performance and user experience, when it comes to network folders, this can create some issues.
In this article, we explain through 2 different methods how you can easily disable or remove the Thumbs.db file on network folders in your Windows 11/10.
Method 1: Through Local Group Policy Editor
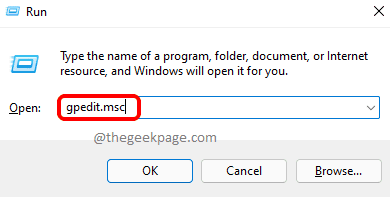
Step 1: Press the keys Win + R at the same time to bring up the Run dialog box.
Once it pops open, type in gpedit.msc and hit the Enter key.
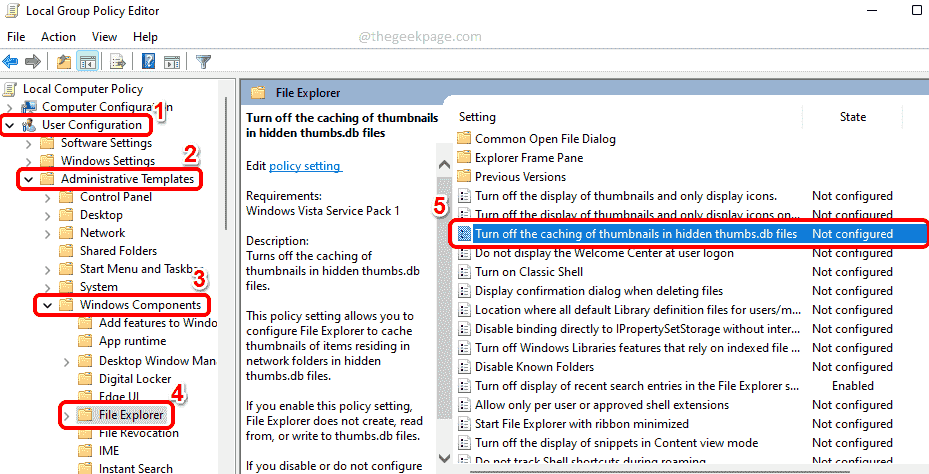
Step 2: When the Local Group Policy Editor window launches open, navigate to the following location by double-clicking on each folder on the way.
User Configuration --> Administrative Templates --> Windows Components --> File Explorer
Once you are at the File Explorer folder, on the right side of the window, you will be able to see a setting named Turn off the caching of thumbnails in hidden thumbs.db files.
Double click on this entry to edit its configuration.
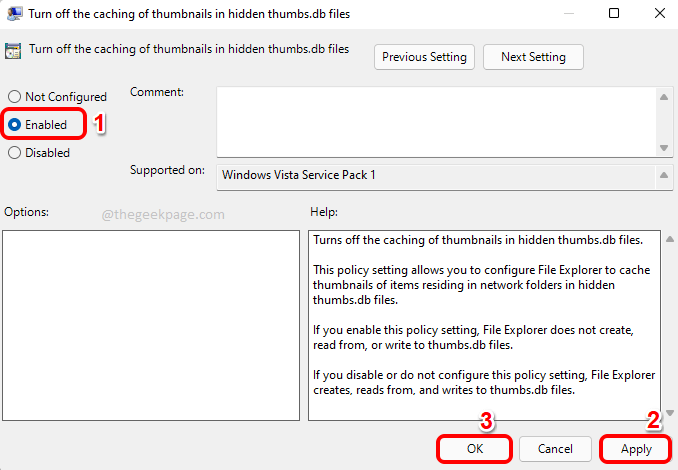
Step 3: On the Turn off the caching of thumbnails in hidden thumbs.db files properties window, choose the radio button corresponding to the option Enabled.
Hit the Apply button and then the OK button.
That’s it. Simple restart your machine for the changes to take over.
Method 2: Through Registry Editor
This method involves making changes to your registry entries. Since incorrect registry settings can cause a highly unstable machine, it is recommended that you backup your registry settings before you proceed with this method.
Step 1: Hit the keys Win + R to launch the Run window.
Type in regedit and hit the OK button to launch the Registry Editor window.
Step 2: Once the Registry Editor launches, copy and paste the following location in the navigation bar and hit the Enter key.
HKEY_CURRENT_USER\Software\Policies\Microsoft\Windows
As next, right click on the Windows folder, click on New and then click on the Key option.
Step 3: Right click on the newly created key, and then click on the Rename option.
Step 4: Name the newly created key as Explorer. Make sure the newly created Explorer key is the selected key by clicking on it.
Now on the right side of the window, right-click on an empty space, click on New and then click on DWORD (32-bit) Value.
Step 5: Name the newly created value as DisableThumbsDBOnNetworkFolders. You can rename the key by clicking on the key and then by pressing the F2 key.
When the DWORD properties window opens up, set the value in the Value data field to 1 and hit the OK button.
That’s it. Don’t forget to restart the computer for the changes to take over.
Please tell us in the comments section whether you found the article useful.


