Command Prompt is one of the most important utilities present in the Windows operating system and even in Windows 11. The command prompt terminal allows you to execute advanced commands and scripts as well. Many users have reported an issue where the command prompt has stopped working or it is not opening at all on their Windows 11 PC.
Here, we have curated a list of troubleshooting methods that can get the command prompt back to a working condition on your Windows 11 system. Go ahead and read this article.
Fix 1 – Try ending task of cmd in task manager
1 -Press CTRL + SHIFT + ESC keys from keyboard to open task manager
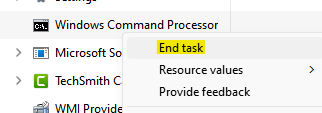
2 – Find Windows command processor in the list. Right click on it and choose end task.

If you are unable to find it, then locate Terminal and end task by right clicking on it.
3 – Now, try to open command prompt again
Fix 2 – Update the Path System Environment Variable
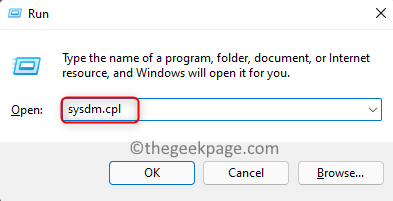
1. Press Windows + R to open Run.
2. Type sysdm.cpl to open the System Configuration.
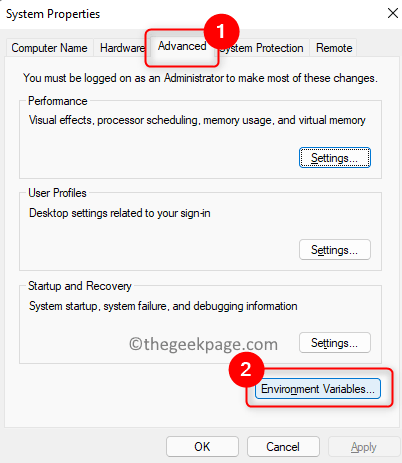
3. Go to the Advanced tab here.
4. Click on the Environment Variables… button at the bottom.
5. In the window that opens, select the Path variable in the User Variables section. Click on the Edit… button.
6. Now, click on New to enter a new path for the environment variable.
7. Type C:\Windows\SysWow64\ and then click on OK.
8. Click on OK to close all the other open windows.
9. Reboot your computer and check if you are able to use the Command Prompt again.
Fix 3 – Make Changes in the Windows Services
1. Just hold the Windows and R key combination to open Run.
2. Type services.msc and hit Enter to open the Windows Services.
3. Locate the Performance Logs & Alerts service in the list of services.
4. Right-click on the service and choose Properties.
5. In the Properties window, change the Startup Type to Automatic using the dropdown box.
6. Click on Apply and then on OK.
7. Now, back in the Services window, click on the Start link in the left pane to start this service.
Check if this helped to fix the issue with the command prompt.
Fix 4 – Edit the Local Group Policy Editor
1. Open the Run dialog by holding the Windows and R keys simultaneously.
2. Type gpedit.msc and hit Enter to open Local Group Policy Editor.
3. In the Local Group Policy Editor window, select User Configuration.
4. Now, choose Administrative Templates –> System.
5. On the right side, look for a setting named Prevent access to the Command Prompt.
6. Double-click on the setting to open it.
7. Make sure either the option Disabled or Not Configured is selected for the Prevent Access to the Command Prompt setting.
8. Click on Apply and then on OK.
9. Check if the Command Prompt is opening and working without any issues.
Fix 5 – Create a Desktop Shortcut
1. Right-click on any empty space on your desktop.
2. Choose New and then in the submenu select Shortcut.
3. In the Create Shortcut window, type cmd.exe in the textbox below the location of the item. Click on Next.
4. Give a name for this shortcut and click on Finish.
5. Once this command prompt shortcut is created on your desktop, right-click on it and choose Properties.
6. In the Properties window, go to the Shortcut tab and click on the Advanced button.
7. Here, check the option Run as administrator and click on OK.
8. Click on Apply and then OK in the Properties window to close it after saving the changes.
Check if you are able to open Command Prompt without any issues.
Fix 6 – Perform SFC and DISM Scan
1. Hit the Windows key and type in powershell.
2. Right-click on Windows PowerShell in the search result and choose Run as administrator.
3. Type the command and execute it.
sfc /scannow
4. Wait for some time till the scan completes. It will detect and fix problematic files on your PC.
5. Check if the issue is fixed. If the issue still exists, perform a DISM scan.
6. Open Powershell and execute the command below
DISM /Online /Cleanup-Image /RestoreHealth
7. Once the scan completes, check if Command Prompt is working.
Fix 7 – Perform a System Restore
1. Hit the Windows key and type restore in the search box.
2. Select Create a restore point in the search result.
3. In the System Protection tab, click on the System Restore button.
4. You can either choose a different restore point or select the recommended restore point.
5. In case you select to choose a different restore point, then select a restore point from the list. Click on Next.
6. Confirm the selected restore point and click on Finish to start the process.
7. Once the system restore completes, check if Command Prompt works as expected without problems.
Thanks for reading.
The command prompt must now be opening or in the working mode without any errors. We hope this article has been informative enough in fixing this issue for you. Comment and let us know the fix that worked for you.


