This one looks like a broken password. It isn’t. Error 0x80080005 is a bad Windows update tripping over its own security feature — your credentials are fine. And once you know that, the fix list gets refreshingly short.
Why This Happens
A recent cumulative update — KB5074109 for most people — broke the sign-in prompt that Remote Desktop and the Windows App lean on. The credential window dies before the handshake finishes. So the connection throws 0x80080005 and gives up.
Microsoft knows. Their release health dashboard lists it as a known issue, with an official rollback file to match. Until the corrected patch ships, you either route around the broken prompt or pull the update off the machine. Both options below.
Fix 1 – Use the Web Client Instead
Meeting in five minutes? Skip the native app entirely. The bug lives in the local app’s authentication token — the browser never touches it.
1 – Open Edge or Chrome.
2 – For Azure Virtual Desktop, go to Web Client ,or try Windows Cloud for the newer portal.
3 – Sign in with your usual Entra ID or Microsoft 365 account.
4 – Launch your desktop or apps right from the browser tab.
Slightly clunkier than the app. Works, though.
Fix 2 – Clear the Saved RDP Credentials
Stale cached tokens make the broken prompt even worse. Wipe them and force a fresh handshake.
1 – Open the Start menu, type “Credential Manager“, and open it.
2 – Click Windows Credentials.
3 – Find every entry starting with TERMSRV. Those are your saved remote desktop logins.
4 – Expand each one and click Remove.
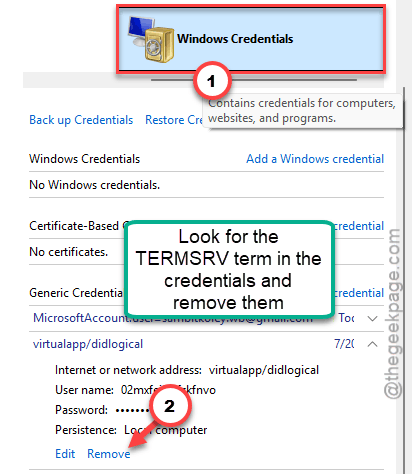
5 – Try the connection again and type your password fresh.
Fix 3 – Uninstall the Broken Update
The real local fix. Pull the patch, reboot, back to work.
1 – Click Start, type cmd, and pick Run as administrator.
2 – Run this code: — if your latest cumulative update has a different KB number, replace it in the code.
wusa /uninstall /kb:5074109
[NOTE – You can check the update from here – Settings > Windows Update > Update history, use that one.]
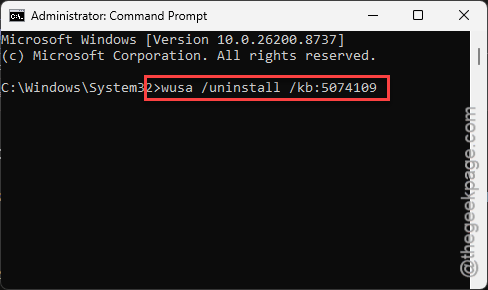
3 – Reboot when it finishes.
Sometimes wusa refuses on this package. Then go the DISM route. Open Terminal (Admin) and find the package name with: Get-WindowsPackage -Online | Where-Object { $_.PackageName -match ‘5074109|RollupFix’ } | Select-Object PackageName
Copy the name it prints, then run this in the admin Command Prompt: dism /online /Remove-Package /PackageName:[paste the name here] /Quiet /NoRestart — and reboot after. An MSP admin who hit this across a whole fleet confirmed the removal plus reboot clears the error.
Fix 4 – Block the Update From Coming Back
Uninstalled it? Windows will quietly reinstall the same patch within days. Rude. Block it first.
1 – Right-click Start and pick Terminal (Admin).
2 – Paste this whole line and press Enter:
New-Item -Path "HKLM:\SOFTWARE\Microsoft\Windows\CurrentVersion\WindowsUpdate\UpdateExclusionList" -Force; New-ItemProperty -Path "HKLM:\SOFTWARE\Microsoft\Windows\CurrentVersion\WindowsUpdate\UpdateExclusionList" -Name "KB5074109" -Value "Block" -PropertyType String -Force
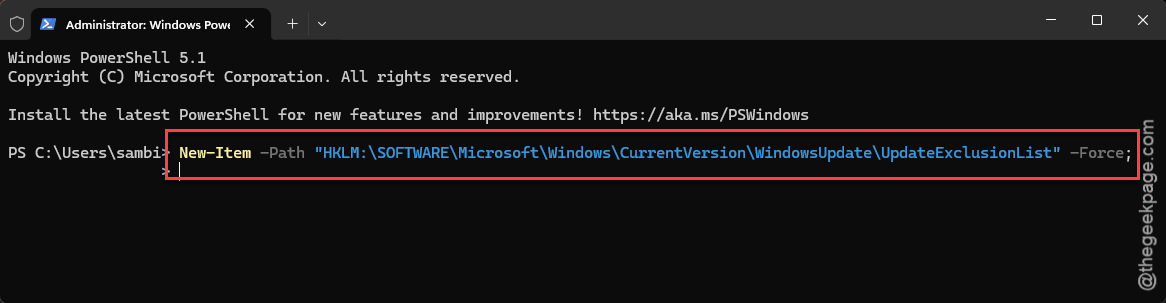
That puts KB5074109 on an exclusion list, so Windows Update skips it. When Microsoft ships the fixed version, delete the KB5074109 value from that same registry key to let updates flow again.
Fix 5 – Deploy Microsoft’s Official Rollback
Managing more than a couple of machines? Use the Known Issue Rollback — a group policy package Microsoft publishes that switches off the exact broken security feature.
1 – Go to Microsoft’s release health dashboard and open the entry for this authentication issue.
2 – Download the Known Issue Rollback MSI linked there.
3 – Run it on the affected client PCs and reboot them.
Cleaner than removing updates by hand. And it keeps the rest of the patch’s security fixes in place.
Fix 6 – Temporarily Disable NLA on the Host
Last resort. NLA (Network Level Authentication) checks who you are before the session even starts — and that pre-check is the part that’s crashing.
1 – On the PC you connect TO, press Windows + I to open Settings.
2 – Click System, then Remote Desktop.
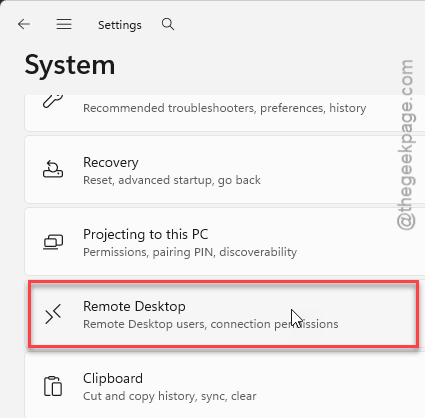
3 – Uncheck Require computers to use Network Level Authentication.
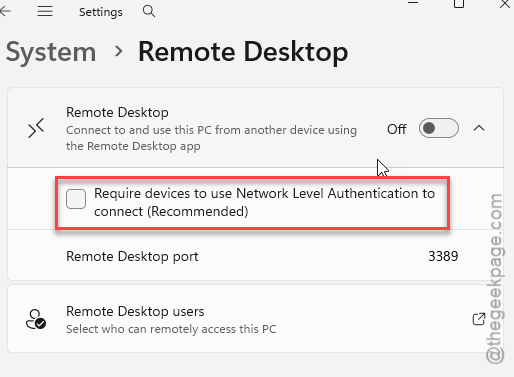
4 – Connect from your machine and get your work done.
Then turn it back on. Seriously. NLA is real protection, and leaving it off on anything reachable from the internet is how bad weeks start.
How to Prevent This
– On machines you depend on for remote work, pause updates for a week or two after Patch Tuesday. Let the bugs surface on someone else’s PC.
– Keep the web client bookmarked. When the native app breaks, the browser is your spare key.
– Before digging through settings after any update, check Microsoft’s release health dashboard. If it’s a known issue, the fix is usually posted right there.
People Also Ask
How do I fix error code 0x80080005?
Uninstall the cumulative update that caused it — KB5074109 in most reports — then block it from reinstalling. In a hurry? Connect through the browser-based web client instead of the native app. Clearing saved TERMSRV entries in Credential Manager helps with lingering token problems too.
How do I fix Remote Desktop connection problems in Windows 11?
Work through the basics first: both PCs online, Remote Desktop enabled under Settings > System > Remote Desktop, and correct credentials. Then clear cached credentials and check whether a recent Windows update is a known troublemaker. Update-related failures usually vanish once the faulty patch is removed.
Is it safe to turn off Network Level Authentication?
As a short-term workaround on a home network, it’s tolerable. Long term, no — NLA screens out attackers before a session ever opens, and internet-facing machines need that shield. Disable it only while you fix the real problem, and switch it back on the same day.