Is your PC restarting frequently as you are trying to play your favorite game on your computer? This problem may occur due to various probable reasons. But, generally, the computer crashes due to any misconfigured hardware that you may have installed on your computer. Just try out these workarounds and check further.
Workarounds –
1. Remove all the USB devices from your computer. Restart your computer now. Launch the game you were playing.
2. Play another game and check whether the error is specific to a particular game.
Recommended Read: How to optimize your Windows 10 pc for gaming and maximum performance
Fix 1 – Use low graphics settings
If you are using high/ultra graphics settings while playing the particular game, your system is crashing because of it.
If your computer doesn’t meet the recommended requirements of the particular game, you can’t set your device to use the highest settings. So, we recommend you do this.
1. Launch the game on your computer.
2. Open the in-game settings. Then, set the graphics quality “Low” or “Lowest” settings.
3. Save and apply the new settings. Re-launch the game, if required.
Continue playing the game. Then, check if this helps your resolve the problem.
Fix 2 – Uninstall any recently-installed hardware
If you have recently installed any new hardware on your computer you may see this issue.
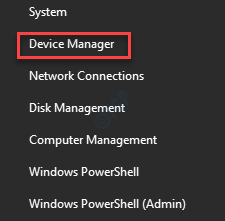
1. Press the Windows key+X keys together.
2. After that, click on “Device Manager” to access it.

3. Once the Device Manager opens up, look for the recently-installed hardware in the list of devices.
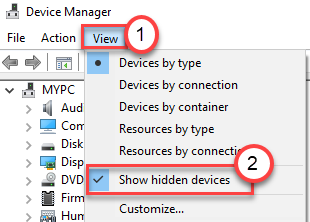
4. If you can’t find it, click on “View“. Then, click on “Show hidden devices“.

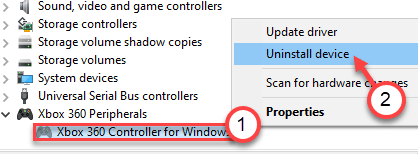
5. Then, right-click on the device you want to remove and click on “Uninstall device“.

6. Don’t forget to click on “Uninstall” one more time to finally uninstall it from your computer.
Once you have uninstalled the device from your computer, close the Device Manager.
7.Then, press the Windows key+R keys together.
8. Next, write “appwiz.cpl“. After that, hit the Enter key.

9. In the list of installed apps, look for the apps related to the driver you have just uninstalled.
10. Right-click on the particular software and further click on “Uninstall“.

Complete the process.
After that, just restart your computer once. Launch any game and check if the computer is still crashing or not.
Fix 3 – Install latest graphics driver
If you are facing this problem while playing the recently released game, you have to install the latest graphics driver optimized for new games.
1. You have to search for the “GeForce Experience“.
2. Then, click on “GeForce Experience” in the search results.

3. After that, go to the “Drivers” tab.
4. Here, click on “Check for updates” to find the latest driver.

5. Click on “Download” to download the driver.

Let GeForce Experience download the driver update.
6. Once the downloading process is complete, you will find two methods to install the driver.
Those are – “Express Installation“ and “Custom Installation”.
7. You have to choose “Custom Installation“.

8. After that, check the “Perform a clean install” check box.
9. Now, to start the installation process, just click on “Next”.

GeForce Experience will uninstall the existing graphics drier and install the latest version.
This process will 5-10 minutes.
10. In a few minutes you will notice the installation has completed.
11. Then, click on “Close“.
Do not forget to restart your computer.
Fix 4 – Empty the Temp folder
Corrupted files in the Temp folder may cause this issue.
1. First of all, press the Windows key+R keys together.
2. After that, type this code and click on “OK” to access the Temp folder.
%temp%

4. When the Temp folder appears, you will see a list of folders there.
5. Just select all the contents in the folder.
6. After that, press the ‘Delete‘ key to clear everything from the Temp folder.

Once you are done, close the File Explorer window.
Launch the game again on your computer. Check further.
Fix 5 – Adjust the amount of Virtual RAM
If you have configured to use a high amount of virtual RAM on your computer, this problem may occur.
1. Just right-click on the Windows key and click on “Run“.
2. In the Run window, write “sysdm.cpl“. Then, hit Enter to open System Properties.

3. In the System Properties window, go to the “Advanced” tab.
4. Under the Performance‘ tab, click on “Settings“.

5. Go to the “Advanced” settings tab.
6. Now, under the ‘Virtual memory‘ section, click on “Change” to alter the paged file size change.

7. In the Virtual Memory window, uncheck the option “Automatically manage paging file size for all drives” so you can alter it.
You have to select the drive where you have installed Windows 10 into.
8. Follow the next steps to configure the page settings more efficiently-
9. Select “C:” drive from the list of drives.

10. Then, click on “Custom size“.
11. Then, set the ‘Initial size’ and the ‘Maximum size’ accordingly.
NOTE –
You can easily calculate the approximate size of these parameters using this formula.
Initial Size (MB) = use the recommended size of RAM mentioned in the screen.
Maximum Size (MB) =1 .5*1024* (Installed RAM)
Example- In this computer, the Installed RAM is = 8 GB.
As the Initial size is mentioned on the page is 2938 MB. So, the initial size of the RAM is set to 2938 MB.
Now the Maximum size will be = 1.5 * 1024 * 8= 12288 MB.
Do the calculations according to the available memory on your device.
12. To finalize the limit, click on “Set“.

13. If a warning message pops up on your screen, click on “Yes“.

14. Then, click on “OK“.

15. In the Performance Options window, click on “Apply” and then click on “OK” to save the changes.

16. When you are back to the System Properties screen, click on “Apply” and then on “OK“.

Now, you have to restart your computer to let these changes take effect.
Launch the game you were facing a problem with.
Fix 6 – Run a memory test
If there is a RAM issue on your computer, you have to run a memory test on your computer.
1. Open the Run terminal, by right-click on the Windows key and click on “Run“.
2. In the Run window, write “mdsched.exe” and hit Enter.

3. Here there are two possible choices available for you.
If you want to restart your machine and start the check click on the “Restart now and check for problems (recommended)” option.
Otherwise, to check the system while your system restarts next time, click on the “Check for problems the next time I start my computer” option.

Wait for the checking process to complete as your computer boots up.