Microsoft released the latest Windows 10 version 2004 in May and since then some of the users have been complaining of quite a few issues. While Windows update brings some important and interesting changes to the Windows 10 device, it can also create a lot of problems.
One such issue is the “OneDrive cannot connect to Windows” error on Windows 10 Version 2004. You see this error when you open OneDrive on your Windows 10 device where you can also see the options to “Try again” and “Download files“. Unfortunately, both the options can’t help get rid of the error.
However, we have tried a few solutions and they seem to work. Let’s see how to fix this issue.
Method 1: Roll Back the May 2020 Update (version 2004)
One of the options is to roll back your update, so that you can go back to the previous Windows version and things are back to normal. You can roll back the May 2020 Update (version 2004) in two different ways. That is, if the 1st solution is not applicable to you, you can try the 2nd one. Let’s see how.
Solution 1: Through Windows Recovery Settings
Step 1: Press the Win + I hotkey on your keyboard to open Settings.
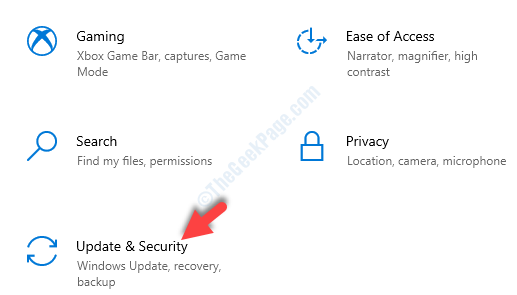
Step 2: In the Settings window, click on Update & Security.

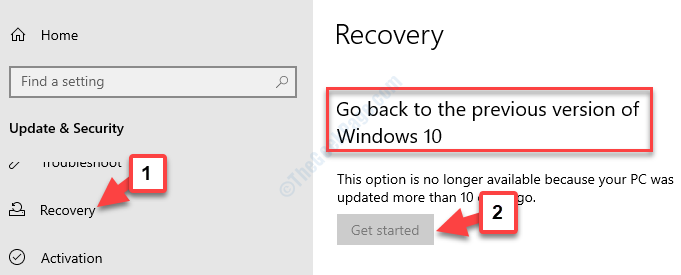
Step 3: Next, on the left side of the pane, scroll down and select Recovery.
Now, on the right side of the pane, navigate to the Go back to the previous version of Windows 10 and click on Get started.
Click on Get started (if it’s highlighted), and it will uninstall the May 2020 Update (version 2004).

However, for many users the Get started button may not be highlighted just like shown above. In such cases, you would need to roll back the update using the Registry Editor. Let’s see how in the next solution.
Solution 2: Using the Registry Editor
Before you make any changes to the Registry Editor, make sure that you backup the registry editor settings. This is to ensure that in case you lose any registry data, you can recover that using the backed up data.
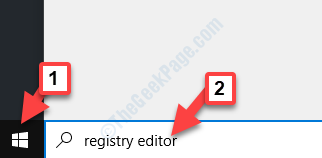
Step 1: Go to the Windows search box (next to Start) and type Registry Editor.

Step 2: Left-click on the result to open the Registry Editor window.

Step 3: In the Registry Editor window, navigate to the path as shown below:
HKEY_LOCAL_MACHINE\SYSTEM\CurrentControlSet\Services\CldFlt\Instances
On the right side, you will see a String Value named DefaultInstance. Double-click on it to open the Edit String dialogue box.

Step 4: In the Edit String dialogue box, change the Value Data field to CldFlt.
Press OK to save the changes and exit.

Exit Registry Editor and restart your PC for the changes to be effective. The May 2020 Update (version 2004) is now uninstalled and rolled back to the previous Windows update version. Your OneDrive should now connect to Windows.
If the problem persists, follow the next method as shown below.
Method 2: Using Command Prompt
This method can also be executed in two different command sets. Let’s see how.
Solution 1: By Resetting TCP/IP to Default
Step 1: Go to Start and type Command Prompt in the Windows search field.

Step 2: Right-click on the result and select Run as administrator. This will open the Command Prompt with admin rights.

Step 3: As the Command Prompt (Admin) window opens, type the below commands one by one and hit Enter after each command:
netsh int ip reset

netsh winsock reset

ipconfig /flushdns
Once the reset process is complete, exit Command Prompt and reboot your PC. The OneDrive should now connect to your PC and you can now view the files.
But, if this does not work, you can try the next solution,
Solution 2: By Enabling the Windows Cloud Filter (CldFlt) Driver
More often the issue arises due to the Windows Cloud Filter (CldFlt) Driver. It may be possible that the Cloud Filter Driver is not attached to the OneDrive sync. Let’s see how to enable it.
Step 1: Go to Start and type Command Prompt in the Windows search field.

Step 2: Right-click on the result and select Run as administrator. This will open the Command Prompt with admin rights.

Step 3: Copy the below command and paste it in the Command Prompt (Admin) window. Hit Enter:
reg query "HKLM\Software\Microsoft\Windows NT\CurrentVersion\Notifications\Data" /v 41960B29A3BC0C75

Once the process is complete, restart your PC (using the Restart button), and your OneDrive sync issue with Windows should be solved.