When trying to install Microsoft Office 365, you may encounter the error code 0-1011 on your Windows 10 PC that prevents you from finishing the installation. You may restart the installer service or even reboot your PC a few times to see if it helps fix the issue, but in most cases it does not. It can be frustrating, especially, if you want the program for some important task.
Some of the other related error codes are, 30088-1015, 30183-1011, and 0-1005. You may encounter the error if there’s an issue with the network connection or if the hard drive is short of space. Fortunately, there are a few possible solutions for the Microsoft Office 365 error code 0-1011.
Method 1: Free Up Hard Drive Space
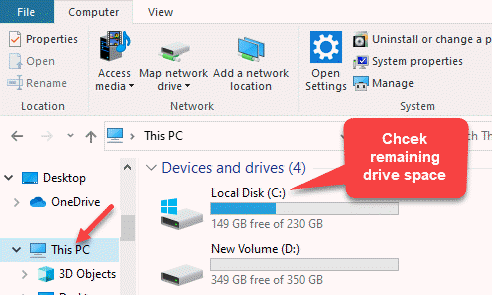
In this case, the first thing to do would be to free up the hard drive space. Here’s how to check how much storage space is left on your hard drive:
Step 1: Press the Win + E keys together on your keyboard to open the File Explorer window.
Step 2: In the File Explorer window, select the This PC shortcut on the left.
Now, on the right-side you can check the storage space displayed under each drive.
 b
b
If you see that a specific drive is almost full, you can clear the space to free up the drive space using this process.
Method 2: Run Quick Repair using Uninstall or change a program
This method helps you to repair the Microsoft Office 365 using the quick repair option. Let’s see how:
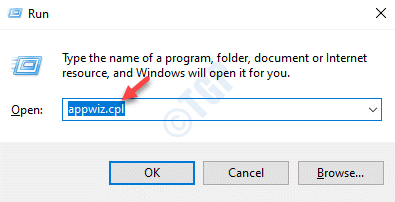
Step 1: Press Windows key and R key together at once from your keyboard to open RUN.
Step 2: In the Run command window, type appwiz.cpl in the search field and hit Enter.

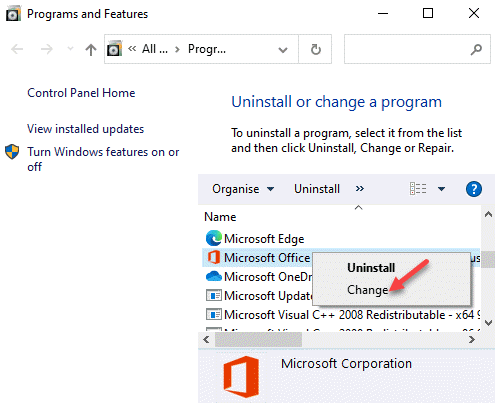
Step 3: This will open the Programs and features window in the Control Panel.
Now, go to the right side and under Uninstall or change a program, right-click on Microsoft Office 365 app and select Change.

Step 4: It will now open a prompt – How would you like to repair your Office Programs?
Select Quick Repair and press the button that says Repair.

Step 5: Next, click on Repair again to confirm the action.
Now, let Windows repair the program automatically.

Once done, try installing the program again and you should not encounter the 0-1011 error again.
Method 3: Uninstall and reinstall Office
This method is applicable when you already have a Microsoft Office 365 installed on your system and you want to upgrade it to the latest version, but you are unable to. In this case you must uninstall the previous version and re-install the latest version. Here’s what you should do:
Step 1: Click on the below link to download the Microsoft Support and Recovery Assistant that helps uninstall Office based on your browser:
Step 2: Click to open the Setup file and then follow the on-screen instructions to install the tool.
Step 3: Once installed, select the program and the version you want to uninstall and press the Next button.
Follow the on-screen instructions to finish uninstalling Office.

Now, restart your PC and the tool will re-open to finish uninstalling the Office program. Once done, try re-installing the program again. You should now be able to re-install it without any errors.
Method 4: Use the offline installer to install Office
Alternatively, you can try installing Microsoft Office 365 through the offline installer because it may help skip any proxy servers, firewall or antivirus security blocks, or even any issues with the internet connection that may occur during the installation process. Follow the below instructions to use the offline installer to install Office:
Step 1: Click on the below link to open the official Microsoft page for the offline installer:
Log in with your Microsoft Account, if you have not already signed in to your Office version with the same credentials.
Step 2: Now, click on the Install Office button on the right.

Step 3: In the Microsoft Account window, under the Services & Subscriptions section, click on Install again (next to Microsoft Office 365).

Step 4: It will now open the Download & install Office prompt.
Click on Other options on the upper right.

Step 5: In the next screen, select the language from the drop-down below Choose a language and check the box next to Download an offline installer.
Press Install to continue.
Now, open the set up file to complete the download. Once it’s complete, you should see a new drive created for the Office installation file in the File Explorer. You can now successfully install each Office product.
Method 5: Temporarily turn off proxy settings
Sometimes using a proxy server can create issues with the network connection and thus, you may face an issue installing the Office app and see the error code 0-1011. You must disable it to check if it helps fix the issue. Here’s how:
Step 1: Press the Win + X shortcut keys on your keyboard and select Run.
Step 2: In the Run command window that opens, type inetcpl.cpl in the search field and press OK to open the Internet Properties window.
Step 3: In the Internet Properties window, go to the Connections tab and click on LAN settings.
Step 4: Next, in the LAN Settings window, go to the Proxy server section.
Here, uncheck the box next to Use a proxy server for your LAN.
Press OK to save changes.
Step 5: Press Apply and then OK in the Internet Properties window to apply the changes and exit.
Now, try installing the Microsoft Office 365 and you should not see the error anymore.
Method 6: Temporarily Turn Off Anti-virus
Sometimes, you may encounter the error code 0-1011 while installing the Microsoft Office 365 due to the 3rd party antivirus on your system that may be blocking the program considering it as a threat. You can turn off the antivirus software temporarily or even install it, to check if this helps fix the issue.
Alternatively, you can also turn off the built-in antivirus software on your Windows 10 PC. To turn it off temporarily, follow the below steps:
Step 1: Press the Win + I keys together on your keyboard to launch the Settings app.
Step 2: In the Settings app, click on Update & Security.

Step 3: In the next window, click on Windows Security option on the left side of the pane.

Step 4: Now, on the right side of the window, click on Virus & threat protection.

Step 5: It will open in new Windows Security pane.
Here, on the extreme right side, under the Who’s protecting me? section, click on Manage providers.

Step 6: Next, on the right side, under the Antivirus section, select Microsoft Defender Antivirus and switch it off.
Once, the Windows Defender Antivirus is turned off, exit Settings window and try installing the Microsoft Office 365 and it should finish installing without any errors now.
Method 7: Temporarily Turn Off Firewall
Step 1: Right-click on Start and select Run to open Run command.

Step 2: In the search box, type firewall.cpl and hit Enter to open the System and Security window in the Control Panel.

Step 5: In the next window, select Turn Windows Defender Firewall on or off.

Step 6: In the Customize Settings window, under the Customize settings for each type of network, select the radio buttons next to Turn off Windows Defender Firewall for both Private and Public network settings.
Press OK to save the changes and exit.

Now, exit Control Panel and check if you can reinstall the Microsoft Office 365 program.
If none of the above method works, you can try using a wired internet connection, or try connecting to internet in a different location. Alternatively, you can try to install the program from home instead of your office or school because the network might not be working properly in these locations.