MS Office is a set of applications introduced by Microsoft for the Windows system. These applications are necessary for creating and editing various types of documents such as presentation slides, word documents, spreadsheets, etc.
Recently many Windows users started getting an error message while trying to open any of the MS Office applications on their Windows system. The error message says
- Something went wrong
- We’re sorry, but we are unable to start your program.
- Please ensure it is not disabled by the system.
- Error Code: 1058-13
Due to this error message, they were not able to open and use any Office application which is creating a huge problem for them. The potential reasons for causing this error message are listed below.
- VPN or Proxy server issues.
- Disabled Office ClickToRun service.
- Outdated Windows system and Office suite program.
- Issues with the Graphics Card Driver.
After analyzing these potential reasons, we gathered a lot of information and compiled a few solutions for all the users who are facing this issue.
If you are going through the same, please continue reading this article which will help you fix the problem.
source:https://techcult.com/fix-office-error-code-1058-13-in-windows-10/
Fix 1 – Start the ClickToRun service of the Office suite
The ClickToRun service of the MS Office is a tool which downloads the packages required for installing the MS Office products by reducing the time needed for streaming. If the ClickToRun service is stopped for any reason, it is bound to throw such errors while trying to open the Office suite on the Windows system.
So we need to make sure that this service is started and running on the system via command prompt using the help of the steps given below.
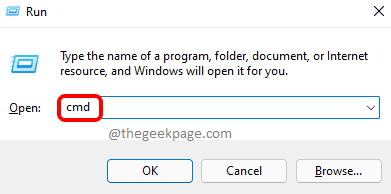
Step 1: To open the Run command box on the system, press the Windows + R keys on your keyboard.
Step 2: Once the Run box appears on the screen, type cmd in the textbox of the run dialogue box and press Ctrl + Shift + Enter keys together at once.

Step 3: This will prompt UAC on the screen which you have to accept by clicking Yes to continue.
Step 4: This opens the Command Prompt window as an admin.
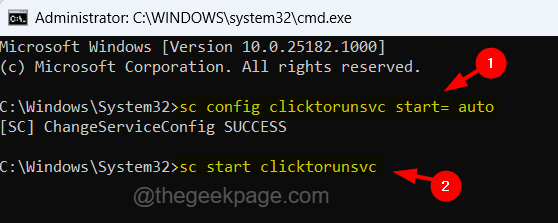
Step 5: Now type the below line in the command prompt and press Enter to execute the command.
sc config clicktorunsvc start= auto
Step 6: This configures the start settings option of the ClickToRun service to always start automatically.
Step 7: Once done, execute the below command for starting the ClickToRun service of Office which will enable it.
sc start clicktorunsvc

Step 8: After these two commands above are executed successfully, check if the problem is resolved.
Fix 2 – Turn Off the Proxy & VPN settings
Sometimes, the Proxy and VPN server settings set by the user interfere in some of the applications because they protect the applications from virus and malware attacks. Therefore, we request our users disable both the proxy and VPN server settings on their system by following the steps given below.
How to turn off the Proxy settings
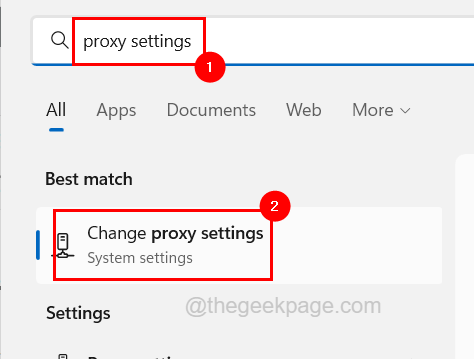
Step 1: To open the Proxy page on the system, press the Windows key and type change proxy settings.
Step 2: Select the Change proxy settings system settings from the search results as shown in the below screenshot.

Step 3: On the Proxy page under Automatic proxy setup, click on the Automatically detect settings toggle button to turn it Off as shown below.
Step 4: Then click the Edit button of the Use setup script option to open the edit window.

Step 5: In the edit setup script window, turn off the Use setup script by clicking its toggle button and then click Save.

Step 6: Once done, go to the Manual proxy setup section and click the Edit button under it to open the edit window.

Step 7: Turn off the Manual proxy setup by clicking on its toggle button and clicking Save to save the changes and close the edit window as shown below.

How to turn off the VPN settings
Step 1: Press the Windows key and type vpn settings.
Step 2: Click VPN settings option from the results as shown in the below screenshot.

Step 3: On the VPN page, you will find two options under the Advanced settings for all VPN connections section.
Step 4: So first turn off the Allow VPN over metered networks option by clicking on its toggle button as shown below.
Step 5: Then do the same for the Allow VPN while roaming option to turn it off as shown below.

Fix 3 – Reinstall the MS Office Suite
If there is any problem because the installation process of the MS Office suite is not done correctly, then such errors tend to occur on the system as we discussed above in this method. So we can resolve this issue by attempting to reinstall the MS Office suite carefully on the system.
Follow the steps given below on how to do it.
Step 1: Open the Installed apps page by pressing the Windows key and typing installed apps.
Step 2: Then select the Installed apps page from the search results as shown below.

Step 3: Once the Installed apps page opens, type microsoft office in the search bar on top of the page.
Step 4: It displays all the apps with the office in its name.
Step 5: Click show more options (horizontal ellipsis icon) of the Microsoft Office suite from the list to view more options.
Step 6: Select Uninstall from the list.

Step 7: Then click Uninstall on the small pop-up window for confirmation as shown below.

Step 8: This will start to uninstall the MS Office suite from the system and once it is done, close the Installed apps page.
Step 9: Next, Go to the Microsoft Account homepage and click Sign in for logging in using your Microsoft account credentials.

Step 10: After signing into the Microsoft website using your account, click Services & subscriptions option on the top menu bar as shown below.

Step 11: Click Install on the Office Home & Student subscription to start downloading and then installing the MS Office suite on the system.

Step 12: Follow the onscreen instructions to carry out the downloading and installing process of the MS Office suite.
Fix 4 – Update the Graphics card Driver
Some users claimed that updating the graphics card driver on their system resolved this issue and they were able to launch all the applications of MS Office suite such as word, excel, etc. So let us also try updating the graphics card driver and see if this works for us too.
Here are the steps on how to update the graphics card driver.
Step 1: Press the Windows+X keys together and then press the M key on the keyboard which opens the Device Manager.
Step 2: After the Device Manager window opens, double-click on the Display adapters to expand it and then right-click on the graphics card.
Step 3: Select the Update driver from the context menu as shown below.

Step 4: Click Search automatically for drivers option to continue searching online for the latest driver.

Step 5: Once done, close the Device Manager.
Fix 5 – Update the Windows system
Usually, an outdated Windows system causes many troubles while opening or running any software on the system. So it is better to regularly update the Windows system using the steps explained below.
Step 1: Press the Windows + R keys together on the keyboard.
Step 2: This opens up the Run command box on the screen and then you have to type ms-settings:windowsupdate in its textbox and press Enter key.

Step 3: Now the Windows Update page will get opened on the system.
Step 4: Click Check for updates on the top right as shown below.

Step 5: This starts to search for any updates available for the Windows system.
Step 6: If any are found, please download and install all of them and then restart the system.
Fix 6 – Visit the Microsoft Support page
If nothing works out, you can always contact the support team of Microsoft for any queries and problems related to any of their products.
You can visit the Microsoft Support contact page by clicking here