Some Windows 11 as well as Windows 10 users have complained that when they are trying to install fonts on their PC and copy and paste the font in their Windows Fonts folder, the font does not show up in the fonts folder and after popping up a message which says font is already installed. Do you want to replace it . If you are also not able to see your installed font in your windows font folder, here is the required fix.
Fix 1 – Install font for all users
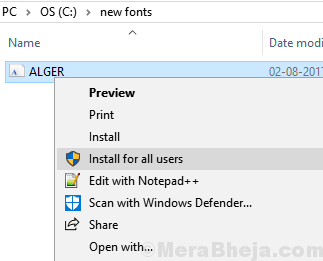
1. Just do a right click on the font you want to install to open right click context menu.
2. Now, choose install for all users.

Fix 2 – Install Font from Control Panel
1. Search control panel in windows 10 search.
2. Click on the search result to go to control panel.
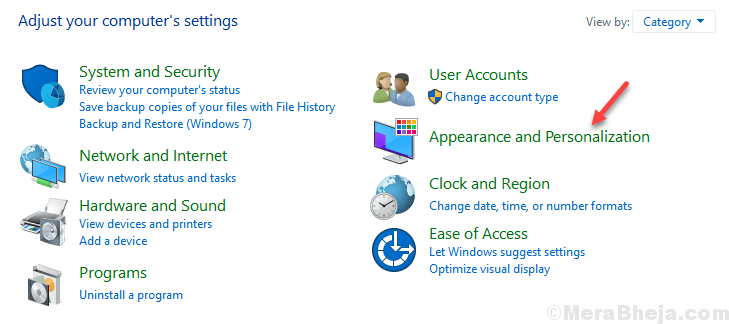
3. Click on Appearance & Personalization.

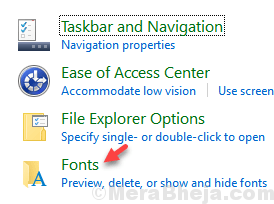
4. Click on Fonts

5. Try to paste and install font here.

Fix 3 – Using Command Prompt
1. Go to C drive and create a folder named new fonts
2. Copy and paste the font you want to install to this folder. For example here i want to install ALGER.TTF font in my case.

3. Now, Search cmd in Windows 10 Search
4. Right click on search result and Choose run as administrator.

5. Now, Copy and paste the command given below in command prompt and hit enter to move to this folder in cmd.
cd C:\new fonts
6. Now, execute the command given below to copy the font to c:\windows\font
copy NAME_OF_THE_FONT.TTF C:\fonts

Fix-4 Run Word in Safe Mode-
If you are encountering this issue, running the application ( in which you are facing this issue) in Safe Mode may help you to solve it.
[We have given the example how to open Word is Safe Mode.]
1. Press Windows key+R to launch Run on your computer. Now, type “winword/safe” and hit Enter.

2. Try to write something using the new font. Check if you can find the new font in the list of the fonts.
3. Once you can see the fonts, close Word in Safe Mode.
4. Now, reopen the original document and you will be able to visualize the font on your computer.
Fix-5 Remove corrupted Fonts-
Some fonts on your computer may be corrupted and that may cause this problem.
1. Press Windows key+R to open Run window. Now, type “services.msc” and hit Enter to open Services window.

2. In Services window, scroll down to find “Windows Font Cache Service“. Select it and then click on “Stop” on the right side of the Services window to stop that service. Now, again double click on “Windows Font Cache Service” to open the Properties of it.

3. In Windows Font Cache Service Properties window, click on the “Startup type:” and select “Disabled” from the drop-down. Finally click on “Apply” and “OK” to save the changes on your computer.

4. Repeat the step-2 and step-3 for “Windows Presentation Foundation Font Cache 3.0.0.0” in Services window.
Close Services window.
5. Reboot your computer to let these changes take effect on your computer.
6. After rebooting your computer, open File Explorer by pressing Windows key+E and then navigate to this location-
C:\Windows\ServiceProfiles\LocalService\AppData\Local
Delete the “FontCache” folder. Then, delete any .dat files with a prefix of “FontCache“.

Close File Explorer window.
7. Now, press Windows key+R to launch Run and then type “control” and hit Enter to open Control Panel.

8. In Control Panel window, find out and double click on “Fonts” to see the full list of fonts on your computer.

9. Now in the list of the fonts, simply right click on the problematic font and then click on “Delete” to delete the font on your computer.

10. If you are prompted “Are you sure you want to delete this font collection?” then click on “Yes, I want to delete this entire font collection from my computer“.

After deleting the fonts from your computer, reboot your computer to save the changes.
11. After rebooting your computer, type “Services” in the search box just beside the Windows icon and then click on “Services” in the elevated search result.

12. In Services window, scroll down to find “Windows Font Cache Service” and double click on it.

13. In Windows Font Cache Service Properties window, click on ‘Startup type:‘ and choose “Automatic“. Now, click on “Start” just under ‘Service status:‘. Finally click on “Apply” and “OK” to save the changes on your computer. This will start the service on your computer.

14. Repeat the same step to start and enable the “Windows Presentation Foundation Font Cache 3.0.0.0” service again on your computer.
Close Services window.
15. Open the document in Word. Select the problematic font. You should notice the cloud symbol beside the font as the font is going to be downloaded and installed on your computer. Select the font and begin typing. Your problem should be solved.
Fix-6 Copy the fonts to the default application directory-
If the font is not showing up at all then copying the fonts directly to application directly can solve this issue.
1. Press Windows key+R to launch Run and then type “control” and hit Enter to open Control Panel.

2. In Control Panel window, find out and double click on “Fonts” to see the full list of fonts on your computer.

3. Now,right click on the font you want to copy and then click on “Copy” to copy the font.

4. Now, go to the font storage of the application on your computer and press Ctrl+V to paste it.
Example: If someone is using Adobe InDesign then they should paste this in this location-
Program Files\Adobe\Adobe InDesign\Fonts
Now, reboot your computer and after rebooting your computer you should be able to use the font on your computer without any further issue.