Sometimes you might have a product description that needs to be inserted in multiple places of a Word document or in different Word documents altogether. In such cases, it wouldn’t be ideal to keep copying and pasting the description every single time. You sure would appreciate a shortcut keyword using which you can insert this text snippet any time you wish to insert it.
Another scenario would be inserting the description of your company at the beginning of every Word document. This content is going to be the same in every document and it definitely doesn’t make sense if you have to copy and paste it every single time. Definitely, a shortcut keyword is going to save up a lot of time.
This Geek Page article is all about the ways through which you can easily insert whole text snippets by just typing in an assigned keyword. Hope you enjoy reading!
Solution 1: Replace Whole Paragraphs Using AutoCorrect Shortcut Options
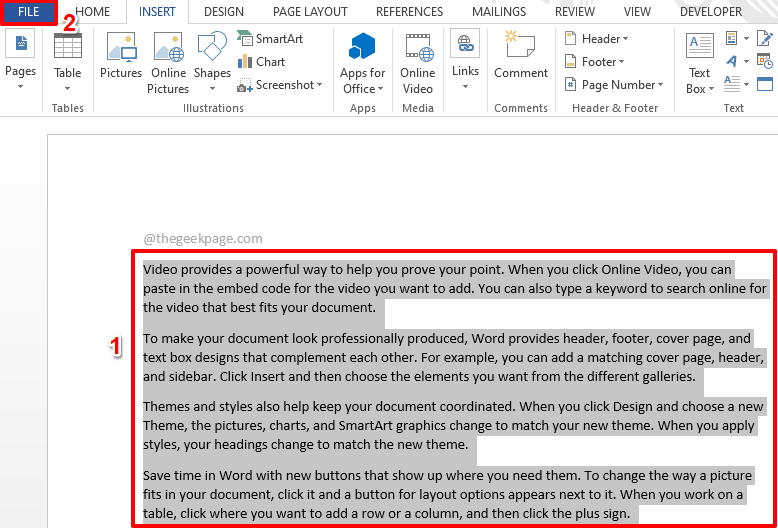
Step 1: Firstly type in your text paragraph. This text can have any sort of formatting including font stylings, colors, etc. It can be a letter, a paragraph, anything of your choice.
Once you have typed in the text, click and select the whole text snippet and then click on the FILE tab at the top.
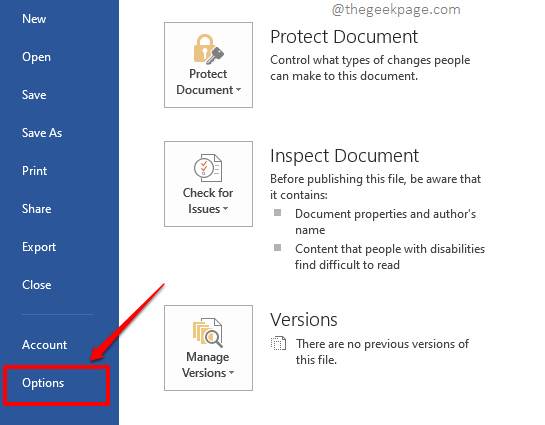
Step 2: Now on the left pane of the window, click on Options.
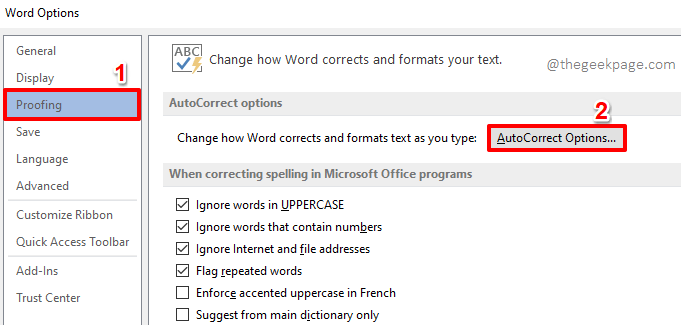
Step 3: On the Word Options window, click on the Proofing tab in the left pane.
Now on the right window pane, under the AutoCorrect Options section, click on the button named AutoCorrect Options.
Step 4: When the AutoCorrect window pops open, make sure you are at the AutoCorrect tab first.
By default, Replace text as you type checkbox will be checked. If not, click on it.
Now, under Replace text as you type section, make sure the radio button against the option Formatted text is chosen.
Now, right under the text Replace, you will be able to see that your chosen text snippet is to be assigned a keyword of your choice. You can type in anything as your keyword. I have used the keyword geekPageText1.
Once you are all done, hit the Add button at the bottom.
Step 5: Now you can see that your entry has been added to the autocorrect list. Hit the OK button to get back to the Word Options window. Hit the OK button there as well.
Step 6: That’s it. It’s time to test our changes. Simply type in GeekPageText1 on your Word document and hit the Enter key. If you assigned a different keyword to your text snippet, you have to type in that keyword instead of GeekPageText1.
Note: The keyword is not case-sensitive. Word treats GeekpageText1 and geeKPageText1 in the same way.
Step 7: When you hit the Enter key, you can see that your keyword is successfully replaced by the text snippet that you typed in Step 1.
Solution 2: Replace Whole Paragraphs Using Text Box Options
This method is very similar to the first method. However, in this method, instead of using the autocorrect options, we use the text box options.
Step 1: Type in your text and then select the whole text by clicking and dragging.
Once you have selected the entire text that you want to be replaced with a keyword, click on the INSERT tab at the top ribbon.
Under the INSERT tab options, there will be a section named Text. Click on the Text Box dropdown button under the Text section.
Step 2: From the list of options available under the dropdown, click on the one that says Save Selection to Text Box Gallery.
Step 3: Now you will be able to see a new window named Create New Building Block.
Inside it, against the field Name, type in the keyword that you want to use to replace the text snippet that you have selected.
Hit the OK button to proceed.
Step 4: You will now be back at your Word document. Type in the keyword that you entered in the step above anywhere on your Word document.
In the example below, we have typed in our keyword, which is geekPageText2.
Once the keyword is typed in, simply press the F3 key.
Note: You can type without the fear of cases being messed up. That is, the keywords geEkPageText2 and GeeKpageTeXT2 are treated the same by Word.
Step 5: The moment you hit the F3 key, you can see that it gets successfully replaced by the text that you want to be inserted. Enjoy!
Please tell us in the comments section if you have any concerns regarding any of the steps. We are always a comment away.
Stay tuned for more amazing technical tricks and tips, all on the way!


