Shapes are ready-made diagrams used to illustrate on a given topic. Different types of shapes such as circles, triangles, arrows etc. are used in different Offices suites such as Word documents, PowerPoint templates & Excel Spreadsheets.
In this article, we’ll follow certain steps to know how to insert and edit Shapes in Microsoft Word 2016:
Step 1:
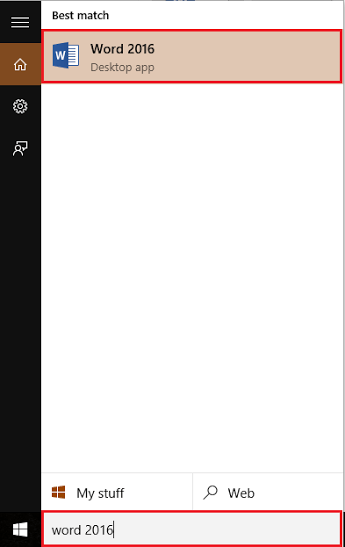
Type “word 2016” in the Windows Search Bar located next to the Start icon. Click on the first option provided.

Step 2:
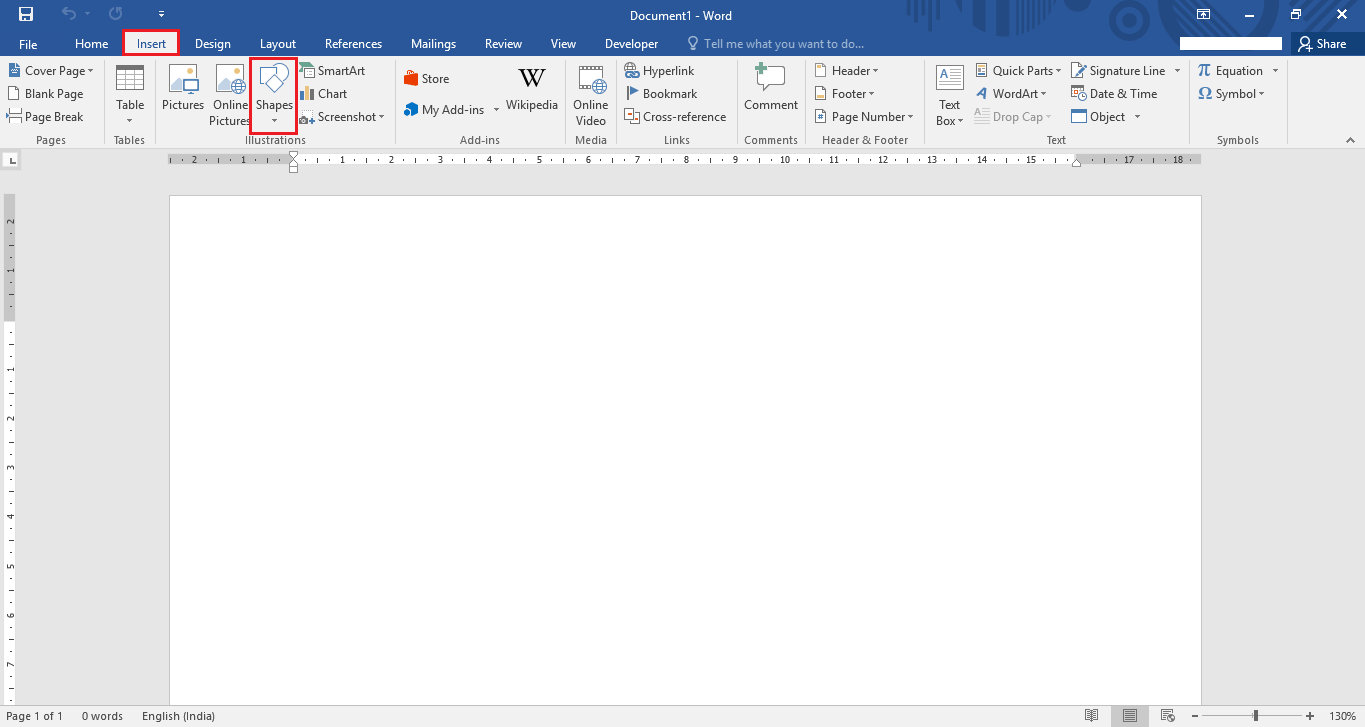
Click on “Insert” tab located at the top left corner of the “Word” window. After clicking, a ribbon toolbar will appear providing numerous options like paging options, tables, illustrations, symbols etc.
In the “illustrations” section, click on “Shapes”.

Step 3:
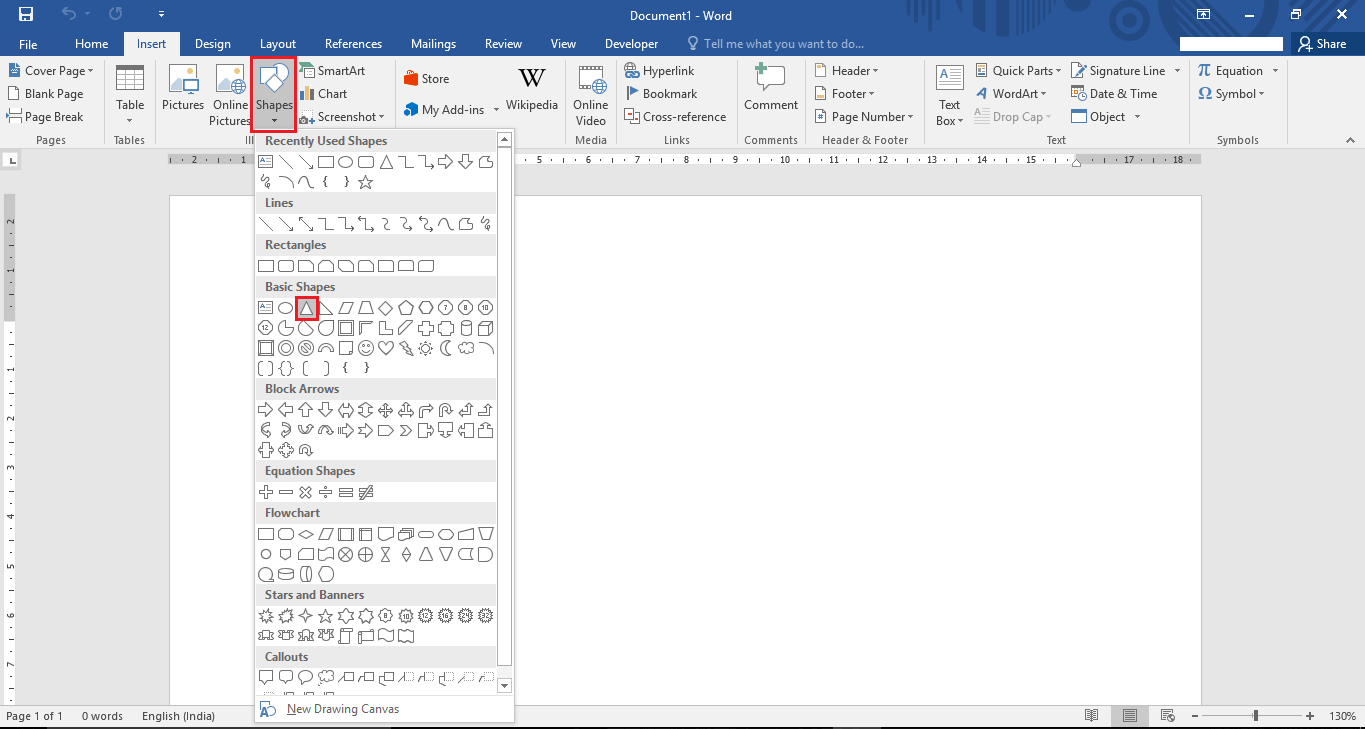
Click to select any of your desired shape from the different categories of shapes such as Lines, Rectangles, Basic Shapes etc.

For instance, we’ve selected a “triangle” in Shapes.
Now, we’ll click anywhere on the screen & drag the cursor on the word page to make a triangle.

Step 4:
If you wish to change the size of the triangle, click & drag on the “circle” icon provided at sides and corners of the triangle. Dragging the icon towards the triangle will make it small and dragging away will make it appear larger.

You can also rotate the triangle 360° by using the “rotate” icon located at the top of the triangle. Click on the icon & drag the cursor in your desired direction to rotate the triangle.

Step 5:
If you wish to have some more shapes, repeat “Step 3”.
For instance, we’ve selected a “Flowchart: Process” shape.
Now, we’ll click anywhere on the screen & drag the cursor on the word page to make a process flowchart.

Step 6:
If you need different positioning of text and images, you can try out the “Layout options”. Layout options consists of features like positioning, text wrapping and size of shapes.
To use this option, click on the shape & then click on the “arc” icon located at the right side of the given shape.

Note: You can choose various layout options from the icons. If you wish to have a different layout rather than the pre-defined layouts, click on the “See more” button.
Step 7:
The “see more” button opens the layout properties window. You can create a custom layout having different horizontal and vertical alignments.
After defining all the alignments and other options, click on “OK” to complete the process.

Step 8:
If you wish to have a different color for a specific shape, click on the shape & then click on “Shape fill” positioned at the ribbon toolbar. Click on your desired color and the same will reflect on your selected shape.

Step 9:
If you wish to have a different outline for a specific shape, click on the shape & then click on “Shape outline” positioned at the ribbon toolbar. Click on any of the colors and the same will reflect on your selected shape. You can also change thickness of the outline from the weight section.

For instance, we’ve selected a black color outline with a weight of 4½ pt.
Step 10:
If you wish to change some effects on a specific shape, click on the shape & then click on “Shape Effects” positioned at the ribbon toolbar. Effects like 3-D, Shadow, Reflection etc. are available for use.

For instance, we’ve selected a “reflection variation” as a virtual effect on the shape.
Step 11:
If you do not wish to keep the current shape then in this case, click on the shape & then click on “Edit Shape” located at the ribbon toolbar.

In this section, click on “Change Shape” & click on any of your desired shape. For instance, we’ve selected a “7-Point Star” shape in place of the current “Process: Flowchart” shape.

Now, the existing shape will be formed into a new shape as given in the screenshot:
That’s it!