Is your Windows device is freezing up during startup or not responding to your commands? If that is the case, you will be annoyed for sure as the system won’t start up unless you solve the issue manually. Just follow these easy instructions to quickly resolute the issue you are facing on your system.
Quick Workarounds –
1. At first, power off your system. Wait for a minute. Then, turn it back on. Do this 2-3 times.
2. Test the Power supply on your system. Sometimes if the PSU is lacking in delivery of an adequate amount of power, you may see this issue.
Fix 1 – Unplug any unnecessary peripherals
Any unnecessary external device attached to your system may cause this problem.
1. At first, tap and hold the power button to shut down the system.
2. Then, very carefully remove detach the system from the power source.
3. Now, remove all the external USB devices (like external HDDs, Bluetooth adapters, WiFi dongles) from your system.
4. Once you are sure that your system has not a single external device connected to it, just connect the power cable to your system and switch it ON.
4. Open the CD/DVD slot and make sure it is empty.
6. Now, press the power button on your machine to start it up.
After this, wait for the system to startup. If your machine is still freezing during the boot, go to the next solution.
Fix 2 – Check whether for any hardware failure
This freezing-up during system startup problem may occur due to a hardware failure on the system.
1. At first, turn off your system completely. Then, detach your system from the power source.
2. Then, open the casing. Now, you can visually inspect the components.
Take a close look at these components –
a. At first, check whether the RAM sticks are working. Detach the RAM stick carefully, clean those up and reattach them again.
b Next, check the cooling system on your system.
c. Finally, blow out all the residual dust from the component using a hand blower
3. If you see any of the components are not functioning properly, you can consider it faulty and you may need to replace it.
4. Otherwise, if everything is just fine, just put the casing back again.
5. Connect the power cable to your computer and boot it up.
Fix 3 – Restart your system in Safe Mode
If the problem is occurring just after you have installed new software, then you have to uninstall it in the Safe Mode.
You have to boot your system into the Safe Mode and then you can uninstall it from your system.
STEPS TO BOOT INTO THE SAFE MODE
You have to boot this system into safe mode with networking capabilities.
1. At first, switch off your system.
2. Then, switch it back on.
c. After that, once your system starts up, just press and hold the power button again to force shutdown your system.
d. Just repeat this task for 1-2 times more and for the 3rd time, let your computer boot up normally.
Your system will go to the ‘Automatic Repair’ mode automatically.
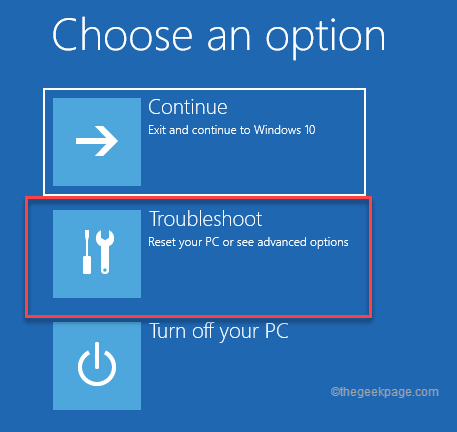
1. Once you see the ‘Automatic Repair’ window has appeared, tap on “Advanced options“.

2. Then, click on the “Troubleshoot” to troubleshoot this issue.

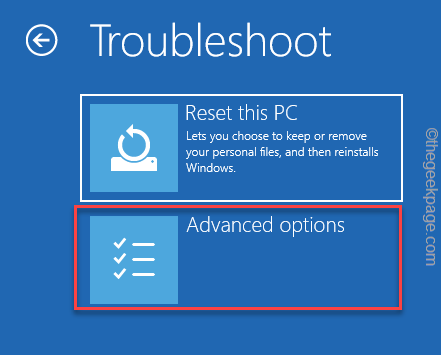
3. After that, tap on the “Advanced options” to go to the next page of settings.

4. In the Advanced options window, click on the “Startup Settings“.

8. Now, tap on “Restart” to restart the system.

This will restart your system.
9. Then, just press the F4 from your keyboard to choose the “Enable Safe Mode” option.
This will automatically boot your system into safe mode. Once your system boots up you will notice four ‘Safe Mode’ inscriptions on the four corners of your desktop.
UNINSTALL ANY RECENTLY INSTALLED APP
Now, as you are in the Safe Mode, you can uninstall the recently installed app from your system.
1. At first, press the Windows key+R keys together.
2. Then, write “appwiz.cpl” and click on “OK“.
3. When the Programs & Features window opens up, you will see the list of apps.
4. Here, right-click on the space and tap on “Sort by:” and click on “Installed on“.
5. You will see the most recent installed apps at the top.
6. Just, right-click on the app you want to uninstall and tap on “Uninstall“.
Now, just follow the on-screen instructions to complete the process. Later, once you are done, restart your window and it shall start up normally.
Fix 4 – Disable the fast startup option
The fast startup option can create this problem in your system. As you have you can’t boot normally, you have to use the Safe Mode.
1. At first, boot your system into the Safe Mode following the steps mentioned before.
2. Once you are there, press the Windows key+R keys together.
3. Then, type “powercfg.cpl” and click on “OK”.
4. When the Power Options window opens up, click on the “Choose what the power button does“.
5. Now, tap on the “Change settings that are currently unavailable“.
6. Now, uncheck the “Turn on fast startup (recommended)“.
7. Then, tap on “Save changes” to save this change.
Now, restart your computer normally. Check whether this works out for you.
Fix 5 – Use the System Restore
You can use the system restore function to restore your system back to normalcy.
1. At first, boot your computer into Windows Recovery mode.
2. Once you are there, tap on the “Advanced options“.

3. Further, go this way –
Troubleshoot > Advanced options
4. Then, tap on “System Restore” to open the System Restore settings.
5. In the System Restore window, choose the “Choose a different restore point” box.
4. Then, tap on “Next“.

5. After that, choose the restore point of your choice.
6. After that, click on “Next“.
7. Finally, tap on “Finish” to start the system restore process.

This way, allow Windows to go back. Your computer will stop freezing while the system boots up.
Your problem should be solved.