Riot Games’ newest first-person shooter has become quite popular among the young gamers, especially the non-CS gamers who are taking alike towards the agent-based tactical combat. Though this game can even run on a potato PC, users are experiencing occasional stutters, frequent FPS drops, and various input delays in the game. In this article, we are listing some very easy system tweaks and tricks to do away with all these issues.
Fix 1 – Adjust the in-game graphics settings
Are you experiencing in-game stutters, jitters, or regular FPS drops? You have to manually adjust the graphics settings.
1. Launch Valorant on your computer, if you haven’t already.
2. Then, tap on the gear-shaped icon on the top-right corner.

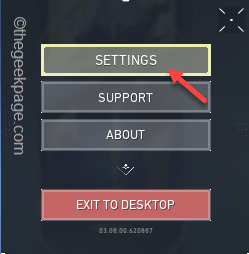
3. After that, click on the “Settings“.

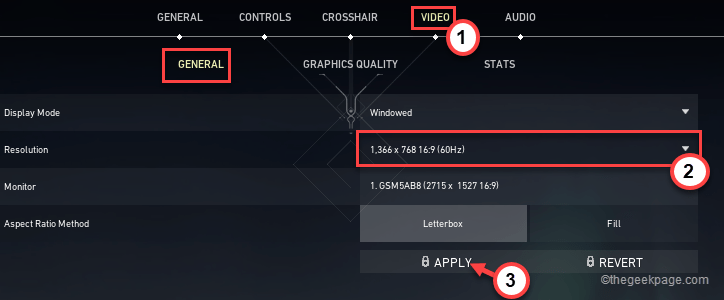
4. Then, click on the “VIDEO” in the menu bar.
5. Here, go to the “GENERAL” section.
6. Now, click on the ‘Resolution’ and set it to anything lower than the maximum available resolution on your screen.
7. Finally, tap on “Apply” to save it.

8. Then, scroll down and toggle all the FPS settings limiters to “Off“. These settings are –
Limit FPS on Battery

Limit FPS in Menus

Limit FPS in Background
9. But, toggle the “Limit FPS Always” to “ON“.

10. Then, set the “Max FPS Always” just one FPS below your screen maximum refresh rate.
[Example – This screen supports up to 60 Hz refresh rate. So, the “Max FPS Always ” = Refresh Rate of the screen – 1 = 60 – 1 = 59]

11. Now, go to the “GRAPHICS QUALITY” section.
12. Here, set “Material Quality“, “Texture Quality“, “Detail Quality” and “UI Quality” to “Low“.
13. Similarly, set the “Vignette” to “Off” settings.

14. Now, toggle the “Anti-Aliasing” to “None“.
15. Then, set the “Anisotropic Filtering” to “2x“.
16. Now, all the rest of the options, like “Improve Clarity“, “Bloom“, “Distortion“, “Cast Shadows“, set those to “Off“.

Finally, close the Settings. Start a deathmatch and check the FPS and other issues. Your problem should be solved.
Fix 2 – Disable the skins
Valorant is well-known for its jaw-dropping skins. But, the skins on the guns are graphics-intensive. Like the ElderFlame Vandal or the GlichPop Phantom- they eat up the last bit of your system GPU unit. So, go back to the basic skin or the solid single-colored skins (like the Solid Blue, or Aristocrat collection) of the gun. It will be less lucrative, but the FPS will significantly make the gameplay smoother.
Fix 3 – Highly Prioritize the Valorant Process
You can ensure that your computer puts all the resources into the Valorant.
1. Launch Valorant on your system.
2. Then, press Ctrl+Shift+Enter keys together to access the Task Manager.
3. In the Task Manager, go to the “Details” tab.
4. Here, you will find the “VALORANT” process. Just, right-click on it and tap on “Set priority“.
5. Choose “High” to give the priority to make your system provide the highest amount of resources for that process.

After doing that, close the Task Manager. You should be back in the Valorant. Check whether this works for you. But remember, this setting can’t be saved. So, you have to redo it every time you launch the game.
Fix 4 – Disable Full-screen optimizations
In some cases, disabling the full-screen optimizations for your system may work out.
1. At first, press the Windows key+E keys together.
2. Then, go to the Valorant folder on your system. Usually, it is in this location –
C:\Riot Games\VALORANT\live
3. Once you are there, search for “.exe” in the top-right corner and hit Enter.
You will notice that multiple exe files have appeared in the results.

4. Now, right-click on the “VALORANT” and tap on “Properties“.

5. Then, go to the “Compatibility” tab.
6. Here, just check the box beside the option “Disable fullscreen optimizations“.

7. Finally, tap on “Apply” and “OK” to save these changes.

8. Repeat the same steps for the other exe files in the search results.

This way, once you have disabled the optimization for these applications, close the File Explorer. Launch Valorant normally. This will stop the stutters and jitters.
Fix 5 – Opt for High-Performance mode
You have to switch to the High-performance mode.
1. At first, tap on the Windows key and the R keys together.
2. Now, write down this command in the Run terminal and click on “OK“.
powercfg.cpl

3. Now, click on the drop-down icon beside “Show additional options“.
4. Check whether there is an “Ultimate Performance” mode. Select it if you can see it.
Otherwise, if you don’t have an ‘Ultimate Performance’ mode, opt for the “High Performance” mode.

Close the Control Panel. Reboot your computer once. Later, launch Valorant and check the status of your issues.
Fix 6 – Update your graphics driver
You will need the latest graphics driver on your computer which regularly fixes this kind of issue.
We have shown how to update the NVIDIA graphics driver. If you are using an AMD card or Intel card, the steps may differ but the process is the same.
1. Open GeForce Experience on your computer.
2. When it opens up, go to the “Drivers” tab.
3. Then, tap on “Download” to download the graphics driver on your computer.

Let it download the graphics driver on your computer.
4. Now, just tap on “Express installation“.

This will automatically install the graphics driver on your computer.
Fix 7 – Clean up the PC
Use disk cleanup to clean up your PC.
1. At first, press the Windows key+R keys together.
2. After that, type “cleanmgr /low disk” and click on “OK“.

3. Once the Disk Cleanup opens up, click on the “Drives:“.
4. Now, click on the drop-down and choose the “(C:)” drive.
5. After that, click on “OK“.

Wait a while for your computer to analyze the number of trash files.
6. Now, in the “Files to delete:” tab, tick all the boxes one-by-one.
7. Finally, tap on “OK” to remove all the files.

8. You will notice a prompt asking for your permission to delete the items.
9. Just click on the “Delete files” to remove those.

10. Now, again open the disk cleanup tool.
11. this time click on clean up system files.

12. Then, select C Drive again.
13. Select files like old windows installations and non-useful safe to delete system files this time.

Additional steps to clean up the Temp folder –
1. At first, right-click on the Windows icon and tap on the “Run“.
2. Just type “%temp%” and click on “OK“.

3. Just tap on “Continue” if a warning message appears on your screen.

4. After the Temp folder opens up, select all the files and folders together and press the ‘Delete‘ key to empty the Temp folder.

6. Now, again press the Windows key+R keys together.
7. Further, write “temp” and hit Enter.

8. Remove everything inside the folder.

Close the File Explorer. Log in to the Valorant to enjoy a way smoother, sleek gameplay on your computer.
Additional Tips –
1. Remove any big files from your system.
2. Disable or uninstall any antivirus you are using on your computer.