Microsoft Excel is widely used especially for data management. The user feeds content into the excel workbook and it can also be shared with others also few use it as a backup for storing data. But all these are useful only when you are able to save the excel workbook. Isn’t it? Sometimes when trying to save excel in a network location or on the computer it gives an error saying ‘document not saved’. It is terrible to see this error. This issue can be caused because of Microsoft Office not being updated, network issues, your account not having proper permissions, etc. But do not worry it can be solved. In this article let us see the various methods to solve the ‘Microsoft Excel Document Not Saved Issue’. Let us start!
Method 1 – Save The Microsoft Excel With A New Name
Step 1 – Open the excel document that is problematic and click on the file option that is at the top left corner
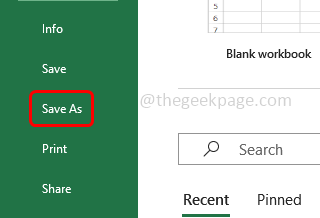
Step 2 – On the left side, select save as option
Step 3 – Choose the location where you want to save the excel
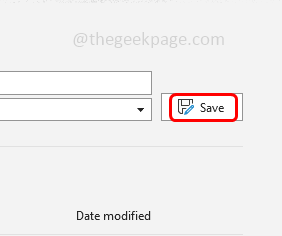
Step 4 – Give a file name that is different from the current one then click on save. Then open the newly saved and check if the issue is solved.
Method 2 – Check If There Are Any Interruptions From The Background
Step 1 – Right click on the taskbar and from the appeared list click on task manager
Step 2 – Check if there are any office like applications that is interrupting the process
Step 3 – Right click on it and click on end task
Step 4 – Relaunch the problematic excel and then check if the problem is resolved.
Method 3 – Open Microsoft Excel In Safe Mode
Step 1 – Open the run prompt using Windows + R keys together
Step 2 – Type excel /safe in the run prompt and hit enter
Step 3 – Now excel will be opened in safe mode so check if it is working as expected.
Method 4 – Check The Internet Connection
Check whether the internet connection you are using is stable. Incase you want to save the excel to some other network location then you need a good network connection. So check the stability of your network, one of the way is to go to this website and click on Go button.
Method 5 – Disable Microsoft Office Add-ins
Step 1 – Open the excel and click on file at the top left corner
Step 2 – At the bottom left side click on options
Step 3 – In the opened window, click on add-ins
Step 4 – In the manage dropdown at the right side, select COM Add-ins and click on Go
Step 5 – In the appeared window, uncheck all the add-ins (a tick mark should not be present) and then click on ok
Step 6 – Close and reopen the excel and enable (a tick mark in the checkbox) one add-in and try to save the excel. Likewise to check which add-in is the culprit, enable one by one save it and test it.
Method 6 – Copy The Content Of Excel To A New Workbook
Step 1 – Create a new excel in different location of your computer
Step 2 – Go to the excel that is problematic and open it
Step 3 – Select all the contents present in that excel by clicking on Ctrl + A keys together from your keyboard
Step 4 – Copy the selected contents using Ctrl + C keys together
Step 5 – Now go to the newly created excel and paste the copied contents using Ctrl + V keys together
Step 6 – Save the new excel (Ctrl + S) and check if it saves.
Method 7 – Check If The User Account Has Required Permissions
Step 1 – Open the file explorer using Windows + E keys together
Step 2 – Go to the folder where your excel workbook is saved
Step 3 – Right click on it and click on properties
Step 4 – In the opened window go to the security tab
Step 5 – At the bottom, click on advanced button
Step 6 – Click on change
Step 7 – Click on advanced button
Step 8 – Then click on find now. In the search results choose your account and click on ok again click on ok
Step 9 – Enable the Replace owner on subcontainers and objects option by clicking on the checkbox beside it
Step 10 – Click on apply and ok
Step 11 – Again follow step 3 – step 5 and then click on add button
Step 12 – Click on select a principal link
Step 13 – Choose advanced button and then click on find now
Step 14 – In the search results choose your account and click on ok. Again click on ok
Step 15 – Enable the full control access by clicking on the checkbox beside it and save the changes by clicking on ok
Step 16 – Enable the Replace all child object permissions entries with inheritable permissions entries from this object option at the bottom of the window by clicking on the checkbox beside it
Step 17 – Save the changes by clicking on apply
Step 18 – Confirm by clicking on yes and and then ok. Now save the excel and check if the problem resolves.
Method 8 – Check And Apply Updates For Office
Step 1 – Open the Excel and click on file option at the top left corner
Step 2 – On the left side at the bottom, click on account
Step 3 – Click on update options dropdown that is at the right
Step 4 – Then from the drop down list click on update now
Step 5 – If there are any Office updates it will be downloaded and updated
Step 6 – Once the process is completed restart the system and see if the error is resolved.
Method 9 – Repair Microsoft Office Application
Step 1 – Open Windows settings using Windows + I keys together
Step 2 – Click on apps
Step 3 – In the apps & features window, scroll down to find Microsoft Office application (Microsoft 365) and click on it
Step 4 – Click on modify button
Step 5 – A user account control window will open asking for confirmation, click on yes
Step 6 – It will ask you How do you like to repair your office programs, click on online repair option by clicking on the radio button beside it
Step 7 – Then click on repair button and follow the onscreen instructions
Step 8 – Wait for the process to complete and the issue will be solved.
That’s it! I hope the above provided information is useful and easy to follow. Let us know which method you applied to get the issue solved. Thank you and happy reading!!


