Oracle VM VirtualBox, the virtual machine software, throws up the “Failed to create a proxy device for the USB device.” along with detailed information about the error code, USB information, etc. The main reason this fault occurs is that the host computer is already using the USB device that you are trying to plug in. As the host computer has the authority over the device, VirtualBox can’t create a proxy device in its place. Don’t worry. If you go through these solutions, the USB device will be up and running in no time at all.
Fix 1 – Eject the USB from the host machine
You have to eject the USB device from the host machine and then, plug it back in.
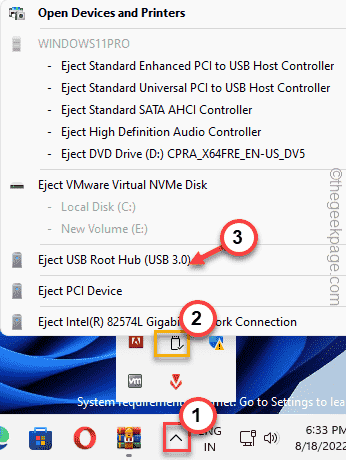
1. On your host computer, click on the arrow sign on your taskbar.
2. Next, right-tap the USB ejector icon and tap the USB device that you want to remove from your system.
This will eject the USB device from the host system.
Now, you should plug the USB device into the virtual machine. This way, VirtualBox should be able to create a proxy device.
Fix 2 – Restart the system
One of the quickest resolutions you should try is to restart your computer. This nullifies any possibility of a glitch or one-time bug on the system.
1. So, you should put the virtual machine on suspend mode (or you can just turn it off as well).
2. Now, close the VirtualBox.
3. Don’t forget to plug out the USB device that you are facing this problem with.
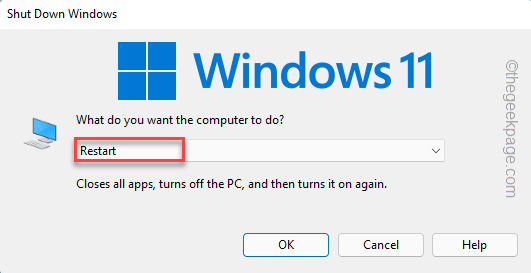
3. Then, press the Alt+F4 keys together.
4. Then, use the keyboard to select the “Restart” option and hit Enter.
5. Once the machine is restarted, open Oracle VM VirtualBox.
Now, you can start the virtual machine and plug in the USB driver. Now, you should see the USB device has appeared on your system.
Fix 2 – Install the Guest Additions
You can install the Guest additions tool on the virtual machine.
1. Launch the Oracle VM VirtualBox on your computer.
2. Now, double-tap the virtual machine to start it.
3. Once the virtual machine boots up successfully, look for the “Devices” option on the menu bar.
4. Click on the “Devices” option and click the “Insert Guest Additions CD Images” option.
Now, just follow the on-screen steps to complete the installation process.
Once you are done, you have to restart the virtual machine so this new change can take effect.
Now, try to put in the USB device again, and this time it will build a proxy device without any further issues.
Fix 3 – Enable USB Controller
You can enable the USB controller from the VirtualBox Manager page.
1. Launch the Oracle VM VirtualBox if you haven’t opened it yet.
2. Once it opens up, right-tap the virtual machine and tap “Settings…“.
3. Now, click on the “USB” from the left-hand pane.
4. Make sure that you have checked the “Enable USB Controller” box.
If you see multiple USB options (such as USB 2.0 and USB 3.0), you may select that option as well.
5. Now, click on the “USB add” icon to add a new USB device.
6. Then, select the problematic USB device that you were facing this problem with on the list.
8. Once that is done, you will see the USB drive has appeared in the list Finally, click “OK“.
After that, plug in the USB device. Start the virtual machine and test if this works.
Fix 4 – Install the extensions pack
You can install additional extensions pack on VirtualBox.
Step 1 Download the extensions pack
Download the extensions pack zip file and extract it to your system.
1. At first, download the Oracle_VM_Extensions pack.
2. Once you have downloaded it, you have to extract the zip file.
Note down the address where you have extracted the zip file.
Once you have extracted the zip file, close File Explorer.
Step 2 Install the extensions pack
You can install the extensions pack from within the VirtualBox Manager.
1. Open the Oracle VM VirtualBox app.
2. When it opens up, click on the “File” menu.
3. Then, tap the first item on the list “Preferences“.
4. In the VirtualBox Preferences window, go to the “Extensions” from the left pane.
5. Now, tap the extension add icon on the right side of the screen.
6. Next navigate to the location of the extension file that you have extracted before.
7. Once you reach there, select the extension and click “Open“.
8. Now, tap “Install” to install the extension.
9. Once you reach the terms page, scroll all the way to the bottom.
10. Then, tap “I Agree“.
Now, wait for VM VirtualBox to complete the extension installation process. Then, close and relaunch the virtual machine. Then, try to put the USB device again.
Hope this solves the issue permanently.
Fix 5 – Install the USB driver
You can manually reinstall the virtual USB driver.
1. You have to press the Win key+E.
2. When the File Explorer opens up, go to this path –
C:\Program Files\Oracle\VirtualBox\drivers\USB\device
3. Once you reach there, right-tap the “VBoxUSB.inf” file and tap “Show more options” to start the installation process.
4. Now, just click on the “Install” option.
5. Now, come back to the “USB” folder using the address bar.
6. Then, double tap the “Filter” folder to access it.
7. Now, on the right-tap the “VBoxUSBMon” file and tap “Show more options“.
8. Finally, tap “Install” to install it also.
After that, close the File Explorer window. Then, restart the VirtualBox Manager and plug in the USB drive, and test if this works.


